
Food
Easy Shrimp Ceviche Recipe Mexican
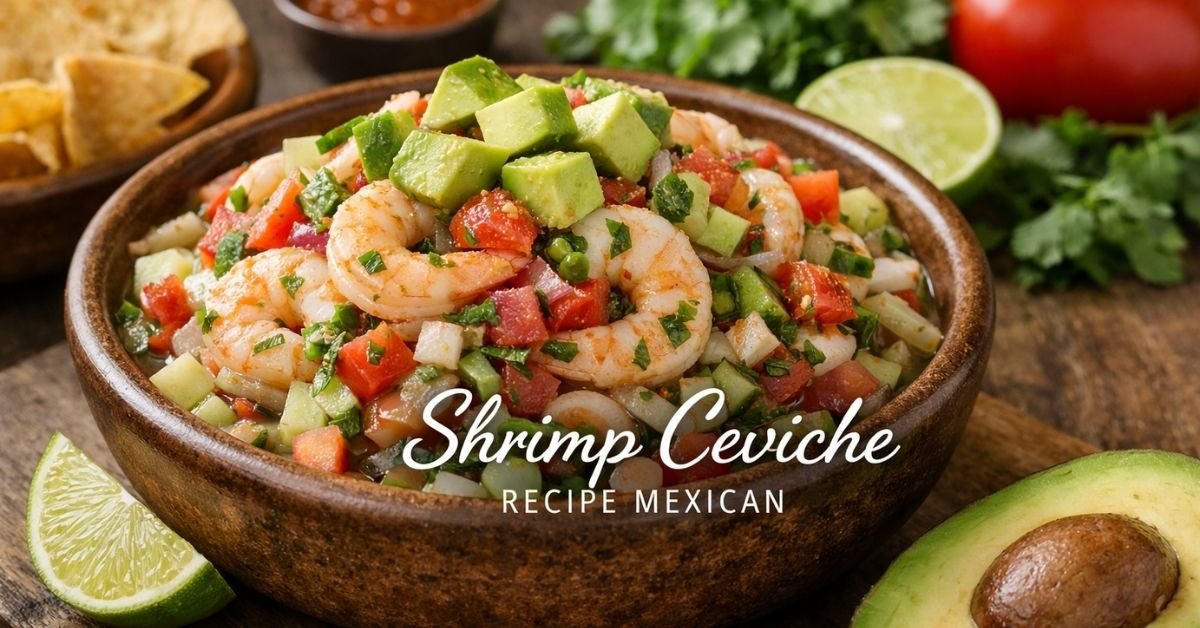
If you’ve been looking for a fresh, tangy, and flavorful dish, this Shrimp ceviche recipe mexican is exactly what you need. Shrimp ceviche is a classic Mexican dish that combines tender shrimp, zesty lime juice, crisp vegetables, and a touch of spice for a refreshing taste. This Shrimp ceviche recipe mexican is beginner-friendly and perfect for anyone wanting to enjoy an authentic Mexican seafood experience at home. By following this guide, you’ll learn how to marinate shrimp properly, balance flavors, and serve the dish in ways that bring out its natural colors and textures.
Read also: What is Carpaccio Beef: Definition and Recipe
Ingredients Needed for Shrimp Ceviche Recipe Mexican
-
1 pound raw shrimp, peeled and deveined
-
6–8 fresh limes, juiced
-
1–2 serrano or jalapeño peppers, finely chopped
-
2 Roma tomatoes, diced
-
1 small white onion, finely chopped
-
1 cucumber, peeled and diced
-
1 avocado, diced (add at the end to prevent browning)
-
2 tablespoons fresh cilantro, chopped
-
Salt and pepper to taste
-
Optional: ½ cup Clamato juice or tomato juice
-
Optional: Tortilla chips or tostadas for serving
This ingredient list ensures your Shrimp ceviche recipe mexican has all the right flavors and textures for a classic experience.
Choosing the Right Shrimp
For the best Shrimp ceviche recipe mexican, using the right shrimp is crucial. Medium-sized shrimp (about 21–25 count) are ideal because they stay tender without being rubbery. You can use raw shrimp that will “cook” in lime juice, giving that authentic ceviche texture. If you prefer pre-cooked shrimp, they only need a short marination time of 15–20 minutes so they soak up the flavor without becoming tough. Using the right shrimp ensures your Shrimp ceviche recipe mexican is fresh and delicious.
Preparing the Citrus Marinade
The lime juice in this Shrimp ceviche recipe mexican does more than add flavor—it “cooks” the shrimp. For best results, always use fresh lime juice. Mix lime juice with salt, pepper, and optional Clamato juice if you like a slightly richer flavor. Pour this mixture over your shrimp and refrigerate. Raw shrimp should marinate for 30–60 minutes, while pre-cooked shrimp only need 15–20 minutes. Timing is key for this Shrimp ceviche recipe mexican to achieve the perfect balance between tangy and tender.
Vegetable Preparation and Texture Tips
Vegetables give your Shrimp ceviche recipe mexican crunch, freshness, and color. Dice tomatoes and cucumber evenly so every bite is balanced. Chop onions and peppers finely to distribute heat. If you prefer mild spice, remove seeds from the peppers. Fresh cilantro is essential for authentic flavor, so chop just before mixing. Add avocado only at the very end to avoid browning, keeping your Shrimp ceviche recipe mexican visually appealing and creamy.
Mixing and Layering Flavors
Once the shrimp is marinated, drain excess citrus if it’s too strong. Gently fold in vegetables, cilantro, and optional Clamato juice. Taste and adjust seasoning with salt, pepper, or a pinch of celery salt for depth. Stir carefully so tomatoes and avocado remain intact. This careful mixing ensures your Shrimp ceviche recipe mexican stays fresh, tangy, and colorful with every bite.
Serving Suggestions for Shrimp Ceviche Recipe Mexican
Shrimp ceviche is versatile and can be served in many ways:
-
On tostadas with cilantro and diced avocado
-
In small bowls as an appetizer
-
With tortilla chips for casual snacking
-
As a side dish with grilled fish or seafood
Chilling the ceviche before serving enhances flavors and keeps the dish refreshing. Presentation matters, and these simple options make your Shrimp ceviche recipe mexican both tasty and inviting.
Regional Variations
Different regions in Mexico offer unique twists on Shrimp ceviche recipe mexican:
-
Sonora Style: Combines tomatoes, serrano peppers, and sometimes tomato juice for a slightly sweet taste.
-
Coastal Style: Emphasizes lime, onions, and peppers for a pure, citrus-forward flavor.
-
Quick Version: Uses pre-cooked shrimp for a 15–20 minute prep without compromising taste.
Exploring these variations lets you enjoy multiple versions of this Shrimp ceviche recipe mexican while learning about authentic Mexican culinary styles.
Spice Level Adjustments
Adjusting spice is easy in this Shrimp ceviche recipe mexican. Serrano peppers are hotter than jalapeños, so start small and taste as you go. Removing seeds reduces heat for milder flavor, while keeping seeds intensifies spice. Flavors develop during marination, so it’s better to start mild and add more heat if needed, ensuring your Shrimp ceviche recipe mexican suits everyone’s taste.
Make-Ahead and Storage Tips
While best fresh, this Shrimp ceviche recipe mexican can be prepped ahead:
-
Marinate shrimp separately and mix vegetables later.
-
Combine just before serving.
-
Store in an airtight container in the fridge for up to 24 hours.
-
Avoid freezing, as shrimp texture changes and vegetables get watery.
Following these steps keeps your Shrimp ceviche recipe mexican fresh and vibrant while saving prep time for busy days.
Health Notes
Shrimp ceviche is naturally low in calories and high in protein, making this Shrimp ceviche recipe mexican a healthy meal choice. Vegetables add fiber and vitamins, while lime juice provides vitamin C. Adding avocado contributes healthy fats and creaminess. Using fresh, high-quality shrimp reduces risks associated with raw seafood, keeping your Shrimp ceviche recipe mexican both safe and nutritious.
Common Mistakes to Avoid
-
Over-marinating shrimp can make it rubbery.
-
Adding avocado too early leads to browning.
-
Using bottled lime juice reduces flavor intensity.
-
Skipping salt or peppers makes the dish flat.
-
Not draining excess citrus can make the ceviche too sour.
Avoiding these mistakes ensures your Shrimp ceviche recipe mexican comes out perfectly every time.
Enhancing Flavor and Presentation
For a visually appealing Shrimp ceviche recipe mexican, serve in clear bowls or on colorful tostadas. Garnish with fresh cilantro, avocado, or a lime slice. Optional radish slices or a pinch of paprika add flair without changing the authentic taste. Small presentation touches elevate your Shrimp ceviche recipe mexican from simple to impressive for family or guests.
Conclusion
This Shrimp ceviche recipe mexican gives you a fresh, tangy, and colorful dish perfect for summer, parties, or a light meal. From choosing the right shrimp to marinating, mixing vegetables, and serving creatively, every step enhances flavor and texture. By following these simple steps, you can enjoy an authentic Mexican shrimp ceviche experience at home with vibrant flavors and easy preparation.
FAQs
How long should shrimp marinate in lime juice?
Raw shrimp need 30–60 minutes, pre-cooked shrimp 15–20 minutes.
Can I use pre-cooked shrimp?
Yes, just shorten marination time for proper texture.
Do I have to use Clamato juice?
No, it’s optional. Lime juice alone works for this Shrimp ceviche recipe mexican.
Can I make it ahead of time?
Yes, store shrimp and vegetables separately and mix before serving.
Which peppers are best for heat?
Serrano for spicy, jalapeño for mild. Adjust seeds for flavor.
How should I serve it?
Tostadas, bowls, or tortilla chips work best for this Shrimp ceviche recipe mexican.

Lansdale Meats & Deli is a well known neighborhood butcher shop and deli located in Lansdale, Pennsylvania. Many locals visit the shop for freshly cut meats, classic deli sandwiches, and prepared foods that are convenient for everyday meals. The store combines the atmosphere of a traditional butcher shop with the variety of a neighborhood deli. This combination makes it popular with families who want quality meat cuts and quick lunch options in one place.
The shop has built a reputation for fresh ingredients, reasonable prices, and friendly service. Customers often stop in to pick up steaks for dinner, sliced turkey for sandwiches, or a hot hoagie for lunch. Because the shop focuses on simple, fresh food, many people prefer it over larger grocery stores. Instead of pre packaged meat, shoppers can choose exactly how their meat is cut and prepared.
Another reason people search for Lansdale Meats & Deli is convenience. It provides both a butcher counter and deli menu in one location. That means customers can buy raw meats for cooking at home and ready to eat meals at the same time. This type of store is becoming less common, which makes local delis like this one valuable to the community.
Location, Address, and How to Find the Store
Lansdale Meats & Deli is located in Lansdale, Pennsylvania, a suburban town in Montgomery County. The shop sits along North Broad Street, which is one of the main roads that runs through the area. This location makes it easy for both residents and travelers to stop by for groceries or lunch.
Visitors looking for the store usually search for the exact address before visiting. The commonly listed location details include the following:
• Address: 1801 North Broad Street, Lansdale, PA 19446
• Area: Colonial Village shopping area
• City: Lansdale, Pennsylvania
• Type: Local butcher shop and deli market
The location is convenient because it sits close to residential neighborhoods and small businesses. Many people stop by while running errands or commuting home from work. Parking is generally available nearby, which makes quick visits easy for customers picking up food for dinner or lunch.
For people traveling from outside the town, Lansdale is roughly an hour from Philadelphia by car. The area has a strong community atmosphere, and local shops like this deli are an important part of the food culture in the region.
Read also: What Is Creamed Honey? Smooth Honey Explained
Typical Store Hours and Best Time to Visit
Store hours can change depending on holidays or seasonal schedules, so many customers check online before visiting. In general, local delis like this one operate during daytime and early evening hours when people are most likely to shop for food.
Typical business hours often follow a pattern similar to this:
• Morning opening around 9:00 AM
• Afternoon peak during lunch hours
• Evening closing between 6:00 PM and 7:00 PM
• Shorter hours on Sundays depending on the week
Lunch hours are usually the busiest time of the day. Customers often stop in for hoagies, sandwiches, and prepared foods during this period. If someone wants to shop for raw meats or deli products without waiting in line, the morning hours are usually the most relaxed time to visit.
Checking hours ahead of time is always helpful, especially before holidays. Small local food shops sometimes adjust schedules during busy seasons or special events.
Fresh Butcher Meats Available at the Shop
One of the biggest reasons people visit Lansdale Meats & Deli is the butcher counter. Unlike grocery store meat departments, butcher shops offer personalized cuts and higher quality selections. Customers can ask for specific thickness or weight when purchasing steaks, pork, or poultry.
Common meat options often available include:
• Filet mignon steaks
• New York strip steaks
• Ribeye steaks
• Pork loin cuts
• Fresh ground beef
• Chicken breast and thighs
• Italian sausages
• Specialty cuts for grilling
These meats are often cut fresh rather than pre packaged. This allows customers to choose exactly what they need for dinner or weekend cooking. Butchers can also offer advice about cooking methods, seasoning, and preparation.
Many people prefer buying meat from a butcher shop because the quality tends to be more consistent. The meat is typically fresher and prepared in smaller batches, which helps maintain flavor and texture.
Popular Deli Sandwiches and Hoagies
In addition to raw meat, the deli section offers ready to eat food. Hoagies and sandwiches are among the most popular items on the menu. These classic deli sandwiches are often stacked with freshly sliced meats and cheeses on soft rolls.
Customers often order hoagies that include:
• Italian hoagie with salami, ham, and provolone
• Turkey hoagie with lettuce and tomato
• Roast beef sandwich with cheese
• Ham and Swiss sandwich
• Chicken salad sandwich
• Tuna salad sandwich
Many deli sandwiches are made fresh after the order is placed. This helps keep the bread soft and the fillings flavorful. Some shops also offer toasted hoagies, which add a warm texture to the sandwich.
Hoagies are a major part of food culture in Pennsylvania, especially in towns near Philadelphia. Local delis often take pride in their sandwiches, using fresh bread and quality meats.
Prepared Foods and Ready to Eat Meals
Another reason customers enjoy local lansdale meats & deli is the availability of prepared foods. These dishes make it easy for people to pick up a meal without cooking from scratch. Busy families often rely on these options when they need a quick dinner solution.
Common prepared foods may include:
• Pasta salads
• Potato salad
• Coleslaw
• Macaroni salad
• Prepared deli sides
• Chicken dishes
• Daily hot food specials
Prepared foods are usually made in small batches and displayed in refrigerated lansdale meats & deli cases. Customers can order by weight or choose small containers for takeaway meals.
These dishes are convenient for picnics, family gatherings, and quick lunches. They also pair well with sandwiches and deli meats, making it easy to build a complete meal.
Catering Services for Events and Parties
Many neighborhood delis provide catering services, and Lansdale Meats & Deli is often searched by people planning events. Catering from a deli is popular for office lunches, birthday parties, and small gatherings because the food is simple and easy to serve.
Typical catering options may include:
• Hoagie trays with assorted sandwiches
• Deli meat platters
• Cheese trays
• Party salads
• Sandwich platters for meetings
• Family size prepared dishes
Catering trays are convenient because they require very little setup. Guests can serve themselves and choose the foods they like. Deli style catering is especially popular for casual events where guests prefer light meals rather than full formal dinners.
Ordering ahead is usually recommended because catering trays require preparation time. Many customers place orders a day or two in advance.
Customer Reviews and Local Reputation
Reviews play a major role in how people choose restaurants and food shops today. Many visitors check review platforms before deciding where to eat or shop. Lansdale Meats & Deli generally receives positive feedback for quality food and friendly service.
Customers frequently mention several strengths:
• Fresh meat quality
• Generous sandwich portions
• Fair prices compared to supermarkets
• Friendly neighborhood atmosphere
• Quick service during lunch hours
Many reviewers also highlight the hoagies as a favorite item. Sandwiches made with freshly sliced lansdale meats & deli tend to stand out compared to chain sandwich shops.
Local reputation is important for small food businesses. Shops that maintain consistent quality and service often develop loyal customers who return regularly.
What Makes Local Butcher Shops Special
Local butcher shops provide a different experience than large grocery stores. Instead of choosing meat from a shelf, customers interact directly with the people preparing the food. This personal connection can make shopping more enjoyable.
Benefits of buying from butcher shops include:
• Fresh cuts prepared daily
• Ability to request custom thickness
• Advice from experienced butchers
• Higher quality meat selections
• Support for local small businesses
Many cooks also find that meat from butcher shops tastes better when cooked at home. Because the meat is fresher and often handled more carefully, it can produce better results when grilling, roasting, or pan frying.
This personal service is one reason traditional butcher shops remain popular even in the age of large supermarkets.
Simple Cooking Tips for Fresh Butcher Meat
Buying high quality lansdale meats & deli is only the first step in creating a great meal. Proper cooking methods help bring out the natural flavor and tenderness of the meat. Simple techniques often work best when using fresh butcher cuts.
Helpful cooking tips include:
• Let steaks reach room temperature before cooking
• Season meat with salt and pepper before grilling
• Use high heat for steak searing
• Allow meat to rest after cooking
• Use a thermometer to avoid overcooking
For example, a thick ribeye steak from a butcher shop can be cooked by searing it in a hot skillet for several minutes on each side. After resting for a few minutes, the steak becomes juicy and flavorful.
These simple cooking habits help customers enjoy the full quality of the meats they buy from local delis and butcher shops.
Tips for First Time Visitors
People visiting the lansdale meats & deli for the first time often appreciate a few helpful tips before walking in. Local food shops can sometimes feel busy during peak hours, so knowing what to expect makes the visit smoother.
Helpful tips include:
• Visit during morning hours for shorter lines
• Ask staff for sandwich recommendations
• Check daily specials on the counter
• Order catering trays ahead of time
• Bring a cooler if buying large meat orders
Trying a hoagie or deli sandwich during the first visit is a good introduction to the shop. These items are quick to prepare and showcase the quality of the meats and ingredients.
Regular customers often discover their favorite menu items after a few visits, whether it is a specific sandwich or a particular cut of meat.
Conclusion
Lansdale Meats & Deli is a classic neighborhood butcher shop and deli that offers both fresh meats and ready to eat food. Customers visit for quality steak cuts, traditional hoagies, deli sandwiches, and prepared meals that are easy to take home. The shop has built a loyal customer base thanks to fresh ingredients, reasonable prices, and friendly service. For residents of Lansdale and nearby communities, it provides a convenient place to buy meats, enjoy a quick lunch, or order catering trays for gatherings. Anyone interested in local food shops will find that Lansdale Meats & Deli represents the charm and practicality of traditional neighborhood delis.
FAQs
Where is Lansdale Meats & Deli located?
It is located at 1801 North Broad Street in Lansdale, Pennsylvania.
Does Lansdale Meats & Deli sell hoagies?
Yes, the deli offers classic hoagies and sandwiches made with fresh sliced meats.
Can you order catering from the deli?
Yes, many customers order hoagie trays, deli platters, and salads for parties.
What kind of meats are sold there?
The butcher counter often includes steak cuts, pork, chicken, sausages, and ground beef.
Is parking available near the store?
Parking is usually available in nearby shopping areas and local street spots.
Do they sell prepared foods?
Yes, many delis offer sides like potato salad, pasta salad, and other ready meals.

Italian ice flavoring is the ingredient that gives Italian ice its refreshing fruit taste and aroma. Traditional Italian ice is made from finely textured ice, sugar, and flavoring that comes from fruit juice, purees, or concentrated syrups. Unlike ice cream or gelato, Italian ice contains no dairy, which makes the flavoring even more important because it provides nearly all of the dessert’s taste. The flavoring is usually blended into the liquid base before freezing so the taste spreads evenly throughout the frozen dessert rather than sitting only on top.
In commercial kitchens and dessert shops, Italian ice flavoring often comes as concentrated syrups or bases designed specifically for frozen desserts. These concentrates may contain fruit extracts, natural flavor compounds, sugar, and stabilizers that help maintain the smooth texture of the ice. When mixed with water and sugar, they create a balanced base that freezes into the signature soft and scoopable texture that many people recognize from Philadelphia water ice stands and Italian dessert cafés.
At home, Italian ice flavoring can be much simpler. Many recipes rely on fresh fruit juice, citrus zest, and homemade syrups to create bright natural flavors. The freezing process breaks the mixture into fine crystals that produce a smooth texture similar to sorbet but lighter and more refreshing. Because the recipe contains so few ingredients, the quality and strength of the flavoring determine whether the final dessert tastes vibrant or bland.
The Origins of Italian Ice and Its Traditional Flavoring
Italian ice traces its history to Southern Italy, where early versions were inspired by frozen desserts such as Sicilian granita. Immigrants brought these recipes to the United States in the late nineteenth century, especially to cities like Philadelphia and New York. Over time, the dessert became known as Italian ice or water ice, depending on the region. Street vendors would freeze sweetened fruit mixtures and scrape them into cups for customers during hot summer months.
Traditional Italian ice flavoring focused mainly on citrus fruits because they were widely available and refreshing. Lemon became the most recognizable flavor, followed by orange and lime. These flavors created a clean, bright taste that balanced the sweetness of the sugar syrup. As the dessert became more popular in American cities, vendors started experimenting with other fruits such as cherry, strawberry, and mango.
Today Italian ice flavoring has expanded far beyond the original citrus options. Modern shops use dozens of fruit blends and sometimes even unusual combinations like tropical punch or watermelon mint. Despite the new variety, the basic idea remains the same. The flavoring must blend smoothly into the ice mixture and maintain its brightness after freezing so the dessert stays refreshing instead of heavy.
Read also: Cuts of Steak: Complete Guide to Beef Cuts
Key Ingredients Used in Italian Ice Flavoring
The ingredient structure of Italian ice flavoring is simple but carefully balanced. A typical flavor base combines sweetness, fruit taste, and acidity so the frozen dessert does not become overly sugary. Each component contributes to the final texture and taste. Even small adjustments in sugar level or acidity can change how the ice freezes and melts in the mouth.
Most Italian ice flavorings are built from these components:
• Fruit juice or fruit puree for natural flavor
• Sugar or simple syrup for sweetness and smooth texture
• Citric acid or lemon juice to balance flavor
• Natural extracts or concentrates for stronger aroma
• Water to dilute the mixture to the right freezing consistency
• Optional stabilizers that keep ice crystals small
Commercial Italian ice flavoring often uses concentrated fruit syrups because they provide strong flavor without adding too much liquid. These concentrates are designed to maintain color and aroma even after freezing. Some companies also create neutral bases that allow shops to mix their own custom flavors using fruit extracts or juices.
Homemade flavoring works best when fresh fruit is used because it contains natural sugars and acids that brighten the taste. Many recipes include lemon zest or citrus juice even in non citrus flavors because acidity enhances fruit sweetness and prevents the mixture from tasting flat once frozen.
Difference Between Italian Ice Flavoring and Other Frozen Dessert Flavorings
Italian ice flavoring is quite different from the flavor systems used in ice cream, sorbet, or shaved ice. Each frozen dessert has its own structure and texture, which means the flavoring must behave differently during freezing. Understanding these differences helps cooks choose the correct ingredients when making Italian ice at home or for a small business.
The main differences include:
• Italian ice flavoring blends directly into the base before freezing
• Ice cream flavoring works with dairy fats and emulsifiers
• Sorbet flavoring often uses fruit puree with a higher fruit percentage
• Snow cone syrup is poured over ice instead of frozen into it
• Granita flavoring freezes in large crystals rather than smooth ones
Because Italian ice has a fine crystal structure, the flavoring must remain stable as the mixture freezes. If the syrup contains too much water or too little sugar, the ice becomes hard and flavorless. The right balance creates a soft scoopable texture that melts smoothly on the tongue.
Another important difference is aroma intensity. Italian ice flavoring often needs to be stronger than standard beverage syrups because cold temperatures reduce how strongly the human palate perceives flavor. This is why commercial flavor concentrates are usually very potent before freezing.
Popular Italian Ice Flavor Varieties
One of the reasons Italian ice remains popular is the huge variety of flavors that can be created from simple ingredients. Traditional stands usually offer several classic fruit flavors alongside seasonal specialties. These flavors provide both bright citrus notes and sweet berry tones that appeal to different taste preferences.
Some of the most common Italian ice flavoring options include:
• Lemon
• Cherry
• Strawberry
• Mango
• Blue raspberry
• Watermelon
• Pineapple
• Orange
• Peach
• Coconut
• Green apple
• Tropical punch
Many shops also combine flavors to create layered or blended desserts. For example, strawberry lemon or mango pineapple combinations are common during summer months. These blends add complexity while still keeping the refreshing character of the dessert.
Seasonal fruits also inspire new flavor ideas. In autumn, apple cider or cranberry versions may appear. In warmer regions, tropical fruits such as guava or passion fruit are often used. Because the base recipe is simple, new flavors can be created easily by adjusting the syrup mixture.
Commercial Italian Ice Flavoring Bases and Concentrates
Commercial Italian ice flavoring is widely used by dessert stands, restaurants, and food trucks because it saves preparation time and ensures consistent flavor. These products typically come as concentrated syrups or powdered bases that are mixed with water and sugar before freezing. They are designed for batch freezers that churn the mixture slowly to create the smooth texture associated with Philadelphia water ice.
Common types of commercial flavoring products include:
• Liquid flavor concentrates
• Pre sweetened fruit syrups
• Neutral ice bases with added flavor extracts
• Powdered mixes that dissolve in water
• Sugar free flavor concentrates
Businesses often choose concentrates because they produce a large number of servings from a small bottle. Some products can make several gallons of Italian ice after dilution. These flavoring bases also contain stabilizers that help control ice crystal formation during freezing.
When selecting a commercial flavoring, many dessert shops consider factors such as flavor intensity, color stability, and cost per batch. Some companies even provide detailed instructions that show exactly how much concentrate to mix with water and sugar to produce the desired texture.
How to Make Homemade Italian Ice Flavoring
Creating homemade Italian ice flavoring is simple and allows complete control over sweetness and fruit quality. Many home cooks prefer this approach because it avoids artificial colors or preservatives found in some commercial syrups. The process usually begins with a basic fruit syrup that becomes the base for freezing.
A simple homemade flavoring mixture can include:
• 1 cup fresh fruit juice or puree
• ½ cup sugar
• 1 cup water
• 1 tablespoon lemon juice
• Optional fruit zest or herbs for aroma
The ingredients are gently heated until the sugar dissolves completely. After cooling, the mixture is placed in a freezer safe container. Every thirty minutes it is stirred with a fork to break up ice crystals. This step repeats several times until the mixture becomes fluffy and finely textured.
Although this manual method takes longer than using a machine, it produces surprisingly smooth Italian ice. The key is stirring frequently so large crystals cannot form. Once the mixture reaches a soft frozen consistency, it can be scooped into bowls and served immediately.
Step by Step Italian Ice Recipe Using Flavoring Syrup
Making Italian ice from prepared flavoring syrup is one of the easiest ways to recreate the dessert at home. The syrup already contains the fruit flavor and sweetness needed for the frozen base. All that remains is freezing and aerating the mixture to create the proper texture.
Basic steps include:
• Mix flavoring syrup with cold water according to instructions
• Add lemon juice if additional brightness is desired
• Chill the mixture in the refrigerator for one hour
• Pour the mixture into an ice cream maker or freezer container
• Freeze while stirring occasionally to break crystals
• Continue freezing until the mixture becomes soft and scoopable
When using an ice cream maker or batch freezer, the process becomes much easier because the machine constantly churns the mixture while freezing. This motion keeps the crystals small and evenly distributed, which produces the smooth texture associated with Italian ice.
For a stronger flavor, many cooks slightly increase the concentration of syrup compared with beverage recipes. This adjustment ensures the taste remains vibrant after freezing because cold temperatures can dull sweetness and aroma.
How Dessert Shops Create Smooth Italian Ice Texture
Professional Italian ice shops rely on specialized equipment that freezes the flavored mixture while constantly mixing it. This equipment prevents large ice crystals from forming and creates the signature smooth texture. Without constant motion, the mixture would freeze into a solid block rather than a scoopable dessert.
Common equipment used by shops includes:
• Batch freezers designed for water ice
• High speed mixers that break ice crystals
• Stainless steel freezing tubs
• Temperature controlled storage freezers
The flavoring mixture is poured into the batch freezer and slowly churned as it freezes. This motion introduces small air bubbles while also scraping ice crystals from the sides of the container. The result is a fluffy texture that feels lighter than sorbet even though it contains similar ingredients.
Temperature control also matters. Italian ice is usually stored slightly warmer than ice cream so it stays soft enough to scoop easily. This storage method helps preserve the delicate flavoring that might otherwise become muted at extremely low temperatures.
Tips for Creating Unique Italian Ice Flavor Combinations
Creative flavor combinations help dessert shops stand out and keep customers returning for new experiences. Because Italian ice flavoring blends easily, experimenting with different fruits and herbs can produce refreshing results. The key is balancing sweetness, acidity, and aroma so the flavors complement each other rather than compete.
Interesting combination ideas include:
• Strawberry lemon
• Mango coconut
• Watermelon mint
• Pineapple lime
• Peach raspberry
• Blueberry basil
• Cherry vanilla
• Orange passion fruit
Adding herbs or citrus zest can elevate simple fruit flavors into something more complex. For example, basil pairs surprisingly well with berries because it adds a fresh aromatic note. Mint works well with watermelon and lime because it enhances the cooling sensation of the dessert.
When creating custom flavors, starting with small batches is helpful. This approach allows the cook to adjust sweetness or acidity before producing a large quantity. Over time these experiments can lead to signature flavors that become favorites among friends or customers.
Nutrition and Health Notes for Italian Ice Flavoring
Italian ice is often considered a lighter frozen dessert because it contains no dairy fats. Most recipes rely on fruit juice, water, and sugar for flavoring, which results in fewer calories compared with traditional ice cream. However, the sugar content can still be significant depending on the recipe and flavor concentrate used.
Some health considerations include:
• Italian ice is naturally dairy free and often vegan
• Many recipes are gluten free
• Sugar levels vary depending on syrup concentration
• Fruit based versions provide small amounts of vitamins
Many dessert shops now offer sugar free Italian ice flavoring made with alternative sweeteners. These versions allow people to enjoy the refreshing taste without consuming large amounts of sugar. The texture may differ slightly, but modern formulas are improving rapidly.
Homemade recipes also allow control over sweetness by adjusting the sugar level or using natural fruit sweetness instead. This flexibility makes Italian ice a versatile dessert that can fit different dietary preferences.
How to Store Italian Ice and Preserve Flavor
Proper storage helps maintain the bright taste and smooth texture of Italian ice. Because the dessert contains mostly water, it can develop large ice crystals if stored improperly. These crystals reduce the smooth mouthfeel and weaken the flavor distribution.
Helpful storage practices include:
• Store Italian ice in airtight containers
• Keep freezer temperature stable
• Avoid repeated thawing and refreezing
• Stir the mixture lightly before serving if crystals appear
When stored correctly, Italian ice can maintain good quality for about one to two weeks. After that time, the texture may become harder and the flavor slightly weaker. Fresh batches usually provide the best taste experience.
Many shops produce Italian ice daily or every few days to ensure the flavors remain vibrant. This approach keeps customers coming back for a consistently refreshing dessert.
Conclusion
Italian ice flavoring is the heart of this refreshing frozen dessert. From traditional lemon and cherry to creative tropical blends, the flavoring determines both the aroma and taste of each scoop. Whether using commercial concentrates or fresh fruit syrups, the key is balancing sweetness, acidity, and fruit intensity so the flavor remains bright after freezing. With simple ingredients and a bit of experimentation, anyone can create delicious Italian ice at home or develop unique flavors for a dessert business using the right Italian ice flavoring.
FAQs
What is Italian ice flavoring made from?
It usually contains fruit juice, sugar syrup, natural extracts, and sometimes citric acid for balance.
Is Italian ice dairy free?
Yes, traditional Italian ice is dairy free because it is made from water, sugar, and fruit flavoring.
What are the most popular Italian ice flavors?
Lemon, cherry, strawberry, mango, and blue raspberry are among the most popular varieties.
Can I make Italian ice flavoring at home?
Yes, homemade versions can be made using fruit juice, sugar, water, and lemon juice.
What is the difference between Italian ice and shaved ice?
Italian ice is frozen with flavor mixed in, while shaved ice uses syrup poured over plain ice.
Where can Italian ice flavoring concentrates be used?
They are commonly used in dessert shops, food trucks, and home kitchens to make water ice.

Stuffed chicken breast is one of those dishes that looks impressive but is surprisingly easy to make at home. Whether you want a quick weeknight dinner or a meal to impress guests, recipes for stuffed chicken breast give you endless options. From cheesy and creamy fillings to healthy vegetable or meat-based choices, there’s something for every taste. The best part is that you can customize the stuffing to fit your dietary needs, whether low carb, keto, or protein-packed. In this guide, we’ll explore practical tips, cooking methods, and a variety of flavorful fillings so you can create the perfect stuffed chicken breast every time.
Read also: Quaker Oatmeal Chocolate Chip Cookies (Chewy Recipe + Tips)
Choosing the Right Chicken Breast
Choosing the right chicken breast is crucial for successful stuffing. Look for boneless, skinless breasts that are uniform in size for even cooking. If the breasts are thick, you might want to butterfly them or pound them gently to create a flat surface for stuffing. This ensures that the filling stays in place and the chicken cooks evenly without drying out. Always handle raw chicken carefully and keep your workspace clean to avoid contamination.
Basic Stuffing Techniques
There are two main techniques for stuffing chicken breast: the pocket method and the butterflying method.
-
Pocket Method: Use a sharp knife to cut a pocket along the side of the chicken breast. Insert your filling and secure with toothpicks or kitchen twine.
-
Butterfly Method: Slice the chicken breast horizontally, open it like a book, add your stuffing, and fold it back over. Secure with toothpicks to hold the filling.
Both methods work well for keeping the stuffing inside while cooking, and choosing the right one depends on the thickness and size of your chicken breast.
Popular Fillings for Stuffed Chicken Breast
Stuffed chicken breast is versatile, and you can mix ingredients to suit your taste. Here are popular options:
-
Cheese-Based: Cream cheese, mozzarella, cheddar, or parmesan add a creamy and rich flavor.
-
Vegetable-Based: Spinach, sun-dried tomatoes, mushrooms, bell peppers, or zucchini provide a healthy and colorful filling.
-
Meat-Based: Bacon, prosciutto, or sausage bring savory richness.
-
Combination: Mix cheese with vegetables or meat for maximum flavor.
Remember to season the filling lightly with salt, pepper, and herbs to enhance taste.
Step-by-Step Cooking Instructions
Cooking stuffed chicken breast can be done in multiple ways. Here’s a simple method combining searing and baking for perfect results:
-
Prepare the Filling: Mix your choice of cheese, vegetables, and/or meat with herbs and spices.
-
Stuff the Chicken: Use the pocket or butterflying method and secure with toothpicks.
-
Sear the Chicken: Heat a skillet with olive oil or butter. Sear the chicken for 2-3 minutes per side until golden brown.
-
Bake: Transfer to an oven-proof skillet or baking dish and bake at 375°F (190°C) for 20-25 minutes or until the internal temperature reaches 165°F (74°C).
-
Rest Before Serving: Let the chicken rest for 5 minutes to keep it juicy.
Alternative Cooking Methods
Stuffed chicken breast can be cooked in different ways depending on your preference and equipment:
-
Grilling: Preheat the grill to medium heat and cook for 6-8 minutes per side. This method adds a smoky flavor.
-
Air Fryer: Cook at 360°F (182°C) for 15-20 minutes, checking for doneness. This is a fast and convenient option.
-
Slow Cooker: Place stuffed chicken in the slow cooker with a bit of broth. Cook on low for 3-4 hours. This produces very tender meat.
Each method works well, but remember to monitor the internal temperature to avoid overcooking.
Tips for Perfect Stuffed Chicken Breast
-
Don’t Overstuff: Too much filling can cause the chicken to split during cooking.
-
Even Thickness: Pound thick areas of the breast to prevent uneven cooking.
-
Secure Filling: Toothpicks or kitchen twine keep everything in place.
-
Rest the Meat: Allow the chicken to rest before slicing to retain juices.
-
Customize Flavors: Experiment with herbs, spices, and sauces for variety.
Make-Ahead and Freezer-Friendly Ideas
Stuffed chicken breast can be prepped ahead of time:
-
Assemble the chicken with stuffing and store in the fridge for up to 24 hours before cooking.
-
For freezer-friendly meals, wrap the stuffed chicken individually in plastic wrap and foil. Freeze for up to 3 months.
-
Thaw in the fridge overnight before baking or grilling.
Make-ahead options are perfect for busy weeknights or meal prep for the week.
Pairing Side Dishes
Stuffed chicken breast pairs well with a variety of sides:
-
Vegetables: Roasted asparagus, sautéed spinach, or grilled zucchini.
-
Grains: Quinoa, rice pilaf, or mashed potatoes.
-
Salads: A fresh green salad with vinaigrette balances the richness of the filling.
-
Sauces: Light cream sauces, tomato-based sauces, or pesto drizzle enhance flavor.
Choosing complementary sides makes the meal balanced and visually appealing.
Health Notes and Variations
Stuffed chicken breast can be adapted to fit healthy diets:
-
Low Carb/Keto: Use cheese, spinach, and bacon. Avoid breadcrumbs.
-
Vegetarian Version: Substitute chicken with portobello mushrooms or tofu for a plant-based alternative.
-
Lower Fat: Use part-skim cheese or Greek yogurt in the filling.
-
High Protein: Combine chicken with cottage cheese or ricotta for extra protein.
These variations ensure that the dish fits different dietary needs while remaining flavorful.
Troubleshooting Common Issues
-
Dry Chicken: Ensure even thickness and do not overcook. Resting is key.
-
Filling Falls Out: Secure with toothpicks and avoid overstuffing.
-
Uneven Cooking: Pound chicken to uniform thickness. Check temperature with a meat thermometer.
-
Browning Too Fast: Lower searing heat and finish baking in the oven.
Following these tips makes it easier to achieve a consistently tasty result.
Serving and Presentation Tips
Presentation makes stuffed chicken breast feel like a restaurant-quality dish:
-
Slice the chicken crosswise to show the colorful filling.
-
Drizzle sauce over the top or around the plate for visual appeal.
-
Garnish with fresh herbs like parsley, basil, or chives.
-
Arrange sides neatly for a balanced plate.
Visual appeal enhances the dining experience and makes the meal more inviting.
Scaling for Family Portions
Stuffed chicken breast is easy to scale:
-
Multiply ingredients and adjust baking time for larger breasts or more servings.
-
Keep filling ratios consistent for uniform taste.
-
For parties, prepare multiple stuffed breasts and bake in batches to ensure even cooking.
Planning ahead saves time and ensures all portions are cooked perfectly.
Quick 30-Minute Recipes
For faster meals, try these ideas:
-
Spinach & Cheese: Simple blend of mozzarella, cream cheese, and spinach. Cook using the sear and bake method.
-
Bacon & Cheddar: Add crispy bacon and cheddar cheese. Bake for 20 minutes.
-
Caprese: Stuff with mozzarella, sun-dried tomatoes, and basil. Serve with balsamic glaze.
Quick recipes allow you to enjoy stuffed chicken breast without long prep times.
Conclusion
Recipes for stuffed chicken breast are versatile, flavorful, and perfect for any occasion. By choosing the right chicken, using the correct stuffing technique, and experimenting with fillings and cooking methods, you can make a dish that impresses everyone at the table. Whether you want a quick weeknight meal or a show-stopping dinner, stuffed chicken breast can be adapted to suit your taste and dietary preferences, making it a reliable favorite in your cooking repertoire.
FAQs
Can I make stuffed chicken breast ahead of time?
Yes, assemble and store in the fridge up to 24 hours before cooking.
What is the best cheese for stuffing chicken breast?
Mozzarella, cream cheese, and cheddar work well depending on flavor preference.
Can I freeze stuffed chicken breast?
Yes, wrap individually and freeze for up to 3 months.
How do I prevent the filling from falling out?
Use toothpicks or kitchen twine and avoid overstuffing.
Can stuffed chicken breast be cooked in an air fryer?
Yes, cook at 360°F (182°C) for 15-20 minutes, checking for doneness.
What sides go well with stuffed chicken breast?
Roasted vegetables, rice, salad, or light sauces complement the dish perfectly.
-

 Food3 weeks ago
Cuts of Steak: Complete Guide to Beef Cuts
-

 Food3 weeks ago
What Is Andouille Sausage? Complete Guide
-

 Drinks3 days ago
Easy Lychee Martini Recipe Sweet & Floral Cocktail
-

 Food4 weeks ago
Shirleys Coffee Shop Guam Locations Menu and Guide
-

 Food3 days ago
Black Pudding Guide: History, Recipe & Nutrition
-

 Food3 weeks ago
Ultimate Tripas Recipe and Cooking Guide
-

 Food1 day ago
Italian Ice Flavoring Guide: Flavors, Bases, and Recipes
-

 Blog3 weeks ago
Saltwater Kitchen & Sushi: Menu, Reviews, and Visitor Guide