
Food
Wagyu Beef Price per Pound: Complete Cost Guide
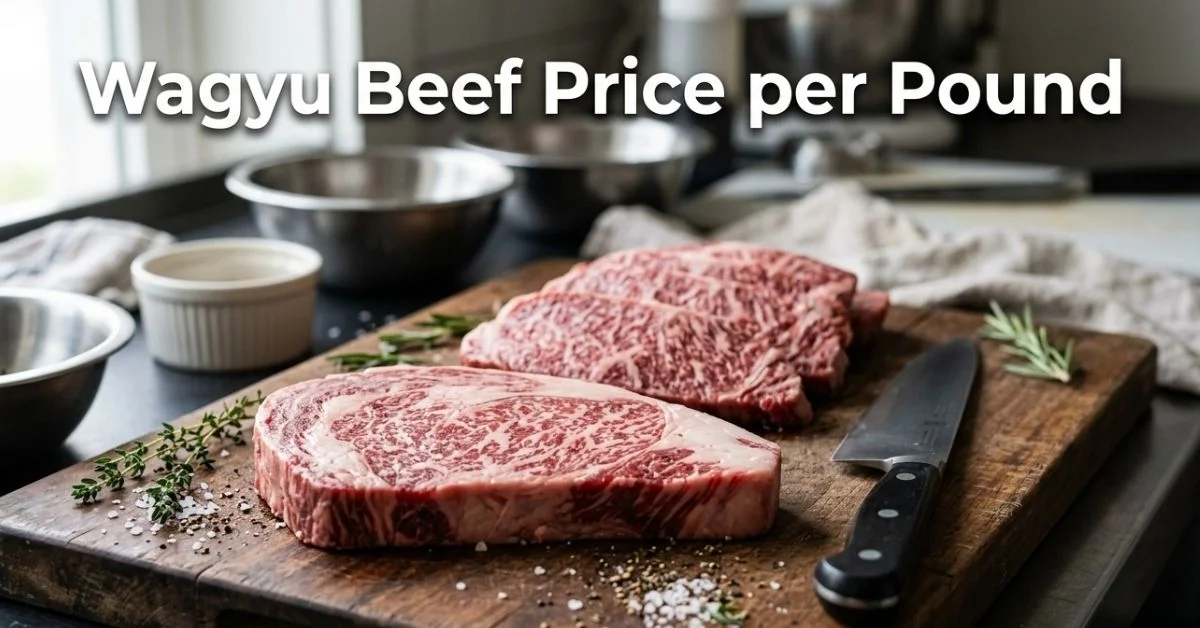
Understanding Wagyu beef price per pound can be confusing, especially with huge differences between Japanese, American, and Australian varieties. Many buyers see prices ranging from affordable to extremely expensive without knowing what actually justifies the cost. This often leads to overpaying or buying lower-quality “Wagyu-style” beef instead of authentic cuts.
This guide breaks everything down clearly. You’ll see real 2026 price ranges, how grading systems like A5 work, and what impacts cost the most. It also explains how to compare Wagyu with regular beef, where to buy it, and how to avoid common mistakes. Whether you’re planning a special dinner or just exploring premium meat options, this guide helps you make informed decisions without wasting money.
What Is Wagyu Beef?
Origin and meaning of Wagyu
Wagyu beef literally means “Japanese cow,” but the term represents much more than geography. It refers to specific cattle breeds in Japan known for their genetic ability to produce intense marbling. These cattle have been carefully bred for centuries to enhance fat distribution and meat quality.
In Japan, Wagyu production follows strict standards. Regions like Kobe beef and Miyazaki Wagyu are known worldwide for producing some of the highest-quality beef available. Each region maintains traceability, ensuring authenticity.
Outside Japan, Wagyu beef price per pound cattle have been crossbred with local breeds. This creates American and Australian Wagyu, which still offer good marbling but differ in taste, texture, and price.
Read also: Crandall Menus Breakdown: Essential Features You Need
Why Wagyu is different from regular beef
The biggest difference between Wagyu Beef Price per Pound and standard beef is marbling. Wagyu contains fine streaks of intramuscular fat that melt during cooking, creating a buttery texture. This is very different from typical beef, which has less consistent fat distribution.
Another key factor is how the cattle are raised. Wagyu cattle are often fed specialized diets and raised in low-stress environments. This contributes to the tenderness and flavor that justify the higher Wagyu beef price per pound.
Regular beef, even high-quality cuts, cannot replicate the same level of richness. That’s why Wagyu sits in the luxury food category rather than everyday consumption.
Average Wagyu Beef Price Per Pound (2026)
Typical price ranges by category
In 2026, Wagyu beef price per pound varies widely depending on origin and grade. Japanese A5 Wagyu sits at the top, often ranging between $150 to $300 per pound. This reflects its rarity, import costs, and strict grading system.
American Wagyu Beef Price per Pound typically ranges from $30 to $80 per pound. It offers a balance between affordability and premium quality, making it popular for home cooks and restaurants alike.
Australian Wagyu usually falls between $40 and $120 per pound. It often delivers strong marbling at a lower cost than Japanese imports, making it a practical middle-ground option.
Quick comparison table
| Type | Price Per Pound (2026) | Quality Level |
| Japanese A5 Wagyu | $150 – $300+ | Ultra premium |
| American Wagyu | $30 – $80 | High |
| Australian Wagyu | $40 – $120 | High to premium |
These ranges give a realistic view of the market. Prices fluctuate depending on cut, supplier, and demand within the luxury food market.
Japanese A5 Wagyu Price Per Pound
What A5 grade means
A5 grade Wagyu Beef Price per Pound is the highest rating in the Japanese beef grading system. It evaluates yield and meat quality, including marbling, color, texture, and fat quality. A5 represents the best possible combination of these factors.
The grading system runs from A1 to A5, but only a small percentage of beef reaches A5. This exclusivity significantly impacts Wagyu beef price per pound.
When you see authentic A5 Wagyu, it usually comes with certification and traceability. This ensures you’re buying genuine Japanese beef rather than a substitute.
Current price range and examples
Japanese A5 Wagyu beef price per pound typically costs between $150 and $300 per pound in 2026. Certain cuts like ribeye or striploin can exceed this range due to demand and limited availability.
Imported Wagyu also includes additional costs such as shipping, refrigeration, and import regulations. These factors push prices higher in international markets.
In real-world terms, a single A5 steak for a home dinner can easily cost over $100. This is why many people reserve it for special occasions rather than everyday meals.
American Wagyu Price Per Pound
How it differs from Japanese Wagyu
American Wagyu comes from crossbreeding Japanese cattle with breeds like Angus. This creates beef that combines strong marbling with a more traditional steak texture.
It tends to be less rich than Japanese Wagyu, making it easier to eat in larger portions. This is one reason why it’s widely used in the steakhouse industry.
The production process is also less restrictive compared to Japan, which helps keep prices more accessible.
Price range and quality levels
American Wagyu beef price per pound typically falls between $30 and $80. Higher-end cuts or specialty producers may charge more, especially for ribeye or filet.
Quality varies depending on breeding and feeding practices. Some producers aim for near-Japanese levels of marbling, while others focus on balanced flavor.
For most buyers, American Wagyu offers the best entry point into premium beef without the extreme cost of imported Japanese options.
Australian Wagyu Price per Pound
Why it’s more affordable
Australian Wagyu beef price per pound benefits from large-scale farming and fewer export restrictions. This helps reduce overall production and distribution costs.
The climate and feeding systems in Australia also support efficient Wagyu production. As a result, supply is more stable compared to Japanese Wagyu.
Even though it’s more affordable, it still maintains strong marbling and quality, making it a popular alternative.
Price comparison with other types
Australian Wagyu typically costs between $40 and $120 per pound. It sits between American and Japanese Wagyu in both price and quality.
Compared to Japanese Wagyu, it’s less intense in flavor but still significantly better than standard beef. Compared to American Wagyu, it often offers slightly higher marbling at a similar price point.
For many buyers, Australian Wagyu provides the best balance between cost and premium experience.
Wagyu Price by Cut (Ribeye, Strip, Filet)
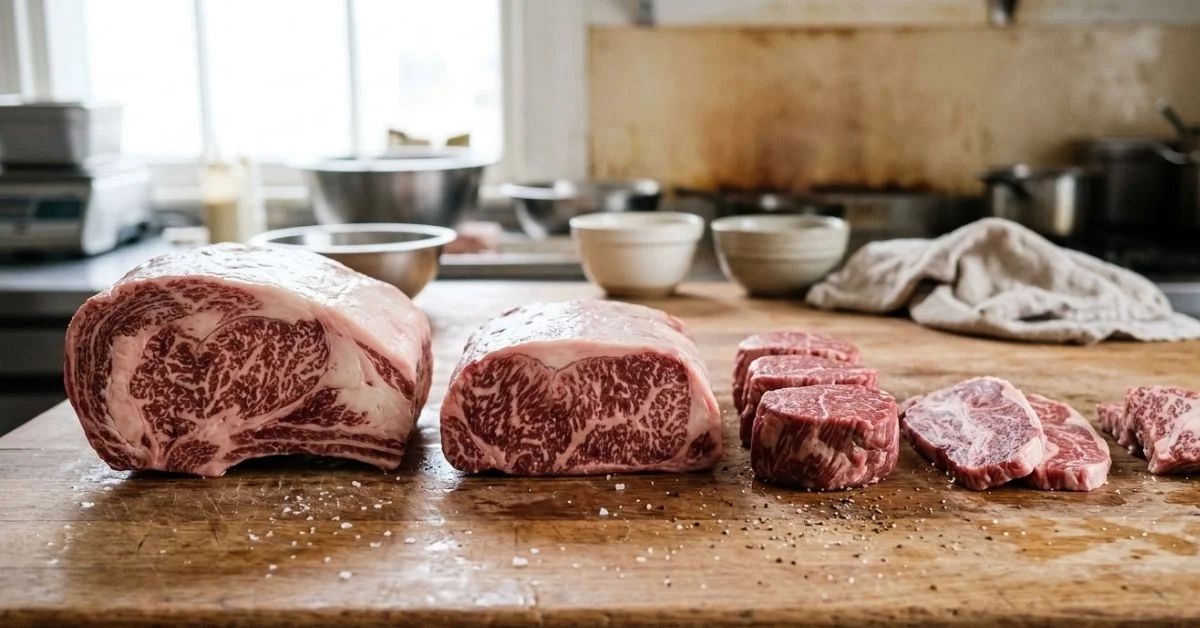
Most expensive cuts explained
Cuts like ribeye and striploin are among the most expensive because they contain the highest marbling. Ribeye steak is especially valued for its rich fat content and flavor.
Filet is also expensive, though it has slightly less marbling. Its tenderness makes it popular despite the higher cost.
These cuts are often featured in high-end restaurants, where presentation and texture matter as much as taste.
Cheapest Wagyu cuts available
More affordable Wagyu cuts include flank, chuck, and ground Wagyu. These still offer improved flavor compared to regular beef but at a lower price per pound.
Ground Wagyu is often used for burgers, giving a premium taste without the cost of steaks. This is a common entry point for first-time buyers.
Choosing less popular cuts can significantly reduce your overall cost while still delivering a Wagyu experience.
Why Is Wagyu Beef So Expensive?
Breeding and feeding process
Wagyu cattle require specialized breeding and long feeding periods. Farmers invest significant time and resources to achieve the desired marbling.
The diet often includes high-quality grains and controlled feeding schedules. This level of care increases production costs.
Unlike mass-produced beef, Wagyu is raised with a focus on quality rather than quantity.
Limited supply and import costs
Authentic Japanese Wagyu beef price per pound is produced in limited quantities. Strict export regulations further restrict global supply.
Importing Wagyu adds costs such as transportation, refrigeration, and compliance with international standards. These factors directly impact Wagyu beef price per pound.
This scarcity is a major reason why prices remain high worldwide.
High marbling and quality
Marbling is not just about appearance. It directly affects flavor, tenderness, and cooking performance.
Higher marbling requires precise genetics and farming techniques. Achieving this consistently is difficult and expensive.
This combination of rarity and quality keeps Wagyu at the top of the premium beef market.
Wagyu Grading System Explained
A1 to A5 grading system
Japan uses a grading system that evaluates both yield (A–C) and quality (1–5). A5 represents the highest possible rating.
The system considers marbling, meat color, firmness, and fat quality. Only a small percentage of beef reaches A5.
This grading system is widely recognized as one of the most strict and reliable in the world.
How grading affects price
Higher grades mean better marbling and overall quality, which increases demand. As a result, A5 Wagyu commands the highest prices.
Lower grades like A3 or A4 are still high quality but more affordable. These can be good options for buyers who want quality without extreme cost.
Understanding grading helps avoid overpaying and ensures you get the value you expect.
Wagyu vs Regular Beef Price Comparison
Cost differences
Regular beef typically costs between $5 and $15 per pound, depending on the cut and quality. In comparison, Wagyu beef price per pound is significantly higher across all categories.
Even entry-level Wagyu can cost several times more than premium regular beef. This price gap reflects differences in production and quality.
For many buyers, the decision comes down to occasion rather than everyday use.
Taste and value comparison
Wagyu offers a richer, more buttery flavor due to its marbling. Regular beef has a firmer texture and less fat content.
Some people prefer Wagyu for special meals, while others find it too rich for large portions. Value depends on personal preference and how the meat is used.
In practical terms, Wagyu is about experience, not just nutrition.
Where to Buy Wagyu Beef
Online stores vs local markets
Online meat retailers offer a wide selection of Wagyu, including imported Japanese cuts. They often provide certifications and detailed product descriptions.
Local butchers may carry American or Australian Wagyu. This allows you to inspect the meat before buying.
Both options have advantages, but online stores typically offer more variety.
How to verify authenticity
Authentic Japanese Wagyu beef price per pound comes with certification and traceability. Look for official documentation and origin details.
Be cautious of labels like “Wagyu-style” or “Wagyu-inspired,” which may not be genuine. These products are often crossbred and priced lower.
Understanding labeling helps ensure you’re paying for real quality.
Tips to Buy Wagyu at a Lower Price
Best cuts for budget buyers
Choosing less popular cuts can reduce costs significantly. Flank, chuck, and ground Wagyu are good starting points.
These cuts still deliver improved flavor without the high price of premium steaks. They are also more versatile for everyday cooking.
This approach allows you to enjoy Wagyu without overspending.
When and where to find deals
Seasonal sales and bulk purchases can lower the price per pound. Some online retailers offer discounts during holidays.
Restaurants sometimes sell surplus inventory at reduced prices. This can be a good opportunity for buyers.
Planning ahead can make a noticeable difference in cost.
Is Wagyu Beef Worth the Price?
Who should buy it
Wagyu is best suited for people who value premium food experiences. It’s ideal for special occasions or fine dining at home.
For everyday meals, the cost may not justify the difference for some buyers. It depends on personal priorities and budget.
Understanding your purpose helps determine if it’s worth it.
When it makes sense
Buying Wagyu beef price per pound makes sense for events like celebrations or when trying something unique. A small portion can still deliver a memorable experience.
For example, cooking a Wagyu steak at home can be more affordable than ordering it at a restaurant.
This balance between cost and experience is key.
Common Mistakes When Buying Wagyu
Confusing Wagyu types
Many buyers assume all Wagyu is the same. In reality, Japanese, American, and Australian Wagyu differ significantly.
Misunderstanding these differences can lead to unrealistic expectations. It’s important to know what you’re buying.
Clear labeling and research can prevent confusion.
Overpaying for lower grades
Some sellers charge premium prices for lower-grade Wagyu beef price per pound. Without understanding grading, buyers may overpay.
Always check grade, origin, and certification before purchasing. This ensures you get fair value.
A little knowledge goes a long way in avoiding costly mistakes.
Conclusion
Wagyu beef price per pound depends heavily on origin, grading, and cut, with Japanese A5 at the highest end and American and Australian options offering more flexibility. Knowing how marbling, grading systems, and sourcing work helps you avoid overpaying and choose the right quality for your needs. Whether you are buying for a special dinner or trying Wagyu for the first time, understanding real price ranges makes a big difference. It is not just about cost but about the experience and value you expect from premium beef. For most people, smart buying comes down to choosing the right cut and trusted source. If you plan carefully, you can enjoy Wagyu without overspending. Use this guide as a reference before your next purchase to get the best value.
FAQs
What is the average Wagyu beef price per pound in 2026?
It ranges from about $30 for American Wagyu to over $300 for premium Japanese A5 Wagyu.
Why is Japanese A5 Wagyu so expensive?
It has strict grading, limited supply, high marbling, and additional import costs.
Is American Wagyu real Wagyu?
Yes, but it is usually crossbred, so it differs in taste and texture from Japanese Wagyu.
Which Wagyu cut is the cheapest?
Ground Wagyu and cuts like chuck or flank are usually the most affordable.
How can I tell if Wagyu is authentic?
Look for certification, origin details, and avoid labels like “Wagyu-style.”
Is Wagyu better than regular beef?
It offers richer flavor and tenderness, but whether it’s better depends on personal preference and budget.

Managing food service in healthcare and senior living settings involves more than planning meals. Teams must ensure nutritional accuracy, meet regulatory standards, control costs, and handle diverse dietary needs across large populations. Manual processes or basic tools often lead to inconsistencies, compliance risks, and operational inefficiencies. This is where structured systems like crandall menus become relevant. Designed for dietitians and food service professionals, these platforms combine menu planning, nutrition analysis, and compliance tracking into a single workflow. They help standardize operations while supporting flexibility for different dietary requirements. Understanding how crandall menus work, what features they offer, and how they fit into real-world operations is essential for making an informed decision in healthcare food service management.
What Are Crandall Menus?
Crandall menus refer to a structured menu planning system developed by Crandall Corporate Dietitians. It is designed specifically for healthcare food service environments, where accuracy and compliance are not optional. The system supports menu creation, nutrition tracking, and dietary management in a single framework.
At its core, crandall menus function as a specialized menu planning software tailored for facilities such as hospitals and senior living communities. It allows registered dietitians and food service managers to build menu cycles, standardize recipes, and ensure meals meet defined nutritional requirements.
Unlike basic menu tools, this system integrates dietary management with compliance reporting and operational workflows. That means menus are not just planned but validated against guidelines such as USDA dietary standards and therapeutic diet requirements.
Read also: Simple Natural Red Food Coloring (Proven Results)
Who Uses Crandall Menus (And Why It Matters)
Crandall menus are widely used in senior living facilities where residents require consistent, nutritionally balanced meals. These environments often deal with diverse dietary needs, including low-sodium, diabetic, or texture-modified diets. The system helps maintain consistency across daily operations.
Hospitals and healthcare providers also rely on this type of menu planning system. Patient meal services must align with clinical recommendations, which make integration with electronic health records and dietary notes essential. Crandall menus support that connection between nutrition and care.
Food service teams benefit from a centralized system that reduces manual coordination. Instead of juggling spreadsheets or disconnected tools, staff can access a unified platform that manages recipes, menu cycles, and compliance reporting in one place.
Core Features of Crandall Menus

Automated Menu Planning
One of the defining features of crandall menus is automated menu planning. Instead of building menus from scratch each time, dietitians can create structured menu cycles that repeat over weeks. This ensures consistency while reducing workload.
Automation also allows for quick adjustments. For example, if a facility needs to modify a menu for seasonal ingredients or supply changes, the system can update multiple meals at once without starting over. This saves time in high-volume operations.
In real use, this feature supports efficiency during peak planning periods. Facilities managing hundreds of meals daily benefit from a system that reduces repetitive tasks while maintaining accuracy.
Nutrition Analysis & Compliance Tracking
Nutrition analysis tools are built into the system, allowing dietitians to evaluate meals against established guidelines. This includes calorie counts, macronutrients, and micronutrient levels, all aligned with healthcare nutrition standards.
Compliance tracking is especially important in regulated environments. Crandall menus help ensure meals meet therapeutic diet requirements and align with standards such as those recommended by USDA. This reduces the risk of non-compliance during audits.
From a practical standpoint, this feature allows dietitians to validate menus before they are served. Instead of reacting to issues later, teams can catch and correct problems during the planning stage.
Allergen & Dietary Management
Managing allergens and special diets is a critical part of healthcare food service. Crandall menus include tools for tracking allergens and ensuring meals meet specific dietary restrictions, such as gluten-free or low-sodium requirements.
The system also supports therapeutic diets, which are often prescribed for medical conditions. This ensures that each meal aligns with patient needs, reducing the risk of errors that could affect health outcomes.
In day-to-day operations, this feature simplifies communication between kitchen staff and dietitians. Everyone works from the same data, which reduces confusion and improves consistency.
Menu Customization Options
Flexibility is another key feature of crandall menus. Facilities can customize menu cycles based on resident preferences, cultural considerations, or seasonal availability. This helps improve satisfaction without sacrificing compliance.
Customization also extends to portion sizes and recipe adjustments. Dietitians can modify meals to meet specific nutritional goals while maintaining consistency across the menu.
This level of control is particularly useful in diverse facilities where one-size-fits-all menus do not work. It allows teams to balance personalization with operational efficiency.
Reporting and Documentation Tools
Documentation is essential in healthcare environments, and crandall menus provide built-in reporting tools. These reports cover nutrition analysis, compliance data, and menu records, all in a structured format.
This makes it easier to prepare for inspections or internal audits. Instead of compiling data manually, facilities can generate reports directly from the system.
Over time, these tools also support data-driven decisions. Managers can review trends, identify inefficiencies, and adjust operations based on reliable information.
How Crandall Menus Work in Real Operations
In practice, crandall menus follow a structured workflow. Dietitians begin by creating menu cycles, often spanning several weeks. Recipes are standardized, and nutritional data is linked to each meal.
Once the menu is built, the system analyzes it against dietary guidelines and facility requirements. Adjustments can be made before the menu is finalized, ensuring compliance and accuracy.
A typical example involves a senior living facility managing multiple diet types. The system allows staff to generate variations of the same meal for different dietary needs, all while maintaining consistency in preparation and service.
Key Benefits for Dietitians and Facilities
For dietitians, crandall menus reduce manual workload and improve accuracy. Instead of calculating nutrition values by hand, the system handles analysis automatically. This allows professionals to focus on higher-level planning.
Facilities benefit from improved efficiency. Menu planning, compliance tracking, and reporting are all handled within one platform, reducing the need for multiple tools or manual processes.
There is also a clear improvement in consistency. Meals are planned, validated, and documented in a standardized way, which reduces variability and improves overall quality.
Cost Efficiency and Operational Impact
Cost control is a major concern in food service operations. Crandall menus support this by helping facilities plan menus that align with budget constraints while maintaining nutritional quality.
Time savings are another important factor. Automation reduces the hours spent on menu planning and reporting, which can free up staff for other tasks. Over time, this leads to more efficient operations.
Resource optimization is also improved. With better planning and data insights, facilities can reduce food waste and manage inventory more effectively, contributing to overall cost efficiency.
Pros and Limitations of Crandall Menus
Advantages
Crandall menus offer strong integration between menu planning, nutrition analysis, and compliance tracking. This makes them particularly useful in regulated environments where accuracy is critical.
The system also supports scalability. Whether a facility serves dozens or hundreds of residents, the same framework can adapt to different operational sizes.
Another advantage is reliability. With structured workflows and built-in validation, the risk of errors is significantly reduced compared to manual systems.
Potential Drawbacks
One limitation is the learning curve. Staff may require training to fully understand and use the system effectively, especially if they are transitioning from manual processes.
Integration with existing systems, such as electronic health records, can also present challenges. While possible, it may require technical setup and coordination.
Cost can be another consideration. Smaller facilities may find it harder to justify the investment compared to simpler tools, depending on their operational needs.
Crandall Menus vs Other Menu Planning Systems
Compared to general menu planning software, crandall menus are more specialized for healthcare environments. They focus heavily on compliance, dietary management, and integration with clinical workflows.
Other systems may offer basic menu planning features but lack the depth required for therapeutic diets and regulatory standards. This makes crandall menus a stronger option for facilities with complex requirements.
However, for smaller operations with simpler needs, a less specialized system might be sufficient. The choice depends on the level of complexity and compliance required.
Implementation and Setup Process
Getting started with crandall menus typically involves setting up menu cycles, importing recipes, and configuring nutritional data. This initial setup is critical for long-term accuracy.
Training is an important part of the process. Staff need to understand how to use the system effectively, from menu planning to reporting. Proper onboarding can reduce errors and improve adoption.
Once implemented, the system becomes part of daily operations. Regular updates and reviews help ensure that menus remain aligned with dietary guidelines and facility needs.
Common Challenges and How to Solve Them
One common challenge is the initial learning curve. Staff may need time to adjust to a new system, especially if they are used to manual processes. Structured training can help ease this transition.
Integration issues can also arise when connecting the system with other tools, such as electronic health records. Working with technical support and planning the integration carefully can minimize disruptions.
Data accuracy is another concern. Ensuring that recipes and nutritional information are correctly entered is essential. Regular reviews and validation checks can help maintain accuracy over time.
Conclusion
Crandall menus bring structure and control to healthcare food service by combining menu planning, nutrition analysis, and compliance tracking in one system. They help dietitians work more efficiently while ensuring meals meet strict dietary standards. Facilities benefit from improved consistency, better cost management, and reduced manual effort across daily operations. At the same time, the system requires proper setup, training, and evaluation to deliver full value. It is not a one-size solution, but for organizations with complex dietary needs, it offers a practical and reliable framework. The key is to match its capabilities with your operational goals. If you are comparing menu systems or planning an upgrade, this is a strong option worth a closer look.
FAQs
What are crandall menus used for?
They are used for planning, analyzing, and managing menus in healthcare and senior living facilities while ensuring dietary compliance.
How does crandall menu software work?
It combines menu creation, nutrition analysis, and reporting into one system, allowing dietitians to plan and validate meals efficiently.
Who should use crandall menus?
Healthcare facilities, senior living communities, and food service teams that require structured dietary management systems.
Does crandall support dietary compliance?
Yes, it includes tools for nutrition analysis and compliance tracking aligned with recognized dietary guidelines.
Can crandall menus be customized?
Yes, menus can be adjusted based on dietary needs, preferences, and operational requirements.
Is crandall menus suitable for small facilities?
It depends on the complexity of operations. Smaller facilities may find simpler tools sufficient, while larger ones benefit more from its features.
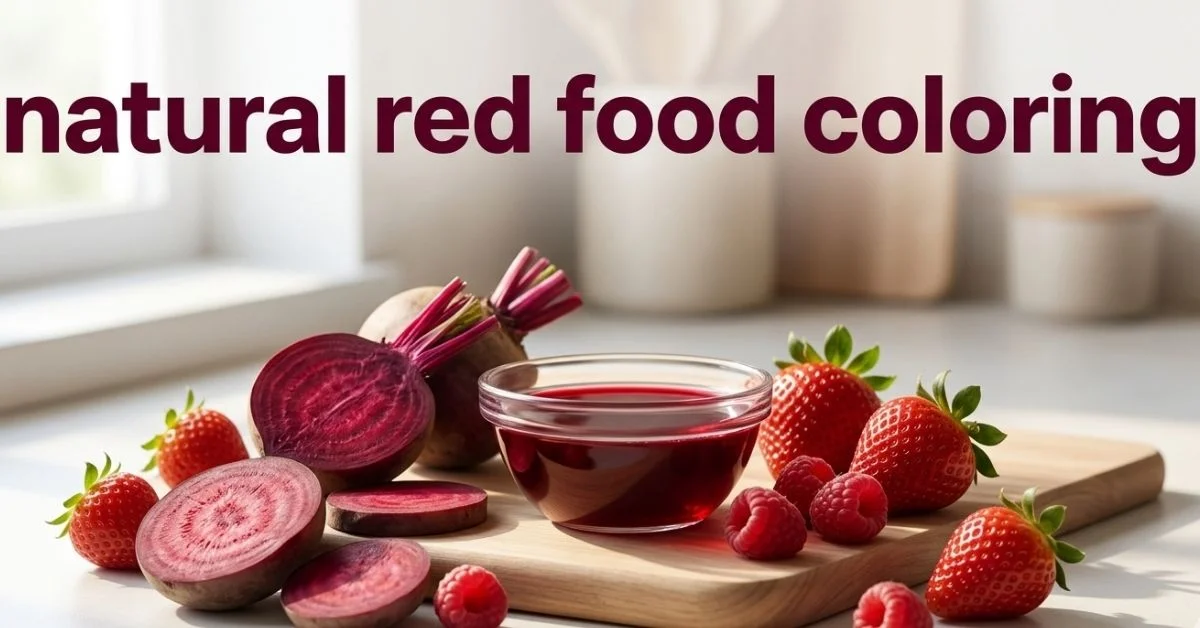
Artificial food dyes like Red 40 are widely used to create bright red colors, but many people prefer to avoid them due to growing concerns about synthetic additives. The challenge is that natural red food coloring often produces dull shades, fades during cooking, or changes color if the process isn’t handled correctly. This makes it difficult to achieve consistent results in baking, icing, or drinks using plant-based alternatives. The good news is that natural red food coloring can work effectively when you use the right ingredients and techniques.
What Is Natural Red Food Coloring?
Natural red food coloring is a plant-based dye made from ingredients like beetroot, berries, and flowers. These sources contain natural pigments that produce red shades without synthetic chemicals. Unlike commercial dyes, the color comes directly from edible ingredients.
The key difference from artificial dyes is how these pigments behave. Synthetic colors like Red 40 are stable and predictable, while natural coloring depends on factors like acidity, temperature, and concentration. This makes it slightly more technical but far more transparent in terms of ingredients.
Natural red food coloring is widely used in clean eating, vegan cooking, and gluten-free baking. It appeals to anyone who wants more control over what goes into their food without sacrificing visual appeal.
Read also: Best Prime Rib Dry Brine for Incredible Flavor
Why Choose Natural Over Artificial Colors?
Many people switch to natural food dye because of concerns around artificial additives. While regulatory bodies like the FDA consider dyes such as Red 40 safe within limits, some individuals prefer to avoid synthetic ingredients altogether, especially in foods for children.
Natural red food coloring fits well into a clean eating lifestyle. It aligns with whole-food cooking and avoids unnecessary chemical processing. For home cooks, it also brings a sense of control, since you know exactly what goes into your food.
There is also a practical benefit beyond health. Natural coloring often adds subtle depth to recipes, especially when using fruit-based ingredients. While it may not always match the brightness of artificial dyes, it creates a more natural and appealing look.
Best Ingredients for Natural Red Food Coloring
Beetroot (Most Effective)
Beetroot is the most reliable source of natural red food coloring. It produces a deep, rich pigment that works well in both liquid and powder form. When concentrated properly, it can rival artificial dyes in intensity.
In my own tests, beetroot consistently delivered the strongest color in frosting and cake batter. Even a small amount can create a noticeable red tone, especially when combined with acidic ingredients like lemon juice.
The main drawback is its earthy flavor, but this can be reduced by using small quantities or pairing it with strong flavors like chocolate or vanilla. For most recipes, beetroot remains the top choice.
Berries (Strawberry, Raspberry)
Strawberries and raspberries offer a softer, more vibrant red compared to beetroot. They are ideal for lighter recipes like icing, smoothies, and desserts where flavor matters as much as color.
Berry-based coloring works best when reduced into a thick concentrate. Fresh juice alone is often too diluted, so cooking it down helps intensify both the color and the flavor.
These options are great for fruit-based recipes but less effective in high-heat baking. The color tends to fade if exposed to long cooking times.
Hibiscus & Floral Options
Hibiscus is a surprisingly powerful natural dye. When steeped in hot water, it produces a deep red liquid that can be used in drinks, syrups, and even icing.
The advantage of hibiscus is its strong pigment and minimal impact on texture. It blends easily into liquids and creates a bright, clean red tone when acidity is controlled.
Its slightly tart flavor can actually enhance certain recipes, especially beverages. This makes it a versatile option beyond traditional baking.
Pomegranate & Other Fruits
Pomegranate juice offers a rich red color with a subtle sweetness. It works well in glazes, sauces, and drinks where a glossy finish is desired.
Like berries, pomegranate needs to be reduced to achieve strong color. Fresh juice alone is often too light, but a concentrated version can produce impressive results.
Other fruits can contribute to natural coloring, but most require experimentation. Pomegranate stands out because it balances color strength and flavor better than many alternatives.
How to Make Natural Red Food Coloring (Step-by-Step)
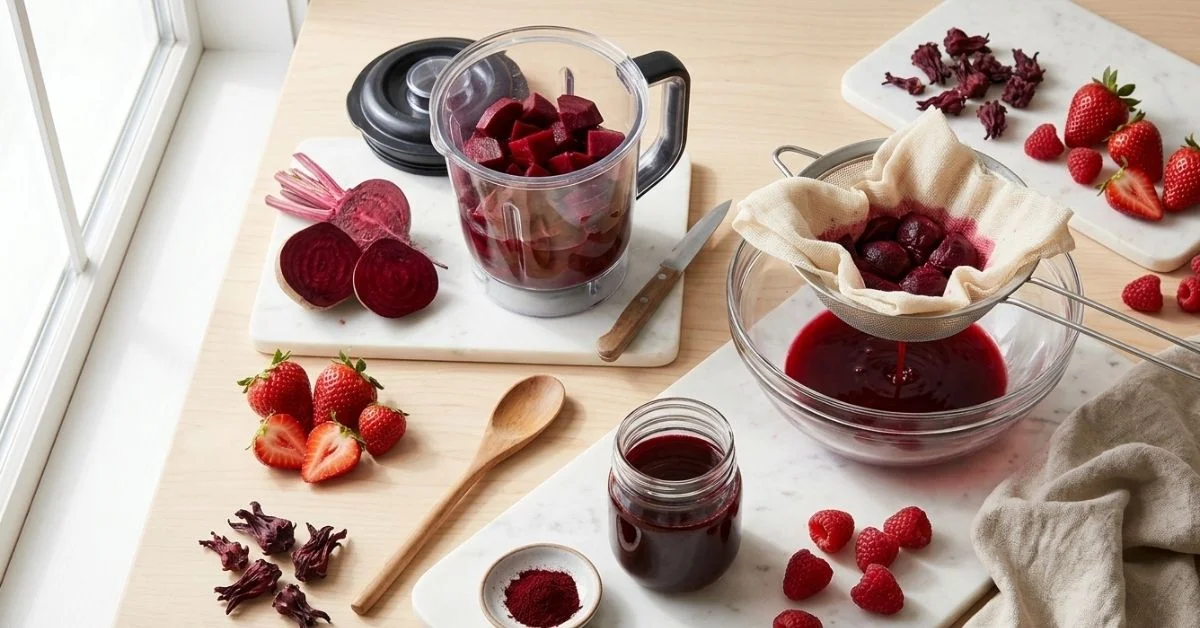
Liquid Method (Juice Extraction)
Start by chopping your chosen ingredient, such as beetroot or berries. Blend it with a small amount of water using a blender until smooth. This helps release the natural pigments efficiently.
Strain the mixture through cheesecloth to remove pulp. What you’re left with is a concentrated liquid dye that can be used immediately in recipes. For stronger color, simmer it in a saucepan to reduce the liquid further.
This method works best for icing, drinks, and batters. It’s quick, flexible, and easy to adjust depending on how intense you want the color to be.
Powder Method (Dehydrated Version)
For a more concentrated option, use food dehydration. Thinly slice beetroot and dry it completely until crisp. This removes moisture and preserves the pigment.
Grind the dried pieces into a fine powder. This creates a strong natural dye that can be stored for longer periods and added directly to dry ingredients.
Powdered coloring is ideal for baking because it doesn’t add extra liquid. It also gives you better control over consistency and intensity.
The Science behind Red Color (Why It Works)
Natural red food coloring comes from compounds called anthocyanin’s. These pigments are responsible for red, purple, and blue colors in many fruits and vegetables.
Anthocyanin’s are sensitive to pH levels. In acidic conditions, they appear more red, while in alkaline environments they can shift toward blue or purple. This is why adding lemon juice or vinegar can enhance red tones.
Heat also affects these pigments. High temperatures can break them down, leading to dull or brownish colors. Understanding this helps you avoid common mistakes when using natural dyes.
How to Get a Deeper, Brighter Red
One of the easiest ways to intensify natural red food coloring is by increasing acidity. Adding a small amount of lemon juice or vinegar can significantly improve the brightness of the color.
Concentration also plays a major role. Reducing your liquid dye through gentle heating removes excess water and strengthens the pigment. This is especially useful when working with berries or pomegranate.
Another practical tip is layering. Adding small amounts of coloring gradually allows you to build depth without overwhelming the recipe. This approach works well in frosting and cake batter.
Liquid vs Powder: Which Is Better?
Liquid natural red food coloring is easier to make and use. It blends smoothly into batters, drinks, and sauces without requiring additional preparation. This makes it ideal for quick recipes.
Powdered coloring offers better stability and shelf life. Since it contains no water, it doesn’t dilute your recipe and holds its color more consistently during baking.
In practice, both have their place. Liquid works best for icing and beverages, while powder is more reliable for baked goods where moisture balance matters.
How to Use Natural Red Food Coloring
Baking (cakes, cookies)
Natural red food coloring can be used in cakes and cookies, but it requires some adjustments. Lower baking temperatures help preserve the pigment and prevent fading.
Using powdered dye is often more effective in baking. It integrates well with dry ingredients and maintains color better than liquid forms.
For best results, combine coloring with acidic ingredients. This helps stabilize the pigment and keeps the color closer to red rather than brown.
Frosting & Icing
Frosting is one of the easiest places to use natural coloring. Since it doesn’t require heat, the pigment remains vibrant and stable.
Beetroot and berry-based dyes both work well here. I’ve found that adding color gradually gives more control and prevents over-darkening.
Cream-based frostings may slightly mute the color, so a higher concentration is often needed. This is normal and easy to adjust.
Drinks & Smoothies
Natural red food coloring is perfect for drinks and smoothies. Ingredients like hibiscus and pomegranate blend easily and enhance both color and flavor.
These applications allow for more vibrant results since there is no heat involved. The pigments remain stable and produce bright, appealing tones.
This is also where natural coloring feels most intuitive, since the ingredients already match the flavor profile of the drink.
Common Problems and Fixes
One common issue is fading color. This usually happens due to heat or insufficient concentration. Using more concentrated dye or lowering cooking temperature can help.
Brownish tones often result from incorrect pH levels. Adding a small amount of acid like lemon juice can restore a brighter red.
Weak pigment is another frequent problem. In most cases, the solution is simple: reduce the liquid further or switch to a stronger source like beetroot.
Does Natural Food Coloring Affect Taste?
Natural red food coloring can affect taste, depending on the ingredient used. Beetroot may add an earthy note, while berries contribute sweetness.
In most recipes, the flavor is subtle and often blends well with other ingredients. Chocolate, vanilla, and fruit-based desserts tend to mask any unwanted taste.
If flavor becomes noticeable, using smaller amounts or switching to a milder source like hibiscus can solve the problem without sacrificing color.
Storage and Shelf Life
Liquid natural food coloring should be stored in the refrigerator. It typically lasts about one week before losing strength and freshness.
Freezing is a good option for longer storage. Small portions can be frozen and thawed as needed without significant loss of color.
Powdered coloring has a much longer shelf life. When stored in a dry, airtight container, it can last for several months without degrading.
When Natural Red Coloring Doesn’t Work Well
High-heat recipes can break down natural pigments quickly. Long baking times often lead to faded or uneven color.
Recipes that require precise color matching may also be challenging. Natural dyes are less predictable than artificial ones and can vary slightly.
In these cases, understanding the limitations helps set realistic expectations. Natural coloring works best in low-heat or no-heat applications.
Conclusion
Natural red food coloring offers a practical way to replace artificial dyes without losing visual appeal in your recipes. By choosing strong ingredients like beetroot, berries, or hibiscus and understanding how pH and heat affect color, you can achieve consistent results at home. Both liquid and powder forms have their place, depending on whether you are baking, making icing, or preparing drinks. While natural options may require a bit more attention, they give you full control over what goes into your food. Small adjustments like adding acidity or concentrating the dye can make a noticeable difference. Once you get familiar with these methods, the process becomes simple and reliable. Try one technique in your next recipe and build from there.
FAQs
How do you make natural red food coloring?
Blend ingredients like beetroot or berries, strain the juice, and reduce it for stronger color.
What is the best natural red dye for icing?
Beetroot and raspberry concentrates work best because they provide strong color without heat.
Does beetroot change taste in baking?
It can add a mild earthy flavor, but it’s usually not noticeable in chocolate or vanilla recipes.
Why is my natural red color turning brown?
This often happens due to high heat or low acidity. Adding lemon juice can help restore the color.
Can I make powdered food coloring at home?
Yes, by dehydrating ingredients like beetroot and grinding them into a fine powder.
Is natural food coloring safe for kids?
Yes, it uses whole-food ingredients and avoids synthetic additives, making it a safer choice for most people.
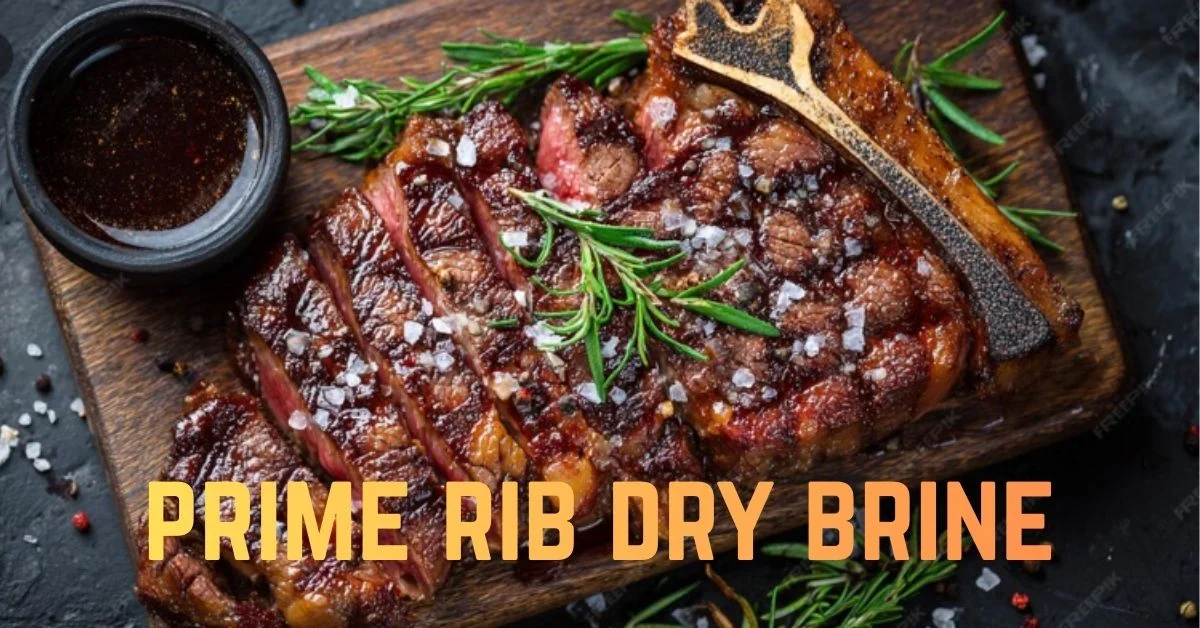
Cooking prime rib at home often falls short in one key area: flavor that penetrates beyond the surface. Many roasts look impressive but taste under-seasoned inside, or worse, end up unevenly cooked and lacking that rich, savory depth people expect. The problem usually comes down to preparation, not cooking. Proper prime rib dry brine changes everything. When done correctly, it transforms a simple rib roast into a deeply seasoned, tender, and juicy centerpiece with a beautifully developed crust. It is not complicated, but it does require the right timing, salt ratio, and setup. This guide breaks down exactly how to dry brine prime rib with clarity and precision. You will learn the science behind it, the correct method, and how to avoid the common mistakes that ruin results.
What Is Dry Brining and Why It Matters
prime rib dry brine brining is a simple process where you apply salt directly to the surface of meat and let it rest over time. Unlike wet brine, there is no water involved. The salt works gradually, drawing moisture out and then allowing it to be reabsorbed.
For prime rib dry brine, this method is especially effective because of the size and fat content of the roast. A thick rib eye roast needs time for seasoning to penetrate beyond the surface, and dry brining allows that to happen naturally.
The result is a roast that is seasoned all the way through, not just on the outside. It also helps create a better crust during cooking, which is one of the defining features of a well-prepared prime rib.
Read also: Powerful Coconut Water with Pineapple Health Benefits
The Science behind Dry Brining
When salt is applied to meat, it first draws moisture out through a process often explained as osmosis. That moisture dissolves the salt, creating concentrated brine on the surface. Over time, this liquid gets pulled back into the meat.
As the salt diffuses deeper, it begins to break down some of the proteins in the meat fibers. This process, known as protein denaturation, helps the meat retain moisture during cooking and improves tenderness.
prime rib dry brine brining also sets the stage for a better Maillard reaction. As the surface dries out in the refrigerator, it browns more effectively in the oven, creating a rich, flavorful crust that defines a great prime rib.
Ingredients and Tools You’ll Need
Essential Ingredients
The foundation of any prime rib dry brine is kosher salt. Its coarse texture makes it easier to distribute evenly across the surface, and it avoids the over-salting risk that comes with finer table salt.
Beyond salt, you can layer flavor with black pepper, garlic powder, and fresh herbs like rosemary and thyme. These additions complement the natural richness of the rib roast without overpowering it.
It is best to keep the seasoning simple during the brining stage. Strong marinades or wet ingredients interfere with the drying process, which is essential for proper crust formation later.
Must-Have Tools
A wire rack is one of the most important tools for dry brining. It allows air to circulate around the entire roast, which helps dry the surface evenly while it rests in the refrigerator.
A sturdy roasting pan is necessary for cooking, especially for larger cuts. It should hold the roast securely and allow heat to circulate evenly during roasting or reverse searing.
A reliable meat thermometer is essential. Prime rib is too expensive to guess. Monitoring internal temperature ensures you hit the right doneness without overcooking.
Best Salt Ratio for Prime Rib Dry Brine
Getting the salt ratio right is where many people go wrong. A good guideline is about ½ teaspoon of kosher salt per pound of meat. This provides enough seasoning without overwhelming the natural flavor.
For larger roasts, consistency matters more than precision. The goal is to coat the entire surface evenly, including the sides and any exposed edges. Uneven application leads to uneven flavor.
If you are unsure, it is better to slightly under-salt than overdo it. You can always add a finishing sprinkle after cooking, but fixing an over-salted roast is far more difficult.
How Long to Dry Brine Prime Rib

Time is what makes the prime rib dry brine effective. At a minimum, you should allow 12 hours, but this is usually not enough for thicker cuts. A full 24 hours delivers much better results.
For optimal flavor and texture, 36 to 48 hours is ideal. In testing different timings, a 48-hour dry brine consistently produced deeper seasoning and a noticeably better crust.
Going beyond 48 hours is possible, but the benefits start to level off. The key is giving the salt enough time to work without letting the exterior dry out excessively.
Step-by-Step Dry Brine Method
Preparing the Roast
Start by patting the prime rib dry with paper towels. Removing surface moisture helps the salt adhere properly and begins the drying process immediately.
Trim any excessive surface fat if needed, but leave a good layer intact. Fat contributes to flavor and helps protect the meat during cooking.
Place the roast on a wire rack set over a tray. This setup ensures airflow around the entire piece, which is critical for even drying.
Applying Salt Evenly
Sprinkle kosher salt evenly over the entire surface. Take your time and ensure all areas are covered, including the sides and ends.
Gently press the salt into the meat so it adheres well. Avoid rubbing aggressively, as this can create uneven patches.
At this stage, you can add a light layer of pepper or garlic powder, but keep it minimal. The focus during dry brining is on salt penetration.
Proper Fridge Setup (Uncovered Method)
Place the rack with the roast in the refrigerator uncovered. This might feel unusual, but it is essential for airflow and surface drying.
Keep the roast on a middle shelf where air circulation is consistent. Avoid crowded areas in the fridge where airflow is restricted.
Over time, you will notice the surface becoming slightly dry and firm. This is exactly what you want for developing a strong crust during cooking.
Should You Add Seasoning Beyond Salt?
Salt does the heavy lifting during prime rib dry brine, but additional seasoning can enhance the final result. The timing of when you add it matters.
For best results, apply herbs and spices shortly before cooking rather than during the brining phase. This preserves their aroma and prevents them from drying out.
A simple mix of black pepper, garlic powder, and fresh herbs works well. Combined with a butter baste during cooking, it creates a balanced and flavorful crust.
Cooking After Dry Brining
Reverse Sear Method
The reverse sear method involves cooking the prime rib slowly at a low temperature first. This allows for even cooking from edge to center.
Once the roast reaches the desired internal temperature, it is finished with a high-heat sear. This creates a crisp, deeply browned crust.
This method pairs especially well with prime rib dry brine brining because the surface is already dry, making it easier to achieve that perfect finish.
Traditional Oven Roast
A traditional oven roast starts at a higher temperature and gradually cooks the meat through. It is a more straightforward method and works well for most home kitchens.
The key is managing the heat so the outside does not overcook before the inside reaches the right temperature. A thermometer is critical here.
Even with this method, the prime rib dry brine improves both flavor and texture. The meat stays juicier, and the crust develops more evenly.
Ideal Internal Temperature Guide
Internal temperature determines the final doneness of your prime rib. For rare, aim for about 120–125°F before resting. Medium-rare typically lands around 130–135°F.
Keep in mind that the temperature will continue to rise slightly after the roast is removed from the oven. This carryover cooking is normal and should be factored in.
Using a meat thermometer removes guesswork. Insert it into the thickest part of the roast for the most accurate reading and consistent results.
Resting and Slicing for Maximum Juiciness
Resting the roast after cooking is not optional. It allows the juices to redistribute throughout the meat instead of spilling out when sliced.
A good resting time for prime rib dry brine is about 20 to 30 minutes, depending on size. Cover it loosely with foil to keep it warm without trapping too much steam.
When slicing, cut against the grain for maximum tenderness. This small detail makes a noticeable difference in texture and overall eating experience.
Common Dry Brining Mistakes to Avoid
One of the most common mistakes is over-salting. This usually happens when using fine salt instead of kosher salt or applying too much without measuring.
Another issue is poor airflow in the refrigerator. Placing the roast in a covered container or crowded space prevents proper drying and reduces crust quality.
Timing mistakes also matter. Brining too briefly limits flavor penetration, while excessive time can lead to an overly dry surface. Balance is key.
Dry Brine vs Wet Brine: Which Is Better?
prime rib dry brine brining and wet brining both have their place, but for prime rib dry brine is generally the better choice. It enhances flavor without diluting the meat.
Wet brining introduces water into the process, which can slightly affect the texture. It works well for lean cuts but is less ideal for a rich rib roast.
Dry brining delivers a more concentrated flavor and better crust. For most home cooks aiming for a classic prime rib result, it is the preferred method.
Pro Tips for Incredible Flavor Every Time
After testing different approaches, one thing stands out: consistency matters more than complexity. A simple prime rib dry brine done correctly will outperform complicated seasoning blends.
Let the roast sit at room temperature for about an hour before cooking. This helps it cook more evenly and reduces temperature shock in the oven.
Finally, do not rush the process. From brining to resting, each step builds toward the final result. Paying attention to these details is what separates a good roast from a great one.
Conclusion
A well-executed prime rib dry brine is the difference between a decent roast and one that delivers deep, even flavor in every bite. By focusing on the right salt ratio, proper timing, and good airflow in the fridge, you set the foundation for a tender and juicy result. Understanding how the process works also makes it easier to avoid common mistakes that can affect texture and taste. Whether you choose a reverse sear or a traditional roast, the preparation does most of the work. Keep the method simple, stay consistent, and trust the process. Once you try it this way, it becomes the standard approach for any prime rib worth serving.
FAQs
How long should youprime rib dry brine?
A minimum of 24 hours works well, but 36 to 48 hours gives the best flavor and texture.
What salt is best for prime rib dry brine brining?
Kosher salt is ideal because of its coarse texture and even distribution.
Do you rinse off prime rib dry brine?
No, rinsing removes the seasoning. The salt is meant to stay and absorb into the meat.
Can you prime rib dry brine too long?
Yes, going much beyond 48 hours can dry out the surface too much without adding benefits.
Should prime rib be covered in the fridge?
No, it should remain uncovered to allow airflow and proper surface drying.
Does prime rib dry brine brining make meat salty?
When done with the correct ratio, it enhances flavor without making the meat overly salty.
-

 Food1 week ago
Cuts of Steak: Complete Guide to Beef Cuts
-

 Food1 week ago
What Is Andouille Sausage? Complete Guide
-

 Drinks1 week ago
Easy Lychee Martini Recipe Sweet & Floral Cocktail
-

 Food1 week ago
Black Pudding Guide: History, Recipe & Nutrition
-

 Food2 weeks ago
Shirleys Coffee Shop Guam Locations Menu and Guide
-

 Food1 week ago
Ultimate Tripas Recipe and Cooking Guide
-

 Food1 week ago
Italian Ice Flavoring Guide: Flavors, Bases, and Recipes
-

 Blog6 days ago
Saltwater Kitchen & Sushi: Menu, Reviews, and Visitor Guide