
Food
How to Make CandyCakes at Home: Ideas, Techniques
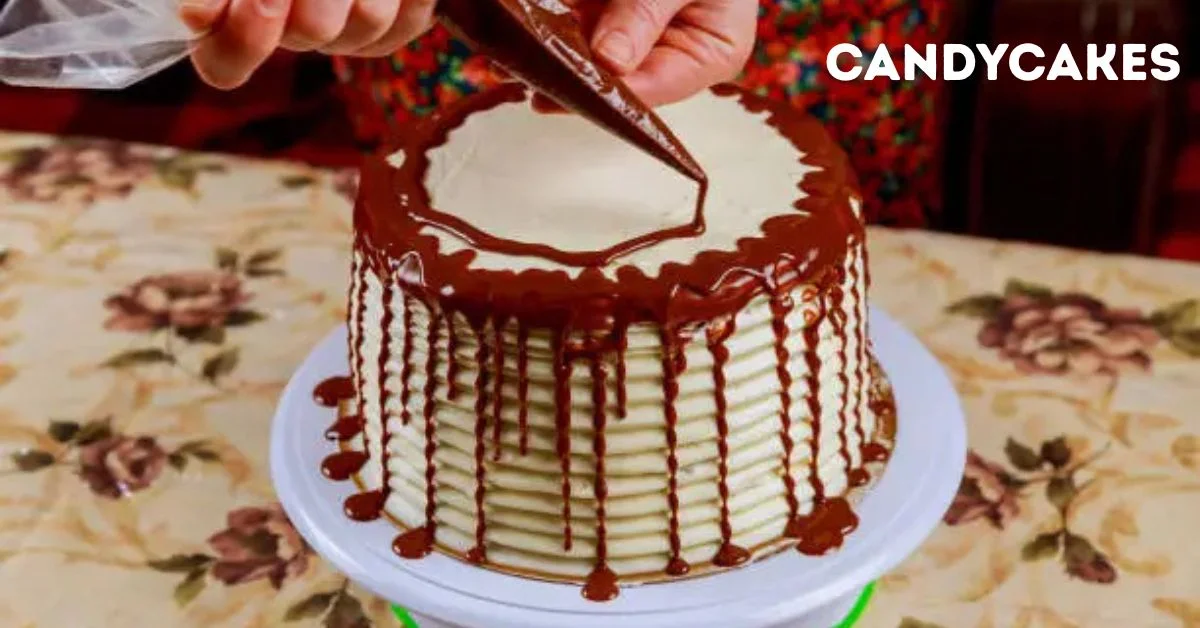
Ever seen a cake covered in Kit Kats and piled high with M&Ms and wondered how people actually make those at home? That is a candy cake, and it is much easier than it looks. You do not need baking experience or fancy tools. You just need the right candy, a frosted cake, and a few tricks that most guides never bother to share. This article on candycakes covers everything from choosing your candy to fixing the problems that catch beginners off guard.
What Is a Candy Cake?
Featured Snippet Answer
A candy cake is a regular baked cake decorated on the outside using real candy like chocolate bars, gummies, lollipops, or M&Ms. The candy sits on top of frosting, which acts as the adhesive. Decorating one takes about 30 to 60 minutes and the candy alone usually costs between $15 and $40 depending on the size of the cake.
The Simple Definition
The concept is straightforward. You bake a cake, cover it in frosting, and then press candy into that frosting across the sides and top. The frosting holds everything in place. The candy creates the look.
That is really all there is to it. The frosting is the glue, the candy is the decoration, and the result looks far more impressive than the effort involved.
Read also: Squid Ink Tonnarelli: How to Cook It Perfectly Without Ruining the Flavor
Why Candy Cakes Have Gone Viral
Scroll through YouTube or Pinterest for five minutes and you will find dozens of these. Creators like Yolanda Gampp from How To Cake It helped push this style into mainstream baking, and it caught on fast. The appeal is obvious: they look dramatic, they feel celebratory, and you can customize them completely based on whoever you are making the cake for.
Kids love the color and the excess. Adults appreciate a cake that looks thoughtful without requiring a pastry degree to pull off.
Choosing the Right Candy for Your Cake
Most first-timers skip this step entirely and just grab whatever candy they like. Then they wonder why things are sliding off or why the white frosting turned pink. Candy selection matters more than most people realize, and getting it right is what separates a great-looking cake from a messy one.
Best Candy for the Sides of a Cake
The sides need candy that is flat, uniform, and sturdy enough to press into frosting without flopping over. Kit Kats are the most popular choice for good reason. They are thin, consistent in height, and stand upright neatly when placed side by side around a round cake. Twix bars work in the same way. Wafer rolls and Pirouette cookies also create a clean, fence-like border that looks polished without much effort.
One thing to keep in mind is height. Your side candy should roughly match the height of your cake layer. A four-inch cake looks best with candy pieces that are also close to four inches tall. When the heights match, the whole design looks intentional rather than thrown together.
Best Candy for the Top Decoration
The top is where you have the most freedom. Gummy bears, M&Ms, Skittles, and Reese’s Pieces all work beautifully for colorful designs. Lollipops pushed upright into the frosting add height and make the cake look more dramatic from a distance. Mini Oreos, small peanut butter cups, and chocolate truffles work well grouped together as a topper cluster.
For a structured look, sort M&Ms by color and arrange them in rows or concentric circles. For the loose, generous style you see in compilation videos, just pile smaller candy freely across the top and let it spill toward the edges slightly.
Candy to Avoid and Why
Some candy causes real problems once it is sitting on a cake. Unwrapped hard candy pulls moisture from the air quickly and turns sticky within an hour in a warm kitchen. That stickiness can drag dye out of the candy surface and into your frosting.
Red and dark blue gummies are the worst for color bleeding. You could decorate in the morning and come back a couple of hours later to find pink or purple spreading across white buttercream. The sugar in those gummies draws moisture from the frosting and carries pigment with it.
Heavy pieces like thick chocolate bark or large candy clusters will sink into soft buttercream and eventually slide off before you even get to serve the cake. If you want to use chunky candy accents, chill the frosted cake first so the surface is firm enough to support the weight.
Step-by-Step: How to Make a Candy Cake at Home
What You Need Before You Start
Nothing fancy is required. A round or rectangular cake pan, a spatula or butter knife for frosting, and a cake board or cutting board to work on. A bench scraper is helpful for smoothing the sides but not essential.
For the frosting, buttercream is the most beginner-friendly option because it is easy to work with and holds candy reliably once chilled. Swiss meringue buttercream is slightly firmer and performs better in warm kitchens. Avoid whipped cream frosting altogether because it is too soft and unstable to hold anything with weight.
Choosing Your Base Cake and Frosting
Vanilla, chocolate, and red velvet are the go-to base choices because they pair well with almost every candy flavor. The cake flavor matters less than the frosting consistency.
Too soft and greasy means candy will not stick. Too stiff and dry means the frosting cracks when you press things in. The right consistency holds its shape when spread but gives slightly when you press a finger into it. That is the texture you are aiming for.
How to Attach Candy to the Sides Without It Falling
Frost the entire cake first, then put it in the fridge for 20 to 30 minutes. That brief chill firms up the frosting just enough to grip candy properly. Once it is chilled, press your side candy pieces directly and firmly into the frosting, starting at the back of the cake and working your way around to the front.
For a Kit Kat fence, tie a ribbon around the finished border. It holds everything tight while the frosting sets around the candy, and it also adds a nice visual detail that people always appreciate.
Decorating the Top
Two approaches work well depending on the look you want. The piled look means heaping candy generously across the top so it creates volume and almost spills over the edges. This works best with smaller pieces like M&Ms, gummies, and mini chocolates.
The pattern approach means placing candy in deliberate arrangements. Rows, circles, or color blocks by sorting M&Ms take maybe 10 extra minutes but make the finished cake look noticeably more polished.
How Long Before Serving Should You Decorate?
For gummies and hard candy, decorate no more than two to three hours before serving. Gummies release moisture over time and can soften the frosting underneath them. Chocolate pieces are more forgiving and can go on several hours ahead without issue.
If you are prepping the night before, use chocolate candy on the sides and save the gummies for the day of the event.
Candy Cake Ideas by Occasion
Birthday Candy Cakes for Kids
Color and volume are what matter most for a kids birthday. A Kit Kat border around the outside, M&Ms poured across the top, a few lollipops pushed in, and some gummy worms draped over the edge. That combination almost never fails. Children react to the abundance first and the taste second.
If you know the child’s favorite candy, build the design around that instead of defaulting to a generic mix. A Skittles cake for a kid who loves Skittles lands very differently than a generic candy pile.
Candy Cakes for Parties and Events
For adult gatherings, a slightly more restrained approach usually reads better. Ferrero Rocher arranged in a neat circle on top, or a clean Kit Kat border finished with gold-wrapped chocolates, looks sophisticated while still being a candy cake at heart. Same idea, different execution.
Holiday-Themed Candy Cake Designs
Seasonal candy does most of the visual work for you in holiday versions. Red and green M&Ms with peppermint sticks for Christmas. Candy corn and mini Reese’s cups in orange and black for Halloween. Pastel candy eggs and Peeps on a white-frosted cake for Easter. None of these require skill, just the right candy.
Real Problems with Candy Cakes and How to Fix Them
Every other guide on this topic shows you the finished product and skips the part where things go wrong. If you are making your first candy cake, knowing these failure points in advance will save you a lot of frustration.
Candy Sliding or Falling Off the Cake
This almost always comes down to frosting that was too warm or too soft when the candy went on. Chill the frosted cake for 20 to 30 minutes first. When you press candy in, angle each piece slightly inward rather than pushing it straight on. The angle gives more frosting contact and holds better.
If candy still falls after chilling, the frosting has too much fat and not enough powdered sugar. Adding a bit more powdered sugar and mixing it through will firm the texture up enough to hold.
Color Bleeding onto White Frosting
This is caused by dark or red gummies sitting on frosting and drawing moisture through the sugar. The fix is to use only well-chilled frosting as the base before placing gummies and never leave them on for more than two hours.
For cakes made the day before, skip the gummies entirely. Use chocolate pieces or plastic candy decorations overnight and add fresh gummies on the day of the event.
Candy Melting or Sweating in Warm Conditions
Chocolate softens fast in warm rooms. If the party is indoors with air conditioning, you have no issue. If it is a warm event or an outdoor setup, keep the cake refrigerated until about 30 minutes before it needs to be out. Taking the cake from a cold fridge into a humid environment too early causes condensation, which makes the candy surface wet and the frosting look patchy.
Keep the cake away from direct sunlight and any warm appliances. This seems obvious but it is one of the most common ways a finished candy cake gets ruined in the last hour before a party.
Cake Looking Too Busy
Too much candy in too many colors creates visual noise rather than impact. If the design feels overwhelming, decide on your main candy and your accent candy. The main candy covers most of the surface. The accent pieces appear in just one or two spots for contrast.
Two to three candy types per cake is a good limit. Beyond that and the different colors and shapes start competing instead of working together.
How to Transport a Candy Cake Safely
Use a box with enough clearance that nothing touches the top decoration. Standard bakery boxes from craft stores usually work for most sizes. If lollipops or tall pieces are sticking up, measure the height before boxing.
Refrigerate the cake before loading it into the car, not after arriving. Cold cakes travel far better. Place the box on a flat surface in the car with a non-slip mat underneath it, not on a slanted seat. Drive carefully over bumps. It sounds basic but it is the difference between a cake that arrives intact and one that does not.
Candy Cake vs. Other Decoration Styles
Candy vs. Fondant
Fondant needs to be rolled, smoothed, cut, and shaped. It takes practice and patience to get right, and a lot of people do not even enjoy eating it. Candy requires no technique and nearly everyone likes the taste. For a home baker working without formal training, candy is the easier path by a wide margin.
Fondant does win in one area: precision. If you need very specific shapes, smooth surfaces, or a heavily themed design, fondant gives you more control. For most home bakers, candy gets you a better-looking result with less effort.
Candy vs. Sprinkles
Sprinkles are quick and easy but they look simple. Candy looks generous and celebratory. For a birthday centerpiece or any cake meant to impress, candy creates more visual impact. For an everyday cake where you just want something quick, sprinkles do the job fine.
When Candy Decoration Makes More Sense Than Piping
If your piping skills are not strong, candy is a great workaround. Pressing Kit Kats around a cake takes about 10 minutes. Piping a full rosette design can take an hour. If you are also baking with kids and want an activity that is actually manageable, candy decorating is the obvious choice.
Cost and Time: What to Realistically Expect
Average Cost to Make a Candy Cake at Home
Three to four standard Kit Kat bars for the border costs roughly $5 to $8. Adding M&Ms and gummies for the top brings the total candy spend to around $12 to $20 for a reasonable design. A heavily loaded cake with multiple candy types can reach $30 to $40 in candy costs.
Baking from scratch adds about $8 to $15 in ingredients. Buying a plain frosted cake from a bakery to decorate at home is another option and usually costs $15 to $25. It saves a few hours and keeps the base quality consistent if baking is not your strength.
How Long Does It Actually Take?
Baking and cooling takes two to three hours. Frosting and chilling takes around 45 minutes. The actual decorating takes 20 to 40 minutes once everything is ready. Starting from scratch, expect four to five hours total. Starting from a store-bought cake, you are looking at closer to one to two hours.
Is It Cheaper to Buy One or Make One?
A custom candy cake from a bakery typically runs $60 to $150 depending on size and complexity. Making one at home with similar visual impact costs $25 to $50 all in. For a party on a budget, the DIY version is a straightforward win.
What Most People Get Wrong About Candy Cakes
The most common mistake is thinking more candy always means a better cake. People load every inch of the surface with as many types of candy as possible and end up with something that looks cluttered rather than impressive.
The cakes that actually get shared and praised are the ones where someone thought about placement. A tidy Kit Kat fence, a clean pour of M&Ms, and three Ferrero Rocher placed on top deliberately looks far better than fifteen different candy types competing for attention across the same surface.
Think of it the way a cook thinks about seasoning. The right amount in the right place makes everything better. Piling on more of everything does not improve the result.
Conclusion
Candycakes are one of those projects that look harder than they are. Once you know which candy to use, how to prep the frosting properly, and what pitfalls to watch for, the whole process comes together quickly. Start simple on your first attempt. Nail the Kit Kat border and a clean top design before going elaborate. Most people are surprised by how good their first one turns out.
FAQs
Does candy melt on a cake?
Chocolate candy softens and melts if the cake sits in a warm room for too long. Gummies and hard candy are more heat-stable but will become sticky and start weeping in humid conditions. Keeping the cake refrigerated until about 30 minutes before serving handles this for most situations.
How far in advance can you decorate a candy cake?
Chocolate-based candy can go on the night before if the cake is kept refrigerated. Gummies and hard candy should be added within two to three hours of serving to avoid color bleeding and texture issues.
What frosting works best for sticking candy?
American buttercream, made with butter and powdered sugar, is the most reliable choice. It firms up properly in the fridge and holds candy securely. Whipped cream frosting, cream cheese frosting, and loose ganache are not suitable because they are too soft to grip candy well.
Can you use any candy on a cake?
Most candy works fine, but a few types cause problems. Dark and red gummies bleed dye into frosting. Very heavy pieces sink into soft buttercream. Unwrapped hard candy gets sticky in humidity. Chocolate bars, M&Ms, Skittles, and gummy pieces are the most reliable options for home bakers.
How do you store a candy cake overnight?
Place the cake in a box or cover it loosely with plastic wrap so the covering does not press into the decoration. Store it in the refrigerator. Take it out 20 to 30 minutes before serving so it comes up to room temperature, which improves both the flavor and the texture of the frosting.
Spotted “herring roe” on a menu and had no idea what it was? Most people have been there. It is the egg mass of the herring fish, eaten across many cultures for centuries. By the end of this article, you will know exactly what it looks like, how it tastes, where to buy it, and how to cook it at home with no confusion.
What Is Herring Roe, Simply Put
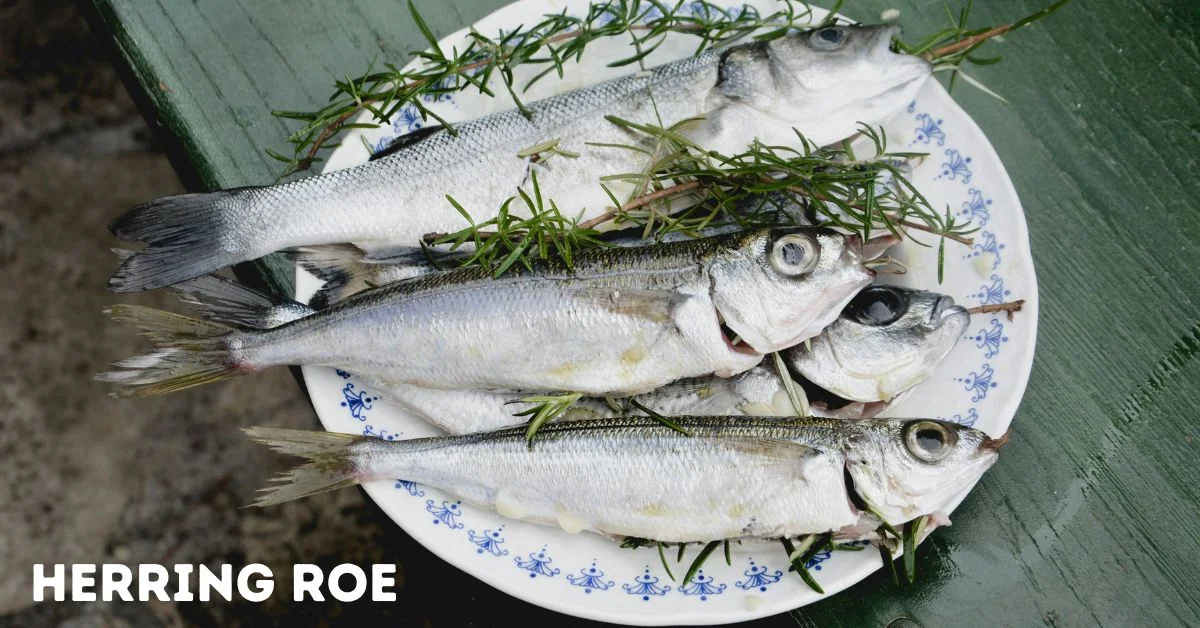
Herring roe is the egg sac of a female herring fish. It looks like a firm, pale yellow or golden block of tightly packed tiny eggs. The flavor is mildly briny, the texture is slightly firm, and the smell is much gentler than most people expect. It is not pungent or overwhelmingly fishy. Think of it as somewhere between a mild fish and a lightly salted seafood snack.
What Exactly Is Herring Roe
Most people who come across herring roe have seen a photo or heard the name but have never actually held one in their hands. That unfamiliarity is the real barrier, and it is worth clearing up before anything else.
The roe comes as a sac, which is a thin membrane holding hundreds of tiny eggs together. Fresh herring roe looks like a soft, slightly translucent pouch. When salted or cured, it becomes firmer and takes on a deeper golden color. Frozen roe is usually sold in blocks or trays and looks similar to fresh once thawed.
The smell is mild when fresh. It has a clean ocean scent, not a strong fishy odor. If the roe smells sharp or sour, that is a sign it is past its best. Good fresh roe should smell lightly of the sea, nothing more.
The taste tends to surprise people in a good way. It is subtly salty, slightly oceanic, and has a gentle pop when you bite into it. If you have eaten tobiko on sushi, herring roe has a similar mild quality but with a firmer, meatier texture.
Read aslo: Squid Ink Tonnarelli: How to Cook It Perfectly Without Ruining the Flavor
Fresh, Frozen, and Salted: How Each Form Differs
Fresh herring roe is soft, delicate, and has the most neutral flavor. It is seasonal, generally available from late winter through spring. It cooks quickly and can fall apart if handled too roughly, so treat it gently.
Frozen herring roe is the most widely available form outside of coastal areas. It usually comes in cube trays or vacuum-sealed blocks. The texture after thawing is very close to fresh, and for most cooking purposes it works just as well. Thaw it slowly in the fridge overnight rather than running it under water.
Salted herring roe, known as kazunoko in Japanese cuisine, is cured in salt brine. This process firms up the texture considerably and deepens the flavor. Before eating, it needs to be soaked in lightly salted water for several hours to draw out the excess salt. The result is chewy, firm, and full of umami.
Herring Roe vs Fish Roe in General
Fish roe simply means fish eggs, and there are many varieties. Salmon roe is large, orange, and juicy. Tobiko is tiny and crunchy. Caviar comes from sturgeon and is considered a luxury product. Herring roe is different because the whole sac is eaten together rather than individual loose eggs, which gives it a unique texture. It is also far more affordable than most other types of roe and has a longer history as an everyday home cooking ingredient.
Where to Buy Herring Roe and What to Look For
Where you find herring roe depends on where you live. In coastal cities and areas near fishing communities, fresh roe shows up at fish markets in late winter and early spring. Asian grocery stores, particularly Japanese supermarkets, often carry it year-round in salted or frozen form. Online seafood retailers also ship frozen roe directly to your door.
Fresh vs Frozen vs Canned
Fresh roe is the best option if you can find it and plan to use it within a day or two. It cooks beautifully and has a clean, light flavor. The downside is that it is only available during herring spawning season, which typically runs from February through April depending on the region.
Frozen roe is the most practical choice for most home cooks. It is available year-round, thaws well, and the quality difference from fresh is small when cooked. Look for vacuum-sealed packaging with no ice crystals inside the bag, as crystals are a sign it has been thawed and refrozen at some point.
Canned or jarred herring roe exists but is less common. When you do find it, it is usually packed in brine or seasoning. It works as a condiment or topping but does not substitute well for fresh or frozen in a proper cooked dish.
Seasonal Availability Explained Simply
Herring spawn in large numbers in late winter and early spring, and that is when the roe is harvested. Along the Pacific coast of North America, particularly in Alaska and British Columbia, the season peaks around February and March. In the Atlantic it varies slightly by location. If you want the freshest possible roe, that is the window to go looking. Outside that period, frozen is your reliable option.
Signs of Quality When Buying
Good fresh roe has a pale golden or cream color and holds its shape without falling apart. The membrane should be intact and unbroken. The smell should be clean and ocean-fresh. Avoid anything with a gray tinge, a leaking sac, or a sour smell. For frozen roe, the packaging should be tightly sealed with no visible frost damage or discoloration inside.
How Different Cultures Eat Herring Roe
This is the part most articles completely skip, which is a shame because it is genuinely interesting. The same ingredient gets treated in very different ways around the world, and knowing that actually helps you understand what you are working with.
Japan: Kazunoko and the New Year Tradition
In Japan, herring roe is called kazunoko and carries real cultural weight. It is one of the key foods eaten during New Year celebrations as part of the traditional osechi ryori feast. The name loosely connects to a wish for many children and family prosperity, which is why it has held this ceremonial place for so long.
Kazunoko is made from salted herring roe that gets desalinated through soaking and then marinated in a dashi-based broth with soy sauce and mirin. The result is firm, chewy, savory, and deeply satisfying. It is usually served cold in small pieces as part of a composed holiday spread.
Pacific Northwest: Roe on Kelp and Pan-Fried Sac
Along the Alaska and Oregon coastlines, herring roe has a completely different character. During spawning season, herring lay their eggs directly onto kelp beds. This roe-on-kelp is harvested and considered a delicacy by Indigenous communities in the region. It is often eaten raw, lightly blanched, or pickled with soy sauce. The kelp underneath adds a natural depth that pairs really well with the mild roe.
Pan-fried herring roe sac is also popular here. The whole sac gets dusted in flour and fried until golden and crispy on the outside while staying soft inside.
Scandinavia and Northern Europe
In Scandinavian countries, herring has been a staple food for hundreds of years, and the roe is no exception. It is typically eaten salted, smoked, or as part of pickled herring preparations. Norwegian and Swedish recipes sometimes use it as a spread on crispbread or folded into simple pan dishes with butter and onion. The approach is rustic and unfussy, built around clean simple flavors.
Quick Comparison by Region
Japan uses salted, marinated roe with a firm chewy texture and deep savory flavor, traditionally served cold as part of a ceremonial meal. The Pacific Northwest uses fresh roe on kelp or pan-fried sac with a lighter, natural seafood flavor. Scandinavia leans toward salted, pickled, or smoked preparations with a stronger character meant to complement bread and simple sides.
How to Prepare and Cook Herring Roe Step by Step
Cooking herring roe for the first time is straightforward. The pan-frying method is the easiest starting point and gives reliable results every time.
Step 1: Cleaning and Rinsing
With fresh roe, rinse it gently under cold water and pat it dry with a paper towel. Be careful because the membrane tears easily if you handle it too roughly. For frozen roe, thaw it overnight in the fridge, then rinse and pat dry. For salted roe, soak it in lightly salted water for four to six hours and change the water a couple of times during that process to pull out the excess salt.
Step 2: Pan-Frying
Heat a non-stick pan over medium heat and add a tablespoon of butter or a neutral cooking oil. Lightly dust both sides of the roe sac with a small amount of flour. This creates a light crispy coating while keeping the inside soft and moist. Place the roe in the pan and cook for three to four minutes per side without moving it around much. You want a golden crust to develop. The roe is ready when it feels firm to the touch and looks golden brown on both sides. Pull it off the heat quickly because it dries out fast if left too long.
Step 3: Serving
A squeeze of lemon juice and a pinch of sea salt is all you really need. A dipping sauce of soy sauce with grated ginger is a classic match that works incredibly well. Some people serve it on toast with butter, similar to smoked salmon. It also goes well with steamed rice, pickled vegetables, or a simple salad.
Common Mistakes to Avoid
Overcooking is the most common mistake. Herring roe turns dry and rubbery very quickly, so take it off the heat a little earlier than you think rather than waiting too long. Using high heat is another problem because it burns the outside before the center warms through. Medium heat throughout is the right approach. Also, go easy on the salt. The roe already has natural saltiness, especially if it was frozen or salted, so taste before you season.
Nutrition and Health Benefits of Herring Roe
Herring roe has a genuinely strong nutritional profile. It is high in omega-3 fatty acids, which support heart health, brain function, and reduced inflammation. A small serving gives you a solid dose of these fats without the calorie load that comes with fatty fish fillets.
It also contains good amounts of protein, vitamin D, vitamin B12, and phosphorus. Vitamin B12 is particularly useful for people who do not eat much red meat, as it is hard to get through plant-based foods alone. The combination of protein and healthy fat makes herring roe surprisingly filling for its size.
Compared to salmon roe, it delivers a similar omega-3 profile at a lower price. Compared to capelin roe, it has a slightly larger sac and a milder flavor. For nutritional value relative to cost, herring roe is one of the better seafood options you can find.
What Most People Get Wrong About Herring Roe
A lot of people assume herring roe has a strong, pungent flavor that only adventurous eaters would enjoy. That assumption comes from mixing it up with heavily pickled or preserved herring dishes, which do have a sharp taste. Fresh or lightly prepared herring roe is actually mild, clean, and easy to enjoy even if you are not a regular seafood eater.
The second wrong assumption is that it is hard to cook. It really is not. A fresh roe sac dusted in flour and pan-fried in butter for a few minutes is one of the simplest seafood dishes you can make at home. The actual effort is minimal.
People also tend to think it is expensive or difficult to track down. Fresh roe during season can carry a higher price, but frozen herring roe is affordable and available year-round at most Asian grocery stores.
Conclusion
Herring roe is the kind of ingredient that seems unfamiliar right up until the moment you actually cook it. Once you do, the process feels simple and the result is genuinely good. Pan-fry a fresh sac with a little butter, squeeze some lemon over it, and you have a meal that most people would not expect from something that sounded so unfamiliar. Give it one honest try and you will probably come back to it again.
FAQs
Can you eat herring roe raw?
Yes, it can be eaten raw In Japan and parts of the Pacific Northwest, raw or lightly blanched preparations are completely normal. If you plan to eat it raw, make sure it is very fresh or sashimi-grade. Properly thawed frozen roe can also be used in raw preparations in certain recipes.
What does herring roe taste like?
It has a mild, lightly salty, and gently oceanic flavor. The texture is firm but not tough, with a soft pop when you eat it. Most first-timers are surprised by how subtle and pleasant it actually is compared to what they expected.
Is herring roe expensive?
Fresh herring roe during season is moderately priced, in line with other fresh seafood. Frozen herring roe is quite affordable and easy to find year-round. Kazunoko tends to cost more because of the curing and marinating process involved, and prices go up around the Japanese New Year when demand increases.
How long does fresh herring roe last in the fridge?
Use it within one to two days of buying it. Keep it in an airtight container in the coldest part of your fridge. If you cannot use it in time, freeze it right away rather than leaving it to sit.
What is the difference between herring roe and kazunoko?
Herring roe is the general name for the egg sac of a herring fish. Kazunoko is a specific Japanese preparation where the roe is salted, soaked to remove that salt, and then marinated in a seasoned dashi broth. Kazunoko ends up firmer and more flavorful than plain fresh herring roe.

Picture someone in your head who eats “super healthy.” Chances are you imagined green smoothies, expensive powders, and a fridge that looks like a farmer’s market. That version exists, but it is not what being a super foodie actually means for most people.
A super foodie is someone who genuinely loves food and also pays attention to what it does for their body. Not obsessively. Not expensively. Just intentionally. This guide will walk you through what that looks like in real life, what their kitchen looks like, and how you can start without changing everything at once.
The Real Meaning of “Super Foodie”
A super foodie is not on a diet. They have not banned entire food groups or memorised a list of approved ingredients. They have just built a way of eating that is both satisfying and nourishing at the same time.
They get excited about food the way a regular foodie does, but they also care about how it makes them feel. That combination is what sets them apart.
Think of it as a middle ground. A regular foodie chases flavour and new experiences. A health nut chases rules and results. A super foodie genuinely wants both, and they have figured out that the two do not have to compete.
Featured Snippet Answer
A super foodie is someone who loves exploring food and also makes thoughtful choices about nutrition. They are not on a strict diet or following a set of rules. They simply eat with curiosity and intention, choosing whole, nourishing foods most of the time while still enjoying what they eat.
Read also: Vegetable du Jour: What It Means and How to Use It
Foodie vs. Health Nut vs. Super Foodie
These three get mixed up all the time, but the difference is actually pretty clear once you look at how each one thinks about food.
A regular foodie eats for pleasure, culture, and experience. If something tastes amazing, they will eat it. Nutrition rarely enters the conversation.
A health nut approaches food more like a system. Macros, food groups, rules, and outcomes. Enjoyment can feel like a secondary concern.
A super foodie does not fit cleanly into either. They get genuinely excited finding a new ingredient like black garlic or moringa. But they also want to know it offers something real nutritionally. They read labels sometimes, but they also cook just for the joy of it. They prioritise whole foods, but they will eat a great taco without guilt or mental calculation.
The mindset is the real difference. A super foodie does not treat health and enjoyment as a trade-off.
The 3 Core Traits That Define a True Super Foodie
Curiosity comes first. Super foodies are always discovering something new, whether that is an ingredient they have never cooked with or a cuisine they have not explored yet. They do not eat the same rotation of ten meals and call it done.
Intention comes second. This does not mean every meal is planned or calculated. It means there is awareness behind the choices. Over time they have learned what actually makes them feel better, and that knowledge quietly shapes what they reach for.
Flexibility comes third, and this one matters most for longevity. A super foodie does not spiral after eating something indulgent. They do not stress at dinner parties or avoid restaurants because the menu is not “clean” enough. Their approach works with real life, which is exactly why it sticks.
Why Becoming a Super Foodie Is Harder Than It Looks
This part rarely gets talked about. Most content just lists superfoods or explains their benefits. Nobody really addresses why people try this lifestyle for a couple of weeks and then quietly abandon it.
The honest answer is that there are some real friction points at the start, and knowing about them upfront makes a big difference.
The “Healthy but Boring” Trap
When people decide to eat better, they usually default to the same small set of “safe” foods. Plain chicken. Brown rice. Steamed broccoli. On repeat. Nutritionally it works fine. Motivationally it falls apart within days.
The super foodie approach only works long term if the food is actually enjoyable. Treating healthy eating like punishment is the fastest way to fail at it. If your meals feel like something you are tolerating rather than something you chose, the habit will not last.
The shift is treating nutritious ingredients the same way a foodie treats a new restaurant. With interest and curiosity rather than obligation. Try black bean pasta. Roast turmeric-spiced chickpeas. Make avocado toast with a poached egg and chili flakes. The goal is food you look forward to that also happens to be good for you.
Why Superfoods Alone Do Not Make You a Super Foodie
Buying a bag of chia seeds and sprinkling them on everything does not make someone a super foodie. That just makes them someone who bought chia seeds.
The identity is not about consuming a checklist of approved ingredients. It is about how you relate to food overall. Someone eating a balanced, colourful, mostly whole-food diet with genuine cooking knowledge is far more of a super foodie than someone adding spirulina powder to an otherwise ultra-processed lifestyle.
Superfoods are tools. They are not the whole approach.
The Budget Problem and How Real Super Foodies Handle It
Healthy eating has earned a reputation for being expensive, and in some cases that is fair. But most of the expensive stuff is optional, not essential.
Frozen berries are just as nutritious as fresh ones and cost significantly less. Lentils, oats, eggs, tinned sardines, and frozen spinach are genuinely among the most nutrient-dense foods available anywhere, and none of them are hard on the wallet. The fancy powders and boutique supplements are additions, not requirements.
If cost is a concern right now, build the foundation on affordable whole foods. The extras, if you ever want them, can come much later.
The Super Foodie Kitchen
You do not need a full kitchen overhaul. You mostly need a few reliable staples and a willingness to make some quiet swaps over time.
10 Pantry Staples Every Super Foodie Keeps Stocked
Rolled oats are one of the most flexible and nutritious breakfast options you can have. Lentils and chickpeas offer plant-based protein and fibre at a very low cost. Tinned wild salmon or sardines give you omega-3s with zero effort. Olive oil is the everyday cooking fat that genuinely earns its place on the shelf.
Dark leafy greens like spinach, kale, and rocket work in almost any meal. Walnuts, flaxseed, and pumpkin seeds add healthy fats and texture wherever you need them. Garlic and ginger are flavour staples that also bring real nutritional value. Turmeric is cheap and useful in more dishes than most people realise. Frozen mixed berries go into smoothies, yoghurt, or oats with no effort. And eggs remain one of the most affordable, complete, and versatile foods available.
These ten cover the majority of what a super foodie actually eats on a regular basis.
What to Ditch and What to Swap
Small swaps are more sustainable than dramatic overhauls. A few simple changes, made consistently, produce real results over time.
Swap white rice for cauliflower rice, or start by using a mix of both. Replace sugary breakfast cereal with overnight oats or a quick egg scramble with vegetables. Use Greek yoghurt instead of sour cream. Choose sparkling water with lemon over fizzy drinks. Reach for dark chocolate over milk chocolate when something sweet sounds good.
None of these feel like a big sacrifice in the moment. Over months, they add up to something significant.
How to Eat Like a Super Foodie Without Overhauling Your Life
Trying to change everything at once is the most common mistake, and also the one most likely to end in giving up. Lasting habits do not usually come from a total reset.
A Day in the Life of a Super Foodie
Mornings tend to start with something quick and filling. Overnight oats with frozen berries, a handful of walnuts, and a spoon of almond butter. Or scrambled eggs with spinach on whole grain toast. Either takes under ten minutes and keeps hunger away for hours.
Lunch is often leftovers from the night before, a big salad with tinned salmon and olive oil, or a batch of lentil soup made over the weekend. The common thread is that it is real food, not something from a packet with a long list of ingredients that are hard to identify.
Dinner is where flavour becomes the priority. Roasted vegetables with spiced chickpeas. A simple stir-fry with ginger, garlic, and whatever greens need using. A salmon fillet with sweet potato and broccoli. Nothing technically difficult. Just real ingredients cooked with some thought.
Snacks are planned rather than grabbed out of desperation. A banana with peanut butter. A small handful of mixed nuts. Greek yoghurt with honey. These keep blood sugar stable and prevent the kind of hunger that tends to lead to poor choices.
5 Simple Habits to Start This Week
Add one vegetable to every meal, even if it is just a handful of spinach stirred into pasta or eggs. Drink water first when you feel hungry between meals before reaching for anything else. Cook in batches on the weekend so weekday meals take almost no effort. Pick one new ingredient to try this week and just one so it stays manageable. Replace one ultra-processed snack each day with something whole, like fruit, nuts, or yoghurt.
None of these feel transformative individually. Combined over time, they genuinely are.
Super Foodie Meal Ideas That Actually Taste Good
Shakshuka, which is eggs poached in spiced tomato sauce, takes around twenty minutes and is genuinely satisfying. Turmeric-roasted cauliflower with tahini drizzle sounds impressive but uses four ingredients. A grain bowl with farro, roasted sweet potato, avocado, and a boiled egg is filling and colourful. Black bean tacos with pickled red onion and lime yoghurt taste like something from a decent restaurant. Miso-glazed salmon with edamame and brown rice comes together in under twenty minutes.
These are not sad, pale health meals. They are genuinely good food that happens to be nutritious.
Super Foodie Recipes for Beginners
Quick Breakfasts Under 10 Minutes
Overnight oats require no cooking at all. Combine half a cup of rolled oats with your milk of choice, a tablespoon of chia seeds, a spoon of nut butter, and whatever fruit you have available. Leave it in the fridge overnight and breakfast is already done by morning.
A green smoothie with frozen spinach, frozen mango, a banana, and almond milk takes about three minutes to blend. The banana and mango completely overpower the spinach flavour, which is genuinely useful for anyone who struggles to eat greens.
Scrambled eggs with cherry tomatoes and baby spinach takes around eight minutes on medium heat. Add a pinch of chili flakes and a slice of whole grain toast and you have a breakfast that holds you for four to five hours.
Snacks That Pull Double Duty
Apple slices with almond butter give you fibre, healthy fat, and natural sugar together. A small portion of hummus with cucumber and carrot sticks is filling and almost effortless to prepare. A handful of mixed seeds and dried fruit travels well and needs no preparation at all. Greek yoghurt with a teaspoon of honey and some walnuts takes thirty seconds and covers protein and healthy fats in one go.
One-Bowl Dinners Worth Making
A lentil and vegetable stew with tinned tomatoes, red lentils, spinach, cumin, and garlic takes thirty minutes and easily makes four servings. A Buddha bowl using whatever roasted vegetables you have, a protein, some cooked grains, and a simple tahini dressing comes together in about twenty minutes. Spiced chickpea and sweet potato curry with tinned coconut milk is one of the most satisfying things you can make on a tight budget.
What Most People Get Wrong About Being a Super Foodie
The most common misconception is that it is all about which specific foods you eat. People spend energy worrying about whether they are getting enough of the right superfoods and completely miss what actually matters.
No single food makes or breaks anyone’s health. What matters is the consistent pattern over weeks and months. Someone eating varied, colourful, mostly whole food around 80 percent of the time, and enjoying whatever they like the rest of the time, will do far better than someone who eats perfectly for three weeks and then crashes back to old habits entirely.
The other mistake is waiting until you feel ready or informed enough to begin. People research extensively, follow countless health accounts, and buy books, but never actually change what they eat. The real learning comes from cooking and trying things. Buying one new ingredient this week and cooking one new recipe is more valuable than another hour of reading about nutrition.
Conclusion
Being a super foodie is not a phase or a strict programme. It is just a way of relating to food that treats eating as something worth doing well, without making it stressful or joyless.
Pick one small thing to change this week. One swap, one new ingredient, one home-cooked meal you would not normally make. That is a more honest starting point than any dramatic reset.
FAQs
Is being a super foodie expensive?
It does not have to be. Lentils, eggs, oats, frozen vegetables, sardines, and bananas are among the most nutritious foods available and also among the most affordable. The expensive side of healthy eating is entirely optional. Starting with affordable whole foods is enough.
Do I need to give up my favourite foods?
No, and in most cases you should not try to. Cutting out foods you genuinely enjoy tends to backfire. The super foodie approach focuses on adding more good things rather than eliminating what you love. When your diet is already full of satisfying, nourishing food, the less healthy stuff naturally takes up less space over time.
What is the difference between superfoods and regular healthy food?
Superfoods is mostly a marketing label applied to foods with high concentrations of specific nutrients. Many ordinary vegetables and fruits offer comparable benefits. Broccoli, carrots, and apples are not marketed as superfoods but they are excellent for your health. The label is not worth chasing.
Can kids or seniors follow a super foodie lifestyle?
Yes, and the core of it looks the same for any age. Colourful whole foods, minimally processed meals, and genuine enjoyment of eating are good principles at every stage of life. Children who grow up around varied, interesting food tend to develop much healthier relationships with eating long term.
How long before I notice a difference?
Most people notice improved energy and digestion within two to three weeks of eating more whole foods consistently. Changes in weight, skin clarity, and mood typically take a few months to become obvious. The timeline varies, but the direction stays consistent as long as the habits do.
Let me be honest with you I spent a good amount of time ruining quesadillas at home before I figured out what was actually going wrong. They would come out soggy, or the filling would slide out the moment I tried to flip them, or the cheese would barely melt while the outside was already burnt. Sound familiar? If you have been trying to recreate that perfectly stuffed, crispy, melty quesadilla rellena you had at a Mexican restaurant, this guide is going to clear up every bit of confusion. We are going to cover the right ingredients, the best filling combinations, and the actual technique that makes it work every single time.
Featured Snippet Answer
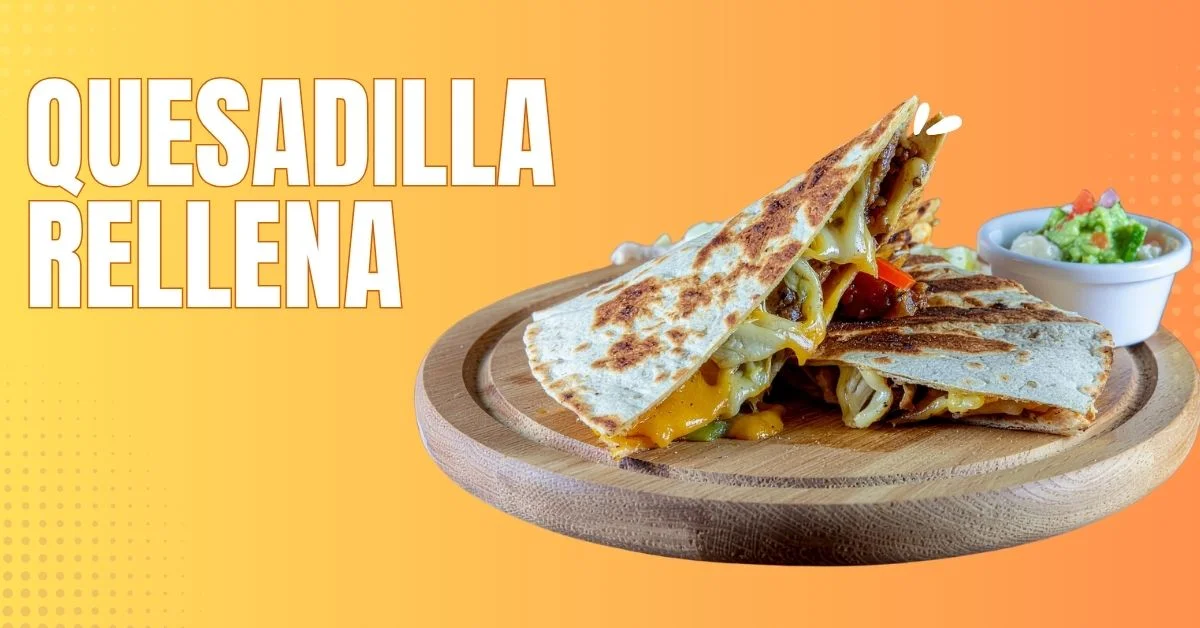
A quesadilla rellena is a stuffed quesadilla filled with a generous layer of cheese, meat, vegetables, or a combination of all three. Unlike a basic quesadilla, the rellena version focuses on a thick, flavorful filling sealed inside a tortilla and cooked until the shell is crispy and the inside is fully melted through.
What Makes a Quesadilla “Rellena” Different
Rellena vs. regular quesadilla
“Rellena” simply means “stuffed” or “filled” in Spanish, so technically every quesadilla is a little rellena. But in real life, a quesadilla rellena is something you put real effort into, where the filling is the main event rather than just a thin layer of cheese melted between two tortillas. A regular quesadilla is quick and minimal, often thrown together with whatever is left in the fridge. A rellena version has a proper filling prepared separately with seasoning, and the whole thing is assembled carefully so nothing leaks out during cooking. That distinction sounds small at first but it honestly changes everything about the final result.
Read also: Vegetable du Jour: What It Means and How to Use It
Why the filling ratio changes everything
Here is the thing most people do not hear enough. Going too heavy on the filling is where everything falls apart, literally. When you overstuff, the tortilla cannot press flat against the pan, the edges cannot seal, and everything spills the moment you try to flip it. A good rule of thumb is to fill no more than half the volume the tortilla can naturally hold when folded, generous but manageable, not crammed to the absolute limit.
Ingredients You Need
Best tortilla type to use
Flour tortillas are the go-to choice for quesadilla rellena because they are more flexible, seal better at the edges, and hold up under a heavier filling without cracking apart. If you prefer corn tortillas for that more authentic flavor, use smaller ones and keep the filling lighter so they do not split when you fold them. For the best surface area, a 10-inch flour tortilla is ideal, and store-bought works perfectly fine as long as it is fresh and the edges have not dried out before you start.
Cheese options that melt properly
Not all cheese melts the same way, and this detail matters way more than most people think. Oaxaca cheese is the top pick because it stretches beautifully without turning greasy and has a mild flavor that works with almost any filling. Chihuahua cheese is rich and creamy with a slightly buttery taste that makes the inside feel genuinely indulgent. Monterey Jack is the easiest to find and melts evenly every time, making it a solid and reliable option. Mozzarella works in a pinch and gives you that satisfying stringy pull when you cut through. One small tip worth remembering is to skip the pre-shredded cheese when you can, because the anti-caking powder coating that keeps it from clumping also stops it from melting as smoothly in the pan.
Filling combinations ranked by popularity
Oaxaca cheese with rajas and corn is the classic that shows up on most Mexican restaurant menus. Seasoned ground beef with cheese and jalapeños is the heartier option that most home cooks try first. Chile relleno style with roasted poblano peppers and white cheese is the more traditional preparation and honestly one of the most rewarding to make. Shredded chicken with black beans and salsa gives you something lighter but still very satisfying. Mushrooms with epazote and cheese work beautifully as a vegetarian version that does not feel like a compromise at all.
The Mistakes Most People Make
This is the part most recipe sites skip entirely, and I genuinely think it is the main reason your homemade version never quite matches what you get at a good restaurant. I spent way too long making the same mistakes before someone finally explained the technique properly, so let me save you that frustration.
Over-stuffing and why your quesadilla falls apart
If you pile in too much filling, the tortilla edges simply cannot reach each other, and when you go to flip it, everything pushes out from the sides and you end up with a messy pan. Fill one half of the tortilla, leave at least a half-inch border along the curved edge before folding, and that border is what seals the whole thing and keeps it together during cooking.
Wrong heat level means soggy or burnt
Many home cooks crank up the flame thinking it will crisp up faster, but what actually happens is the shell chars while the inside stays cold and unmelted. Medium heat is the right call every time, giving the tortilla time to slowly turn golden while the interior heats all the way through in about three to four minutes per side. On the other end, heat that is too low gives you a pale and limp shell with zero crispiness, so the pan should be hot enough that the tortilla sizzles gently the moment it touches the surface.
The sealing technique most home cooks skip
After folding the tortilla over the filling, press down gently with a wide spatula for the first 30 seconds on each side, which helps the edges fuse together and stops the filling from shifting around while it cooks. If you are working with a particularly wet or heavy filling, pressing the edges lightly together before the quesadilla even goes in the pan gives you extra security against any leaks.
Step-by-Step: How to Make Quesadilla Rellena
Preparing your filling in advance
Never add raw filling straight from a hot pan into your tortilla because if your meat or vegetables are still steaming, they will create moisture inside and soften the shell from the inside out before it even has a chance to crisp. Cook your filling first, let it cool for a few minutes, and then start assembling, because this single step alone makes a dramatic difference in the final texture.
Assembling without overfilling
Lay your tortilla flat and spread cheese over one half only, leaving a half-inch border around the edge, then add your filling on top of the cheese layer and keep it even without piling it too high. Add a thin second layer of cheese on top of the filling because this top layer acts as a binder that holds everything together once it melts. Fold the empty half over the filled side and press gently along the edges before it goes anywhere near the pan.
Cooking it on a skillet
Heat a dry skillet or comal over medium heat with no oil needed unless your pan is not non-stick, then place the folded quesadilla in the pan and press lightly with a spatula. Cook for three to four minutes until the bottom is a nice even golden and the curved edge looks firm and set, then flip carefully using a wide spatula and cook another three minutes on the second side. You will know it is done when both sides are evenly golden and the cheese is just starting to ooze very slightly at the edges.
How to flip without losing the filling
Slide your widest spatula fully under the quesadilla before lifting, then flip in one confident and committed motion rather than hesitating halfway through. If your quesadilla is on the larger side, use two spatulas to support the full length of it, because a slow and uncertain flip is almost always the reason the filling slides out.
Best Filling Variations to Try
Classic cheese and chile relleno style
Roast the poblanos directly over a gas flame or under the broiler until the skin is charred all over, then place them in a covered bowl for 10 minutes so the steam loosens the skin. Peel them, remove the seeds, and cut into strips called rajas, then add these inside the quesadilla with Oaxaca or Chihuahua cheese for a filling that is smoky, slightly spicy, and deeply satisfying.
Quesadilla rellena con carne
Season ground beef with cumin, garlic, a pinch of chili powder, and salt, then cook until fully browned and let it cool slightly before using. Adding a layer of refried beans as the base inside the tortilla before adding the beef makes the whole filling more cohesive and adds a creaminess that pairs really well with the crispy shell.
Vegetarian version with roasted vegetables
Roast zucchini, bell pepper, and red onion with olive oil, salt, and cumin at high heat until slightly caramelized and tender, then let them cool before adding inside the tortilla with Monterey Jack cheese. A spoonful of black beans adds extra texture and protein, making this version feel genuinely complete rather than like a side dish pretending to be a meal.
Spicy version for heat lovers
Combine chorizo cooked in a dry pan with diced jalapeños and pepper Jack cheese, and since the chorizo releases its own fat during cooking, no extra oil is needed at all. The result is intensely flavorful with a slow heat that builds after a few bites, so serve with cold crema on the side to balance out the richness.
What to Serve With Quesadilla Rellena
Salsas and dips that complement it
Salsa roja is the classic pairing and works with almost every filling combination you can think of, while avocado crema made from blended avocado, sour cream, lime juice, and salt cuts through the richness of a heavier filling beautifully. Pico de gallo works really well on the side when the filling is on the spicier end, since the fresh tomato and cilantro give a cooling contrast without competing with the main flavors.
Side dishes that round out the meal
Mexican rice with a tomato base is the most natural partner on the plate, and refried black beans with a sprinkle of cotija cheese add a creamy and salty contrast that works really nicely alongside it. A simple cabbage slaw dressed with lime juice and salt gives you something light and crunchy to balance all that richness, and pickled jalapeños on the side let everyone at the table adjust the heat level to whatever they prefer.
What Most People Get Wrong About Quesadilla Rellena
Let’s be honest, most people treat a quesadilla rellena like a regular quesadilla and just throw in more filling, and that is the core misunderstanding right there. The difference is not just in quantity but in technique, because a properly made quesadilla rellena needs the filling to be pre-cooked and slightly cooled before assembly, cheese layered on both sides of the filling rather than only underneath, and steady moderate heat throughout the entire cooking time. Most people also skip the resting step entirely, but after the quesadilla comes off the heat, letting it sit for a full minute before cutting allows the cheese to firm up slightly so the filling stays in place when you slice through instead of sliding out everywhere.
Conclusion
Here is what I want you to take away from all of this. Making a great quesadilla rellena at home is completely within reach, but the small details are what separate a good one from one that falls flat. Cool your filling before assembly, layer cheese on both sides of it, keep the heat steady at medium, and let it rest for one minute before you cut into it. That last step sounds almost too simple to matter, but it genuinely changes things.
Start with the classic roasted poblano and cheese version to get comfortable with the technique, and once that clicks, move into heartier fillings like carne or spicy chorizo. You will find that each time you make it, something improves just slightly without you even trying. And the day you bite into one that genuinely rivals your favorite restaurant version, you will wonder why you ever doubted yourself in the kitchen.
FAQs
Can I use store-bought tortillas for quesadilla rellena?
Yes, store-bought flour tortillas work great as long as they are soft and pliable. Warm them briefly in a dry pan for about 20 seconds per side before assembling so they fold without cracking.
How do I keep my quesadilla rellena from getting soggy?
Let your filling cool completely and drain any extra liquid from vegetables or beans before assembling. A dry and properly heated skillet also helps create the crispy exterior that keeps the shell firm.
Can I make quesadilla rellena ahead of time and reheat it?
You can prepare the filling up to two days in advance and store it in the fridge. If you have leftover cooked quesadilla, reheat it in a dry skillet over low to medium heat rather than the microwave, which turns the shell rubbery within minutes.
What is the best cheese for melting inside a quesadilla rellena?
Oaxaca cheese is the best option because it melts slowly, stretches without turning greasy, and works with almost any filling. If you cannot find it, Monterey Jack melts cleanly and is available almost everywhere.
Is quesadilla rellena the same as a chile relleno quesadilla?
Not exactly. A chile relleno quesadilla uses a roasted pepper filling specifically, while quesadilla rellena is a broader term covering any generously stuffed quesadilla with all kinds of different fillings.
-

 Tech2 weeks ago
Instatroid Explained: Easy & Safe Instagram Viewer Guide
-

 Food2 weeks ago
Cuts of Steak: Complete Guide to Beef Cuts
-

 Food2 weeks ago
Wagyu Beef Price per Pound: Complete Cost Guide
-

 Food2 weeks ago
What Is Andouille Sausage? Complete Guide
-

 Food2 weeks ago
Shirleys Coffee Shop Guam Locations Menu and Guide
-

 Food2 weeks ago
Ultimate Tripas Recipe and Cooking Guide
-

 Tech2 weeks ago
DemonScans Review: Is It Safe for Manga Readers?
-

 Food2 weeks ago
Italian Ice Flavoring Guide: Flavors, Bases, and Recipes