
Food
Easy Recipe for Mediterranean Fish
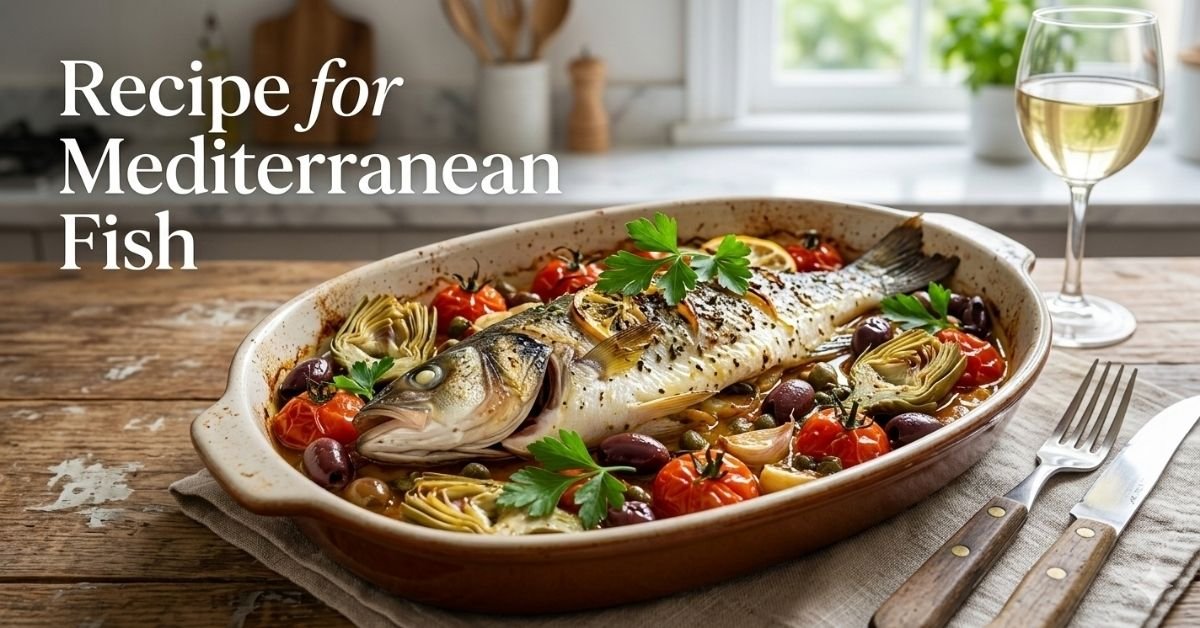
If you’ve been looking for a dinner that feels fancy but takes almost no effort, you’re in the right place. This recipe for Mediterranean fish has become one of my go-to meals, and I make it on repeat. We’re talking tender white fish, juicy cherry tomatoes, salty olives, and herbs that fill your kitchen with the best smell. It’s the kind of dish that looks impressive but is actually beginner-friendly.
Here’s the thing: cooking Mediterranean-style fish isn’t just about following steps blindly. Once you understand how the lemon, garlic, and olive oil work together, you’ll start riffing on this recipe like a pro. I’ll also walk you through choosing the right fish, timing everything perfectly, and a few swaps for when you don’t have every ingredient on hand.
Ingredients
- 4 white fish fillets (cod, halibut, or tilapia)
- 1 cup cherry tomatoes, halved
- 1/2 cup Kalamata olives, pitted and halved
- 1/2 cup artichoke hearts, quartered
- 2 tablespoons capers, drained
- 3 cloves garlic, minced
- 2 tablespoons olive oil
- 1 teaspoon dried oregano
- Juice of 1 lemon
- Salt and pepper to taste
- Fresh parsley, chopped for garnish
Optional Ingredients:
- Feta cheese, crumbled
- Red pepper flakes for extra heat
- White wine for added depth
Choosing the Right Fish
Not all fish are created equal here. White fish like cod, halibut, or tilapia are your best bet because they hold their shape during baking and soak up flavors without falling apart.
When buying fish, trust your nose. Fresh fish should smell clean, almost like the ocean, not like a fish market that’s been sitting in the sun. If fresh isn’t available, frozen fillets work just fine. Just thaw them completely before you cook, or you’ll end up with watery, uneven results.
Can’t find those specific fish? No problem. Mahi mahi or sea bass are solid alternatives. Just keep an eye on thickness because thicker fillets need a couple of extra minutes in the oven.
Read also: Easy Shrimp Ceviche Recipe Mexican
Preparing the Vegetables
Let’s be honest, the vegetables are what make this dish pop. Cherry tomatoes get sweet and jammy when roasted. Kalamata olives bring a salty, briny depth. Artichoke hearts and capers add that tangy punch that makes Mediterranean food so addictive.
Tips for prep:
- Halve the cherry tomatoes so they roast faster and release their juices.
- Rinse your capers to knock off the extra salt.
- Cut artichoke hearts into small quarters for even cooking.
- Toss everything with olive oil, salt, and pepper before it goes near the fish.
One more win here: roasting the vegetables alongside the fish means one pan, one cleanup. Weeknight cooking doesn’t get much better than that.
Marinating the Fish
You might be wondering if the marinade really matters. It does, and it’s dead simple. Mix lemon juice, olive oil, garlic, oregano, salt, and pepper. Brush it over both sides of the fillets and let them sit for about 10 to 15 minutes.
I spent way too long skipping this step early on, thinking it wouldn’t make a difference. It absolutely does. The fish gets more flavor and stays moist in the oven instead of drying out.
One thing to watch: don’t let the fish sit in the lemon marinade for more than 20 minutes. The acid actually starts to break down the fish and change the texture before it even hits the oven.
Baking the Fish
Preheat your oven to 425°F (220°C). Line a baking sheet with parchment paper and lay your marinated fillets down. Spread the vegetables around the fish evenly so everything gets proper heat.
Bake for 12 to 15 minutes depending on how thick your fillets are. You’re looking for an internal temperature of 145°F (63°C), and the fish should flake easily when you press a fork into it. Want a slightly golden top? Broil for 1 to 2 minutes at the end. It makes a big difference visually.
One-Pan Cooking Tips
This whole meal cooks on one pan. That’s the magic of it. A few things to keep in mind:
- Space the fish fillets apart so they cook evenly and don’t steam each other.
- Parchment paper is your best friend here. Nothing sticks, nothing burns onto the pan.
- If your vegetables are on the larger side, give them a 5-minute head start before adding the fish.
- Keep an eye on those cherry tomatoes. They go from perfect to mushy fast.
One pan, one meal, minimal dishes. This is the kind of cooking I actually stick with.
What Most Guides Get Wrong About This
Here’s something most Mediterranean fish recipes don’t tell you: the order in which you add your finishing touches matters more than you’d think. A lot of people add fresh parsley and extra lemon juice before the fish goes into the oven. Wrong move. Those things are for after. Fresh herbs added mid-bake just wilt and lose their brightness, and lemon juice baked too long turns bitter. Add your fresh parsley, feta, and that final squeeze of lemon the moment the pan comes out of the oven. That’s what gives you the fresh, vibrant taste you’re actually going for.
Balancing Flavors
Mediterranean fish lives and dies by balance. The lemon is acidic. The olives and capers are salty. The tomatoes bring sweetness. You need all three working together, not fighting each other.
Before you serve, taste and adjust. A little more salt, a squeeze of extra lemon, or a pinch of red pepper flakes can completely change the dish. Fresh parsley at the end brightens everything up. If you’re feeling fancy, crumbled feta adds a creamy richness that works really well against all that acidity. A small splash of white wine added to the pan before baking also deepens the aroma without being overpowering.
Serving Suggestions
Serve this over:
- Cooked quinoa or rice
- Couscous or bulgur wheat
- Roasted or steamed vegetables
A simple side salad or warm pita bread also rounds out the meal nicely. Right before serving, drizzle a little extra olive oil or fresh lemon juice over everything for that final fresh finish.
Storing Leftovers
Got leftovers? Store them in an airtight container in the fridge for up to 2 days. When reheating, go low and slow in the oven rather than blasting it in the microwave. Fish dries out fast.
Also, try to store the fish separate from the vegetables if you can. Vegetables that hold a lot of moisture (looking at you, tomatoes) can make the fish a bit soggy by day two.
Health Benefits
This dish genuinely ticks every box. It’s low in calories, high in protein, and full of healthy fats from the olive oil and olives. The vegetables bring fiber, vitamins, and minerals to the table. And fish provides omega-3 fatty acids, which are great for both heart and brain health.
The herbs aren’t just for flavor either. Parsley and oregano are both loaded with antioxidants, so every bite is doing something good for your body.
Substitutions and Variations
- Swap white fish for salmon if you want something richer.
- Use green olives instead of Kalamata for a milder flavor.
- Replace lemon juice with lime juice for a different citrus vibe.
- Add roasted red peppers or zucchini for more vegetables.
- Skip the feta entirely if you need a dairy-free version.
These swaps make the recipe flexible enough to work with whatever you have in the fridge.
Conclusion
My Final Verdict: This recipe for Mediterranean fish is one of those rare dishes that feels special without demanding much from you. It’s healthy, it’s full of flavor, and it comes together in under 30 minutes on a single pan. Whether you’re cooking for yourself on a Tuesday or trying to impress guests on a weekend, this one delivers every time. Try it once, and I think it’ll earn a permanent spot in your regular rotation.
FAQs
Can I bake frozen fish for this recipe?
Yes, just thaw it completely first and add a couple of extra minutes to the baking time.
How do I prevent the fish from sticking?
Use parchment paper or lightly oil the baking sheet before placing the fish.
What if I don’t have artichoke hearts?
No worries Leave them out or swap in roasted zucchini or bell peppers.
Can I make this recipe spicy?
Absolutely, a pinch of red pepper flakes in the marinade does the trick.
How long should cherry tomatoes roast?
About 10 to 12 minutes at 425°F, just until they soften and start releasing their juices.
Can I use dried herbs instead of fresh?
Yes, but use about half the amount. Dried herbs are more concentrated, so a little goes a long way.
I used to stand in the grocery store staring at four nearly identical products, chicken broth, stock, bouillon, and base, completely lost. They all seemed to do the same thing, so I just grabbed whatever was cheapest and hoped for the best.
Turns out, I was missing out on the one ingredient that actually changed how my food tasted. Once I understood what chicken base really is and how to use it, my soups, sauces, and gravies got noticeably better. I spent more time than I’d like to admit figuring this out, so let me save you the trouble.
This guide covers what chicken base is, how it’s made, when to use it, and the mistakes that catch most people off guard.
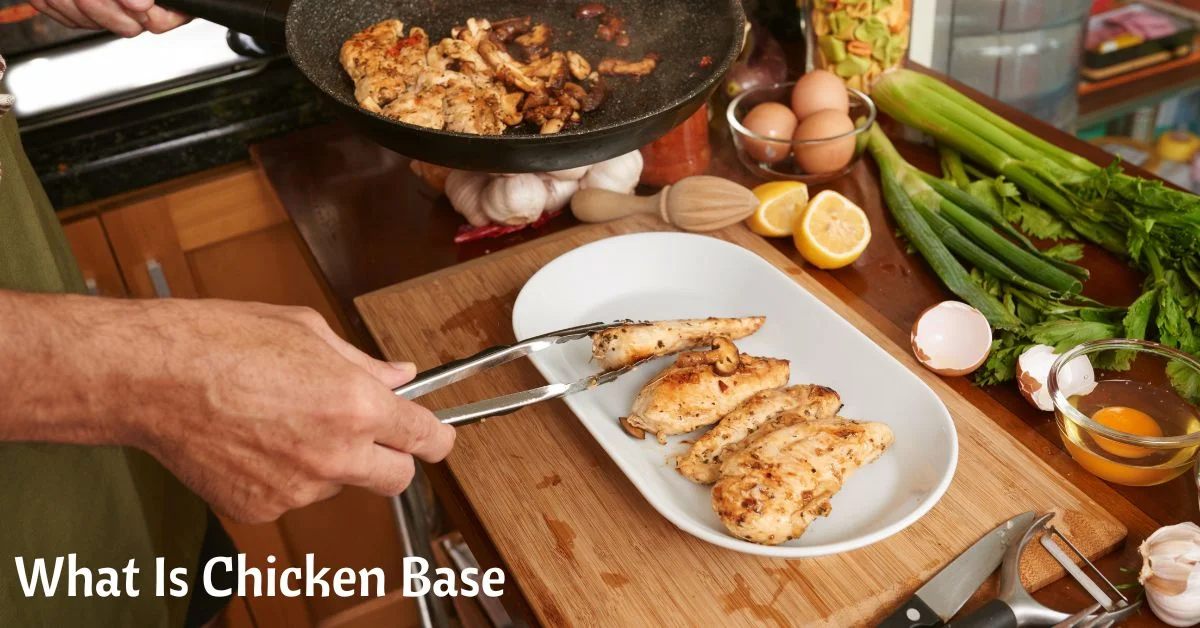
What Is Chicken Base?
Chicken base is a thick, concentrated paste made from cooked chicken meat, bones, and aromatics. Think of it as deeply reduced chicken flavor packed into a small jar. You mix a small amount with hot water to make a rich chicken broth, or stir it directly into soups, sauces, and gravies to boost flavor without adding extra liquid.
It looks like a soft, dark brown paste. Similar to peanut butter in texture, but savory and intensely aromatic.
What It Looks Like
Chicken base comes in three main forms, and knowing the difference matters.
Paste is the most common. Brands like Better Than Bouillon sell it in small glass jars. It has a smooth, dense texture and dissolves easily in hot liquid.
Powder looks like fine tan-colored granules. Lighter, easy to measure, and it lasts a long time if you keep it dry and sealed.
Cubes are compressed blocks. These are technically bouillon cubes, though lots of people call them base. They are slightly different, and I will get to that shortly.
Most home cooks stick with the paste version. It blends more smoothly and gives a cleaner flavor than cubes.
Read also: Cured Meats for Charcuterie Boards: A Practical Guide
What Is Chicken Base Made Of?
Here’s the simple answer: real chicken, cooked down until almost all the water is gone, then mixed with salt and a handful of supporting ingredients.
Common Ingredients
A standard chicken base contains:
- Cooked chicken meat and chicken fat
- Salt (often the second biggest ingredient by weight)
- Vegetables like onion, celery, and carrot
- Natural flavors
- A small amount of sugar
- Sometimes yeast extract or spices
Better quality brands, like Better Than Bouillon, list actual roasted chicken as the first ingredient. Cheaper versions lean harder on salt, MSG, and artificial flavors. You can taste the difference.
Why It Tastes Stronger Than Broth
When you make chicken broth at home, you simmer bones and meat in water for an hour or two. Chicken base goes through a much longer, more intense process where most of the water is pulled out. What you end up with is pure, concentrated flavor.
One teaspoon of chicken base holds the flavor of a full cup of broth. That is why a little goes a long way, and also why beginners sometimes end up with dishes that are way too salty without understanding why.
Chicken Base vs Broth vs Stock vs Bouillon
Let’s be honest, this comparison trips up a lot of people. Here is a clear breakdown.
Chicken broth is a thin liquid made by simmering chicken meat with water and vegetables. Light flavor. Ready to use straight from the carton.
Chicken stock comes from bones, not just meat. It simmers longer and develops a richer, slightly thicker texture from the collagen in the bones. Deeper flavor than broth.
Chicken base is a concentrated paste. Mix it with water and you get something close to broth, but usually richer and more intense.
Bouillon cubes are compressed blocks of dehydrated chicken flavoring, salt, fat, and additives. Quick and cheap, but they often taste more artificial than a good paste base.
Quick Comparison
| Product | Form | Flavor Strength | Best Use |
| Chicken broth | Liquid | Mild | Soups, sipping |
| Chicken stock | Liquid | Medium-rich | Braises, risotto |
| Chicken base | Thick paste | Very concentrated | Sauces, enhancing dishes |
| Bouillon cube | Compressed cube | Strong but salty | Quick cooking |
The real difference you notice when cooking: broth adds liquid and mild flavor. Base adds pure flavor without watering your dish down. That distinction matters more than most people realize.
How to Use Chicken Base in Cooking
How to Mix It With Water
The standard ratio is 1 teaspoon of chicken base per 1 cup (240ml) of hot water. That gives you roughly one cup of chicken broth.
Here’s the thing though: you do not always need to pre-mix it. In many recipes, you can stir the paste straight into a sauce or soup while it cooks. The liquid already in the pan takes care of dissolving it.
If a recipe needs 4 cups of chicken broth, use 4 teaspoons of base in 4 cups of hot water. That is really all there is to it.
Best Uses in the Kitchen
Soups and stews: Add base directly to the pot instead of pouring in cartons of broth. You get full control over how strong you want the flavor.
Rice and grains: Cook your rice in water mixed with a small amount of chicken base. The grains absorb the flavor as they cook and taste so much better than plain water rice.
Gravies and pan sauces: After roasting chicken or cooking a steak, deglaze the pan with water mixed with a bit of chicken base. Instant depth. Way better than plain water.
Pasta water: Some cooks add half a teaspoon to their pasta water. The pasta picks up a subtle savory flavor you can actually notice.
Mashed potatoes: Stir a small amount into the milk or water you use when mashing. It gives potatoes a roasted, savory undertone that people always notice but cannot quite place.
When Should You Use Chicken Base Instead of Broth?
You might be wondering when it actually makes sense to reach for the jar instead of just opening a carton. This is the question most articles never answer properly.
Quick Meals vs Slow Cooking
If you are making a fast weeknight stir-fry or a quick pan sauce, chicken base is just more practical. Scoop what you need, seal the jar, done. No partial carton of broth sitting in your fridge getting forgotten.
For slow-cooked dishes like braises or long-simmered soups, honestly either works. Many experienced cooks use both: broth as the main liquid, then a small spoon of chicken base stirred in near the end to bring the flavor back up.
When You Need Stronger Flavor
If your soup tastes flat or watery, a teaspoon of chicken base fixes it fast. That is the professional kitchen trick for saving underseasoned dishes without reaching for more salt.
Broth cannot do this. Adding more broth to a flat soup just dilutes it further and increases volume when you do not want more liquid.
Budget and Convenience
A jar of chicken base costs around five to eight dollars and makes the equivalent of 30 to 40 cups of broth. That is far cheaper than buying multiple cartons, and the jar takes up almost no space.
It is also shelf-stable until opened. No planning ahead required.
Common Mistakes When Using Chicken Base
Using Too Much
This is the big one. The paste looks small and harmless, so people scoop more than they need. One extra teaspoon in a soup can push it from delicious to unpleasantly salty.
Start with the 1 teaspoon per cup ratio. Always taste before adding more.
Not Adjusting Salt in the Recipe
Chicken base already carries a lot of sodium. If your recipe also calls for added salt, cut it back or skip it until you taste the dish. A lot of people blindly follow recipe salt measurements without factoring in the sodium already sitting in the base. The result is a dish you cannot fix.
Confusing It With Bouillon
They are close but not the same thing. Bouillon cubes are more processed, saltier, and often contain more artificial ingredients. Swapping one for the other without adjusting will change the flavor and often the saltiness of your dish.
If bouillon is all you have, use slightly less and taste as you cook.
Best Substitutes for Chicken Base
Broth or Stock
The most natural swap. Use 1 cup of chicken broth for every 1 teaspoon of base the recipe calls for. Also reduce or cut any added water since the broth already contains liquid.
The flavor will be milder. If you want more depth, simmer longer to reduce and concentrate it.
Bouillon Cubes or Powder
Dissolve a bouillon cube in hot water per the package directions. Flavor-wise it is close to base but usually saltier and a bit less clean in taste.
Fine in a pinch. Just go easier on added salt.
Homemade Chicken Broth
If you have the time, homemade broth from simmered chicken bones is the best substitute. Let it reduce longer than usual to get closer to the concentration of a store-bought base.
How to Store Chicken Base
Shelf Life
An unopened jar is shelf-stable and good for up to two years. Once opened, most brands say to refrigerate and use within a year. In practice, many people find it stays perfectly fine much longer than that.
Powder forms last even longer as long as moisture stays out.
Storage Tips
Keep the lid clean. Seriously. Contamination from other food particles can cause mold, and it is an easy thing to avoid. Always use a clean, dry spoon when scooping from the jar.
Store opened jars toward the back of the fridge where the temperature stays steady. The paste firms up slightly when cold but softens quickly at room temperature and dissolves easily in hot liquid.
Is Chicken Base Healthy?
Honestly, it depends on how you use it.
Sodium Content
The main concern with chicken base is sodium. One teaspoon of most commercial bases contains between 600 and 900 milligrams, which is roughly 25 to 40 percent of the recommended daily intake for most adults.
If you are watching your blood pressure or already eating a salty diet, it adds up faster than you expect.
When to Use It in Moderation
Using chicken base as a flavor booster in a big pot of soup shared across several servings keeps the sodium per bowl manageable. The problem is when people scoop it into everything without thinking about it.
Low-sodium versions exist and they work well. Better Than Bouillon makes one. The flavor is slightly less bold but still does the job.
As a cooking ingredient used thoughtfully, chicken base is not unhealthy. It is like any other seasoning: fine when you are intentional about it, a problem when you are not.
What Most People Get Wrong About Chicken Base
Most people treat chicken base as nothing more than a broth replacement. That is seriously underusing it.
The real value is as a flavor enhancer you layer on top of other liquids. A slow-cooked beef stew gets a surprising depth boost from half a teaspoon stirred in near the end. Roasted vegetables develop a savory, slightly caramelized crust when coated in a mix of olive oil and dissolved chicken base before hitting the oven.
It is not just a broth stand-in. It is a concentrated umami tool, and once you start thinking of it that way, a whole range of cooking possibilities open up that most home cooks never explore.
Conclusion
If your cooking has felt a little flat lately, a jar of chicken base sitting in your fridge might be the simplest fix you have not tried yet.
Start with the basic ratio, go easy on extra salt, and treat it as a flavor tool rather than just a broth substitute. Use it to finish sauces, boost soups, or give roasted vegetables that hard-to-explain savory depth. Once you get comfortable with it, you will wonder how you cooked without it.
FAQs
Is chicken base the same as chicken bouillon?
Similar, but not identical. Chicken base is a thicker paste made from real cooked chicken with a cleaner, richer flavor. Bouillon cubes are more compressed and heavily processed, usually with higher sodium. Base generally tastes better, and most cooks prefer it when both are available.
Can I use chicken base instead of broth?
Yes. Dissolve 1 teaspoon of chicken base in 1 cup of hot water and you have a direct substitute for broth. The flavor tends to be richer than store-bought broth, so start with a little less than the recipe asks for and taste as you go.
How much chicken base equals 1 cup of broth?
One teaspoon dissolved in one cup of hot water equals roughly one cup of chicken broth. That is the standard ratio from most manufacturers, though you can adjust it based on how strong you want the flavor.
Does chicken base need to be refrigerated?
Unopened jars are fine in the pantry. Once opened, refrigerate and try to use within 12 months for the best quality. The cold temperature keeps the flavor fresh and prevents spoilage.
Is chicken base gluten-free?
Many brands are, but not all of them. Better Than Bouillon offers gluten-free certified options. Always check the label if you have celiac disease or gluten sensitivity, since formulas differ by brand and some do include wheat-based additives.
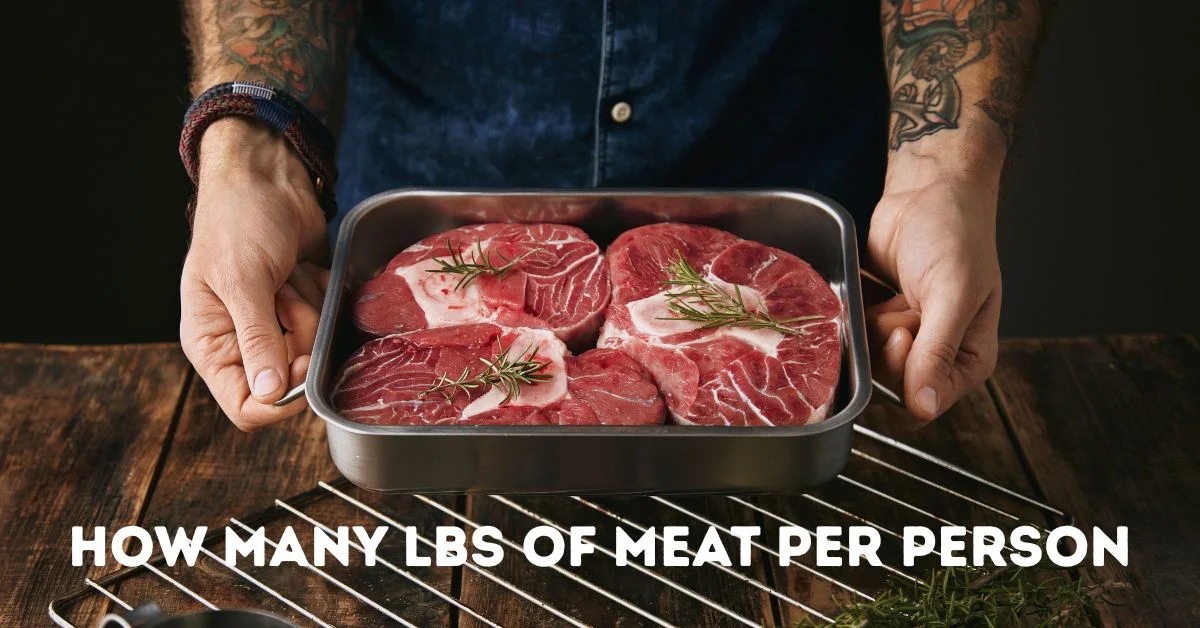
If you’ve ever stood in a grocery store staring blankly at a wall of meat, trying to do mental math for a cookout, you’re not alone. I’ve been there buying way too much one time, not nearly enough the next. Getting this right is genuinely one of those things that looks easy until you’re stuck with 8 lbs of leftover ribs or a very hungry crowd eyeing an empty platter. This guide breaks it all down a simple formula, real examples, and the adjustments most people never think about.
How Many Pounds of Meat Per Person? (Quick Answer)
The standard rule is half a pound (0.5 lb) of cooked, boneless meat per adult per meal. That’s roughly 8 ounces and covers most casual meals like BBQs, family dinners, and parties. For heartier eaters or meat-focused meals with few sides, bump it to 3/4 lb. For lighter events with lots of food, 1/4 lb can be enough.
When to Use 1/4 lb vs 3/4 lb
How many lbs of meat per person? Use 1/4 lb per person when meat is just one part of a big spread. Think buffets, weddings, or events where there are 5 to 6 side dishes on the table. Nobody’s going back for a third plate of ribs when there’s pasta, salad, and bread in the way.
Use 3/4 lb per person for BBQs where meat is the main event, events with big eaters, or anything being called a “meat feast.” Also use this for bone-in cuts a big chunk of that weight is just bone.
The Simple Meat Calculator Formula
No complicated math here. Just two steps.
Basic Formula: Number of guests × meat per person = total lbs to buy
That’s it. The only variable is how much meat per person you go with, and that depends on the event type, cut, and your crowd.
Quick Examples
- 10 people at a casual BBQ: 10 × 0.5 = 5 lbs of boneless meat
- 20 people at a backyard cookout: 20 × 0.75 = 15 lbs (bone-in ribs or chicken)
- 50 people at a buffet: 50 × 0.35 = about 17 to 18 lbs total
For bone-in cuts, always add 30 to 40% extra to account for bone weight. So if the formula says 10 lbs, buy 13 to 14 lbs of bone-in meat.
Read also: Kansas City Strip Steak: What It Is and How It Differs from NY Strip
Meat Portions by Type
Here’s the thing: different meats behave very differently. A pound of brisket and a pound of chicken wings are not the same experience.
Beef
For steaks, plan for a 6 to 8 oz serving per person (about 0.5 lb) that’s one decent-sized steak. For brisket, plan for 1/3 to 1/2 lb per person after cooking. Brisket loses a lot of weight during the long cook, sometimes up to 40%. So if you need 10 lbs of cooked brisket, start with 16 to 17 lbs raw. For burgers, one quarter-pound patty per person is standard. Go up to 1/3 lb if your guests are big eaters.
Chicken
Boneless chicken breasts or thighs: 1/2 lb per person is plenty. Bone-in pieces (legs, thighs, drumsticks): plan for 3/4 lb per person, or about 2 pieces per adult. A whole rotisserie-style chicken, around 4 lbs, feeds about 4 people.
Pork
Pulled pork shrinks a lot during cooking sometimes losing up to half its raw weight. Plan for 1/3 lb of finished pulled pork per person, but buy about 2/3 lb raw per person. Ribs are tricky because so much of the weight is bone. A full rack (about 12 ribs) typically serves 2 to 3 adults, so plan for 3 to 4 ribs per person. Pork tenderloin is leaner and more filling per bite about 1/3 lb per person is enough.
Fish and Lighter Meats
Fish fillets: 1/3 to 1/2 lb per person. Fish is dense protein and people rarely eat as much of it as they would chicken or beef. Shrimp: about 1/4 lb per person as a main, 1/8 lb as part of a bigger spread. Lamb chops: treat it like steak 1/2 lb per person, maybe a bit more since chops have bone.
Bone-In vs Boneless: How It Changes Quantity
This is where a lot of people go wrong. They see “5 lbs of ribs” and assume that feeds 10 people. It doesn’t.
Why Bone Weight Matters
When you buy bone-in cuts, you’re paying for weight that no one eats. A rack of baby back ribs might weigh 2 lbs but only deliver about 1.2 lbs of actual meat. Chicken thighs, lamb chops, T-bone steaks — same story. I learned this the hard way at a cookout once, and honestly, I wish someone had told me sooner.
The Easy Adjustment Rule
For bone-in cuts, add 30% to your total. If the formula says 10 lbs, buy 13 lbs. For cuts with a lot of bone like ribs or whole chicken add up to 40 to 50%.
A simple way to think about it: boneless is what lands on the plate. Bone-in includes what gets tossed.
Adjusting Meat Based on Event Type
The type of event changes everything. The same 20 guests need very different amounts depending on the setting.
BBQ or Cookout
This is a meat-heavy event. People graze, go back for seconds, and the whole vibe is centered around the grill. Plan for 3/4 lb per person minimum. If you’re offering multiple cuts burgers AND chicken AND sausages you can drop each individual item slightly, but total meat per person should still hit around 3/4 lb.
Buffet-Style Events
At buffets, meat competes with everything else on the table. Plan for 1/3 to 1/2 lb per person. If the buffet is particularly elaborate with lots of options, 1/4 lb per person might actually be enough.
Formal Dinners
At a sit-down dinner, portions are controlled. One main protein serving per person usually 6 to 8 oz of boneless meat is standard. That’s about 0.4 to 0.5 lb per person. No one expects seconds at a formal dinner.
Mixed Menu with Multiple Meats
If you’re serving two or three types of meat, calculate the total as if it were one type, then split proportionally. For 20 people needing 15 lbs total, that might mean 5 lbs of each. Don’t plan 15 lbs of every meat unless you want a week of leftovers.
Smart Adjustments Most People Miss
These are the fine-tuning tweaks that separate a well-planned meal from a stressful one.
Reduce Meat if You Have Many Side Dishes
Every filling side dish on the table reduces how much meat guests will eat. If you have 1 to 2 sides, stick with standard portions. With 3 to 4 sides mashed potatoes, coleslaw, corn, baked beans drop your meat estimate by about 15 to 20%. With 5 or more filling sides, you can comfortably reduce by 25 to 30%.
Increase for Big Eaters or Meat-Focused Meals
Hosting athletes, teenagers, or people who specifically came for the food? Add 25% to your base estimate. Teenage boys especially are a category all on their own. If it’s a meat-focused event where sides are minimal, plan for 3/4 lb to 1 lb per person.
Adjust for Kids vs Adults
Kids under 12 typically eat about half what an adult eats, sometimes less. For planning, count two kids as one adult. If you have 20 adults and 10 kids, plan for 25 adult servings rather than 30.
Time of Day Impact
You might be wondering if it matters when you serve. It does. People eat about 20 to 25% less at a midday meal than an evening one. A lunchtime BBQ for 20 people needs less meat than a dinner BBQ for the same crowd.
Meat Quantity Chart for Groups
These numbers assume boneless meat at a standard casual meal with a few sides.
For 5 to 10 people:
- 5 people: 2.5 lbs (light) to 5 lbs (heavy)
- 8 people: 4 lbs (light) to 6 lbs (heavy)
- 10 people: 5 lbs (light) to 8 lbs (heavy)
For 20 to 30 people:
- 20 people: 10 lbs (light) to 15 lbs (heavy)
- 25 people: 12 lbs (light) to 19 lbs (heavy)
- 30 people: 15 lbs (light) to 22 lbs (heavy)
For 50 or more:
- 50 people: 17 to 25 lbs depending on event type
- 75 people: 25 to 38 lbs
- 100 people: 33 to 50 lbs
For bone-in cuts, increase all of these numbers by 30 to 40%.
Real-Life Scenarios
Let’s be honest sometimes the best way to understand this is to just walk through a real example.
Backyard BBQ for 15 People
Mixed group: 12 adults and 3 kids. Serving burgers and bone-in grilled chicken thighs. Two sides: coleslaw and corn.
Count the kids as 1.5 adults, so you’re planning for about 13.5 adult portions. With 2 sides, use standard 0.5 lb per person: 13.5 × 0.5 = 6.75 lbs of actual meat. Since chicken thighs are bone-in, add 35%: 6.75 × 1.35 = about 9 lbs of bone-in chicken. Add 4 to 5 lbs of ground beef for burgers (1/3 lb patties). Total: roughly 13 to 14 lbs across both meats.
Family Dinner for 8
Sit-down dinner, all adults. Beef roast with mashed potatoes, roasted vegetables, and bread rolls.
Formal setting, so 0.4 lb per person. Lots of sides, so knock it down another 15%. 8 × 0.4 = 3.2 lbs, minus 15% = about 2.7 lbs. Round up to a 3 lb boneless roast and you’re covered with maybe a little leftover.
Party with Multiple Meats
30 guests, buffet style. Pulled pork, grilled sausages, and bone-in chicken wings.
Buffet, so plan for 0.4 lb per person total: 30 × 0.4 = 12 lbs of actual meat. Split across three proteins: roughly 4 lbs each. For the wings, add 40% for bone buy about 5.5 to 6 lbs of raw wings. For pulled pork, buy double the finished amount raw: about 8 lbs raw pork to get 4 lbs pulled.
What Most People Get Wrong About Meat Planning
The biggest mistake is treating raw weight and cooked weight as the same thing. They’re not even close.
Brisket can lose 35 to 40% of its weight during a long smoke. Pulled pork loses similar amounts. Ground beef patties shrink on the grill. Chicken loses moisture. If someone hands you a 10 lb raw brisket and says “that’ll feed 20 people at half a pound each,” they’re wrong. After cooking, you might have 6 lbs left.
Always calculate based on cooked, finished weight, then work backwards to figure out how much raw meat to buy. This one adjustment alone will save you from running short at the table.
The second big mistake is not accounting for the full spread. Two people planning the same BBQ can end up buying very different amounts of meat not because one is wrong, but because one has six side dishes and one has two. Context matters.
Common Mistakes to Avoid
Overestimating portions happens when hosts get nervous and just buy extra of everything. That leads to waste and cost. Trust the formula.
Ignoring sides is the most common error. If you have a full spread, cut your meat estimate by at least 15 to 20%. People fill their plates with what’s in front of them.
Not accounting for bone weight has caught out even experienced hosts. Buy bone-in and follow the 30 to 40% rule without fail.
Forgetting cooking shrinkage is what leads to that anxious moment when the brisket comes off the smoker and suddenly looks like it won’t stretch far enough. Always factor in that cooked weight is less than raw weight.
Conclusion
Here’s my parting advice: stop guessing and start with a number. Half a pound per person is your anchor. From there, adjust for your crowd, your cut, and your sides and always, always account for bone weight and cooking shrinkage. Run the numbers once before you shop, and you’ll show up to your own event relaxed instead of panicking at the grill. That’s the whole game.
FAQS
Is 1 lb of meat per person too much?
For most meals, yes. One pound per person only makes sense for very meat-heavy events, large eaters, or situations with almost no sides. For a typical BBQ or dinner, half a pound of cooked boneless meat is plenty.
How much meat for BBQ per person?
For a BBQ where meat is the star, plan for 3/4 lb of boneless meat per adult, or about 1 lb if using bone-in cuts. If you’re serving multiple meats and sides, you can bring that down to 1/2 lb total per person.
How many lbs of meat for 20 guests?
For 20 guests at a casual meal with a few sides, plan for 10 lbs of boneless cooked meat. For a meat-heavy BBQ, go up to 15 lbs. For a buffet with lots of options, 7 to 8 lbs may be enough.
How much pulled pork per person?
Plan for about 1/3 lb of finished pulled pork per person. But since pulled pork shrinks so much during cooking, buy roughly 2/3 lb of raw pork shoulder per person. For 20 people, that means buying around 13 to 14 lbs of raw pork.
Should I plan for leftovers?
If you want leftovers, add 10 to 15% to your total. Leftover brisket, pulled pork, and grilled chicken all reheat well. If you don’t want leftovers, stick to the formula and trust it.
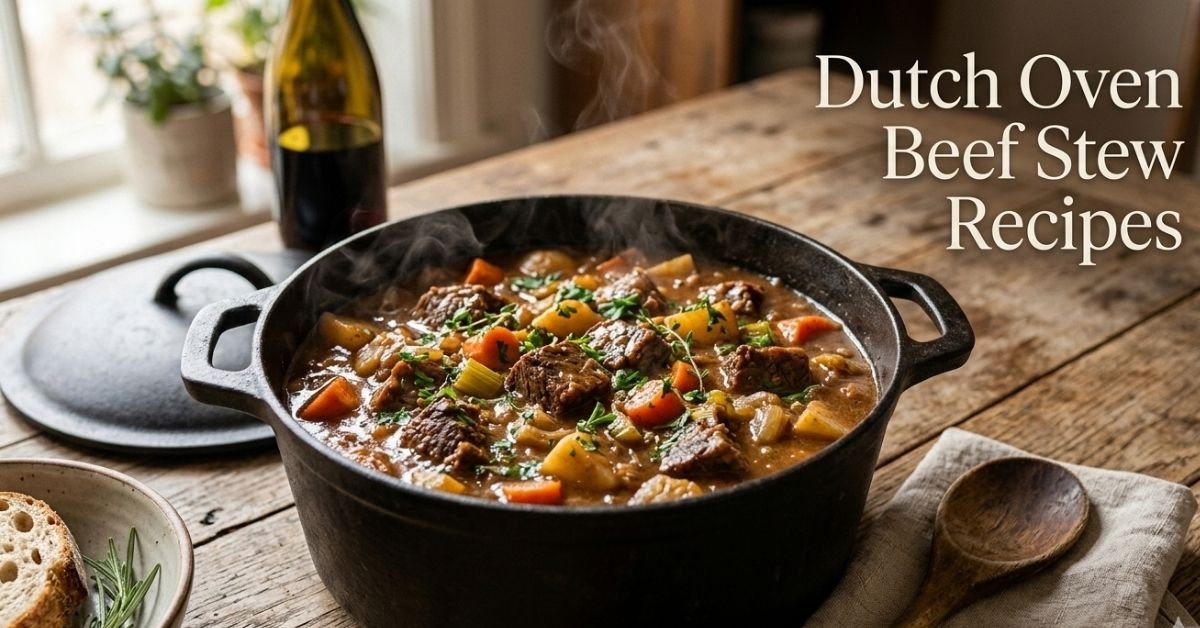
Dutch Oven Beef Stew Recipes are loved because they create deeply flavorful meals with very simple cooking methods. A Dutch oven is a heavy cast iron pot that holds heat evenly and slowly cooks ingredients until everything becomes tender. When beef, vegetables, broth, and herbs simmer together in one pot, the flavors blend beautifully and produce the classic comfort food many families enjoy during colder seasons.
Another reason these recipes are popular is their reliability. Even beginner cooks can produce a rich and satisfying stew with just a few techniques. Browning beef cubes, sautéing onions and garlic, then slowly simmering everything with potatoes and carrots creates a dish that tastes like it has been cooking all day. The thick gravy, tender meat, and soft vegetables make it a complete meal in a single pot.
Dutch oven cooking also reduces cleanup and simplifies meal preparation. Instead of using multiple pans, everything cooks together in the same pot. This style of cooking has been used for generations because it saves time while still delivering rich flavor and texture. Once the stew is in the oven or gently simmering on the stove, the cook can relax while the dish slowly develops its depth of flavor.
Read also: Babbalucci Bill Bakers and Kings County Imperial
Best Cuts of Beef for Tender Stew
Choosing the right cut of beef is one of the most important steps in Dutch Oven Beef Stew Recipes. Tougher cuts actually work best because slow cooking breaks down their connective tissue and transforms them into soft, flavorful meat. Cuts that come from hardworking muscles contain more collagen, which melts during cooking and thickens the stew naturally.
Chuck roast is the most common choice for stew. It contains the right balance of fat and muscle fibers, which helps it stay juicy while cooking for long periods. Other excellent options include bottom round roast, brisket pieces, and beef shoulder cuts. These meats become tender when braised slowly in broth or wine.
Good beef stew starts with evenly cut cubes so they cook at the same speed. Meat pieces about one to one and a half inches work well. Before cooking, it helps to pat the beef dry and season it with salt and pepper. This step helps the meat brown properly, which builds the deep savory flavor that makes stew taste rich and satisfying.
Essential Ingredients for Classic Beef Stew
Most Dutch Oven Beef Stew Recipes Oven Beef Stew Recipes share a group of traditional ingredients that build the foundation of flavor. The combination of beef, vegetables, herbs, and broth creates the classic taste people expect from a hearty stew. While variations exist, the following ingredients appear in many successful recipes.
Common ingredients include:
• Beef chuck roast cut into cubes
• Olive oil for browning
• Yellow onion and garlic
• Carrots and potatoes
• Beef broth or stock
• Tomato paste for depth of flavor
• Fresh thyme and bay leaves
• Worcestershire sauce
• Salt and black pepper
• Flour or cornstarch for thickening
These ingredients work together to create layers of flavor. The vegetables add sweetness and texture while the herbs provide aroma. Tomato paste gives a mild richness that strengthens the broth, and the thickening agent transforms the liquid into a comforting gravy that coats every bite.
Step by Step Method for Dutch Oven Beef Stew
Cooking stew in a Dutch oven follows a simple method that builds flavor gradually. The key steps are browning, sautéing, simmering, and slow braising. Each stage adds another layer of taste and helps produce tender meat and rich gravy.
Follow these basic steps:
• Heat olive oil in the Dutch oven over medium heat
• Brown beef cubes in small batches until golden
• Remove beef and sauté onions and garlic
• Stir in tomato paste and cook briefly
• Deglaze the pot with broth or red wine
• Return beef to the pot with herbs and seasonings
• Add carrots and potatoes
• Cover and cook slowly in oven at 325°F for about 2 hours
During the slow cooking process, the beef becomes tender and the vegetables soften without falling apart. The broth thickens naturally as collagen from the meat melts into the liquid. When finished, the stew should have a rich color, thick gravy, and tender chunks of meat.
How to Make the Gravy Thick and Rich
One of the defining features of great Dutch Oven Beef Stew Recipes is the rich gravy that coats every ingredient. Achieving the right thickness depends on both cooking time and thickening methods. As stew simmers, gelatin from the beef slowly thickens the broth, but additional techniques can improve the final texture.
Many cooks use a simple roux made from butter and flour. Cooking the roux briefly before adding liquid removes the raw flour taste and creates a smooth gravy. Another option is a cornstarch slurry, which mixes cornstarch with cold water before stirring it into the stew near the end of cooking.
The goal is a gravy that is thick enough to coat a spoon but still fluid enough to pour easily. Stirring occasionally while simmering prevents sticking and ensures the gravy thickens evenly throughout the pot.
Vegetables That Work Best in Beef Stew
Vegetables add sweetness, nutrition, and color to Dutch Oven Beef Stew Recipes. Choosing vegetables that hold their shape during long cooking is important. Some vegetables soften too quickly, while others develop deeper flavor as they simmer in broth.
Popular stew vegetables include:
• Yukon Gold or red potatoes
• Carrots sliced into thick rounds
• Celery pieces for aroma
• Pearl onions or chopped onions
• Mushrooms for extra umami flavor
• Frozen peas added near the end
These vegetables absorb the savory broth and become flavorful without losing their texture. Potatoes help thicken the stew slightly as they release starch, while carrots add natural sweetness that balances the savory beef.
Cooking in the Oven vs Stovetop
Dutch Oven Beef Stew Recipes can be prepared either in the oven or on the stovetop. Both methods produce excellent results, but each approach has small advantages depending on the cook’s preference.
Cooking in the oven provides steady heat from all directions. This helps the stew cook evenly and prevents scorching on the bottom of the pot. The oven method also requires less stirring because the heat remains consistent throughout the cooking process.
Stovetop cooking is more flexible and allows easy monitoring of the stew. Some cooks prefer to adjust the simmer level or add ingredients gradually. As long as the heat stays low and gentle, the stovetop method can produce the same tender beef and rich broth as oven cooking.
Substitutions for Wine, Gluten, and Other Ingredients
Many traditional Dutch Oven Beef Stew Recipes include red wine because it adds acidity and complexity. However, some cooks prefer to skip alcohol or need substitutions due to dietary needs. Fortunately several alternatives can provide similar depth of flavor.
Common substitutions include:
• Extra beef broth instead of red wine
• Balsamic vinegar for mild acidity
• Tomato juice for subtle sweetness
• Cornstarch instead of flour for gluten free thickening
• Sweet potatoes instead of white potatoes
• Coconut aminos instead of Worcestershire sauce
These adjustments allow the recipe to fit different diets without losing the essential stew flavor. The key is maintaining balance between savory broth, tender beef, and vegetables that complement the rich gravy.
Make Ahead and Freezing Tips
One advantage of Dutch Oven Beef Stew Recipes is that they store and reheat extremely well. In fact, stew often tastes better the next day because the flavors continue blending as it rests in the refrigerator.
To store stew safely, allow it to cool slightly before transferring it to airtight containers. Refrigerated stew usually stays fresh for three to four days. When reheating, gently warm it on the stovetop with a splash of broth to restore the consistency.
For longer storage, stew freezes well for up to three months. Freeze portions in freezer safe containers so they can be thawed easily for quick meals. Thaw overnight in the refrigerator before reheating to maintain the best texture.
Common Mistakes When Making Beef Stew
Even simple Dutch Oven Beef Stew Recipes can go wrong if a few key mistakes occur during cooking. Learning these common problems helps ensure every batch turns out rich, tender, and flavorful.
Mistakes to avoid include:
• Skipping the step of browning the beef
• Crowding the pot while searing meat
• Cooking at too high a temperature
• Adding vegetables too early
• Over thickening the gravy
Browning beef properly is especially important because it creates the flavorful crust that forms the base of the stew. Cooking slowly at low heat allows the meat fibers to break down gradually, which is what creates the tender texture everyone expects from a classic stew.
Serving Ideas and Side Dishes
Dutch Oven Beef Stew Recipes are already filling, but the right side dishes can make the meal even more satisfying. Bread is one of the most popular companions because it absorbs the rich gravy.
Popular serving options include:
• Crusty artisan bread or baguette
• Buttery dinner rolls
• Creamy mashed potatoes
• Simple green salad
• Steamed green beans
Fresh herbs such as parsley or thyme sprinkled over the stew brighten the flavor and add color. Some cooks also enjoy pairing the dish with a glass of red wine or dark beer, which complements the savory richness of the beef and gravy.
Healthy Notes and Nutrition Considerations
While Dutch Oven Beef Stew Recipes are hearty comfort foods, they can also provide balanced nutrition. Beef contains protein, iron, and important vitamins that support energy and muscle health. Vegetables like carrots and potatoes contribute fiber, potassium, and antioxidants.
To make the stew lighter, cooks can trim excess fat from the beef before cooking and increase the proportion of vegetables. Using low sodium broth also helps control salt levels without sacrificing flavor.
Because the stew cooks slowly, nutrients from vegetables and herbs remain in the broth rather than evaporating. This makes each serving nourishing as well as satisfying, especially during cooler months when warm meals are most comforting.
Conclusion
Dutch Oven Beef Stew Recipes remain one of the most comforting and dependable meals in home cooking. The combination of tender beef, hearty vegetables, and rich gravy creates a dish that is simple yet deeply satisfying. With the right cut of meat, proper browning, and slow cooking, anyone can prepare a stew that tastes flavorful and balanced. The recipe is flexible enough to include substitutions, dietary adjustments, and make ahead storage. By understanding the basic techniques and avoiding common mistakes, cooks can enjoy a classic one pot meal that brings warmth and comfort to the table.
FAQs
What is the best cut of beef for beef stew?
Chuck roast is usually best because it becomes tender during slow cooking.
How long should beef stew cook in a Dutch oven?
Most recipes cook for about 2 hours at 325°F until the meat becomes tender.
Can I make beef stew without wine?
Yes, simply replace wine with beef broth or a small amount of balsamic vinegar.
How can I thicken beef stew without flour?
Use a cornstarch slurry mixed with cold water and stir it into the hot stew.
What potatoes are best for beef stew?
Yukon Gold or red potatoes hold their shape and add creamy texture.
Can beef stew be frozen?
Yes, it freezes well for up to three months when stored in airtight containers.
-
 Food1 month ago
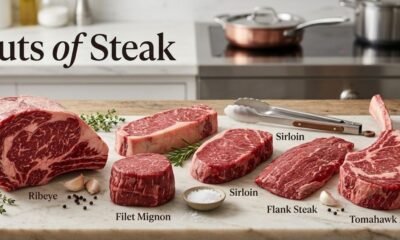
Cuts of Steak: Complete Guide to Beef Cuts
-

 Food1 month ago
What Is Andouille Sausage? Complete Guide
-

 Food1 week ago
Shirleys Coffee Shop Guam Locations Menu and Guide
-

 Food1 month ago
Ultimate Tripas Recipe and Cooking Guide
-

 Tech15 minutes ago
DemonScans Review: Is It Safe for Manga Readers?
-

 Drinks3 weeks ago
Easy Lychee Martini Recipe Sweet & Floral Cocktail
-

 Food4 weeks ago
Wagyu Beef Price per Pound: Complete Cost Guide
-

 Food2 weeks ago
Italian Ice Flavoring Guide: Flavors, Bases, and Recipes