
Food
Toro Sashimi Guide: Cuts, Taste, and Preparation
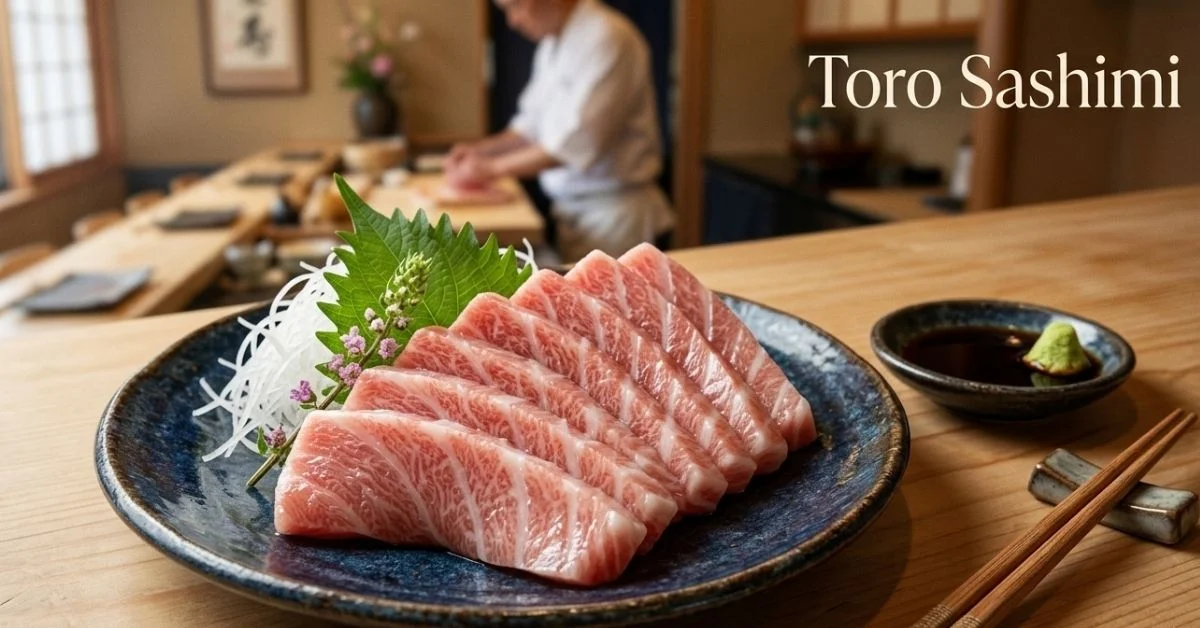
Toro sashimi is one of the most luxurious dishes in Japanese cuisine. It refers to slices of raw fatty tuna taken from the belly portion of bluefin tuna. Unlike lean tuna cuts used in many sushi dishes, toro contains heavy marbling of natural fat. This fat creates a silky texture and a rich flavor that gently melts in the mouth. Because of this exceptional quality, toro sashimi is usually served in high end sushi restaurants and is considered a premium delicacy among seafood lovers.
The word “toro” simply means fatty tuna. It usually comes from the belly of Pacific bluefin tuna, a species famous for its flavor and high fat content. When served as sashimi, the fish is sliced into clean, smooth pieces and eaten raw without rice. The dish focuses entirely on the natural flavor and texture of the tuna. Light condiments like wasabi, soy sauce, or yuzu ponzu are often added to enhance the umami taste without overpowering the fish.
In traditional Japanese dining, toro sashimi represents purity and craftsmanship. Chefs carefully select tuna with excellent marbling and slice it with razor sharp sashimi knives. The result is a delicate dish that highlights the natural oils, omega 3 richness, and buttery softness of the tuna belly. For many people experiencing sushi culture for the first time, toro sashimi becomes the most memorable part of the meal.
Read also: Cuts of Steak: Complete Guide to Beef Cuts
Toro Cuts Explained: Otoro vs Chutoro
Toro is divided into several cuts depending on where the tuna belly is taken from. The two most famous types are otoro and chutoro. Each cut has its own balance of fat, flavor, and texture, which influences how it is used in sushi or sashimi.
Otoro comes from the fattiest section of the tuna belly, usually near the head area. This cut has extremely heavy marbling that looks similar to fine wagyu beef. Because of its high fat content, otoro is incredibly soft and melts instantly when eaten. The taste is rich, buttery, and slightly sweet. Otoro is the most expensive toro cut and is usually served as premium sashimi or nigiri sushi in luxury sushi restaurants.
Chutoro is taken from the middle section of the tuna belly. It contains a balanced mix of lean meat and marbled fat. Compared to otoro, chutoro has a slightly firmer texture and a lighter flavor, but it still delivers the signature toro richness. Many sushi chefs prefer chutoro for its balance of flavor and texture, making it ideal for both sashimi and sushi preparations.
Here is a quick comparison of the main tuna cuts used for sashimi:
• Otoro: highest fat content, extremely soft texture, premium price
• Chutoro: medium fat marbling, balanced flavor and texture
• Akami: lean red tuna meat with very little fat
Understanding these differences helps diners appreciate the subtle qualities of toro sashimi and choose the cut that best suits their taste.
Taste and Texture Profile of Toro
The flavor of toro sashimi is very different from ordinary tuna. The heavy marbling inside the fish creates a rich buttery taste that feels smooth and delicate on the palate. When eaten at the correct temperature, the fat slowly melts in the mouth and releases layers of umami flavor. This melting quality is the reason why toro sashimi is often described as luxurious.
Texture plays an equally important role. Otoro slices are extremely tender and almost creamy, while chutoro offers a slightly firmer bite with balanced oils. Both cuts feel silky rather than fibrous. When sliced correctly with a sharp sashimi knife, the surface of the fish appears glossy and smooth. This clean cut helps preserve the natural structure of the tuna fibers and enhances the eating experience.
The aroma of toro is mild and clean, unlike stronger seafood flavors. Fresh sushi grade tuna should never smell fishy. Instead, it should have a subtle ocean scent that signals freshness. When paired with simple condiments such as soy sauce, fresh wasabi, or pickled ginger, the flavor becomes deeper while still allowing the natural taste of the tuna to remain the star of the dish.
Sourcing Sushi Grade Toro
Finding high quality toro sashimi begins with proper sourcing. Because the fish is eaten raw, freshness and handling standards are extremely important. Sushi grade tuna is typically frozen at extremely low temperatures shortly after being caught. This freezing process kills parasites and preserves the texture of the fish.
When buying toro for home preparation, look for the following quality signs:
• Bright pink to pale red color with visible fat marbling
• Clean ocean smell with no strong fishy odor
• Firm but slightly soft texture when touched
• Even fat distribution through the meat
Many specialty seafood markets and Japanese grocery stores sell sushi grade toro. Online seafood suppliers may also ship frozen bluefin tuna belly directly to customers. When choosing toro, always verify that it has been handled for raw consumption and kept frozen at safe temperatures.
Sustainability is another important consideration. Bluefin tuna populations have faced heavy fishing pressure in the past. Responsible buyers often look for suppliers that follow regulated fishing practices or offer responsibly farmed tuna. Supporting sustainable seafood helps protect ocean ecosystems while still allowing people to enjoy premium dishes like toro sashimi.
Essential Tools for Preparing Toro Sashimi
Preparing toro sashimi at home does not require many tools, but the few items used must be precise and high quality. The most important tool is the sashimi knife. Japanese sashimi knives are long, thin, and extremely sharp. They are designed to cut through fish in a single smooth motion without damaging the delicate fibers.
Proper knife maintenance is essential for sashimi preparation. A dull blade crushes the fish instead of slicing cleanly. For the best results, chefs sharpen their knives regularly using whetstones. This process maintains a razor sharp edge that allows perfect slices of tuna.
Other useful tools include:
• Long sashimi knife or yanagiba knife
• Whetstone for sharpening the blade
• Clean cutting board dedicated to raw fish
• Tweezers for removing small bones
• Paper towels for drying the fish surface
Keeping the preparation area clean is also important. Raw fish should be handled with sanitized tools and fresh surfaces to maintain food safety. When these tools are used correctly, slicing toro sashimi becomes a precise and satisfying culinary skill.
Step by Step Guide to Slicing Toro
Slicing toro sashimi requires patience and a gentle touch. The goal is to create smooth, glossy pieces that highlight the marbling inside the fish. Begin by thawing frozen sushi grade tuna slowly in the refrigerator. Rapid thawing can damage the texture and cause the fish to lose moisture.
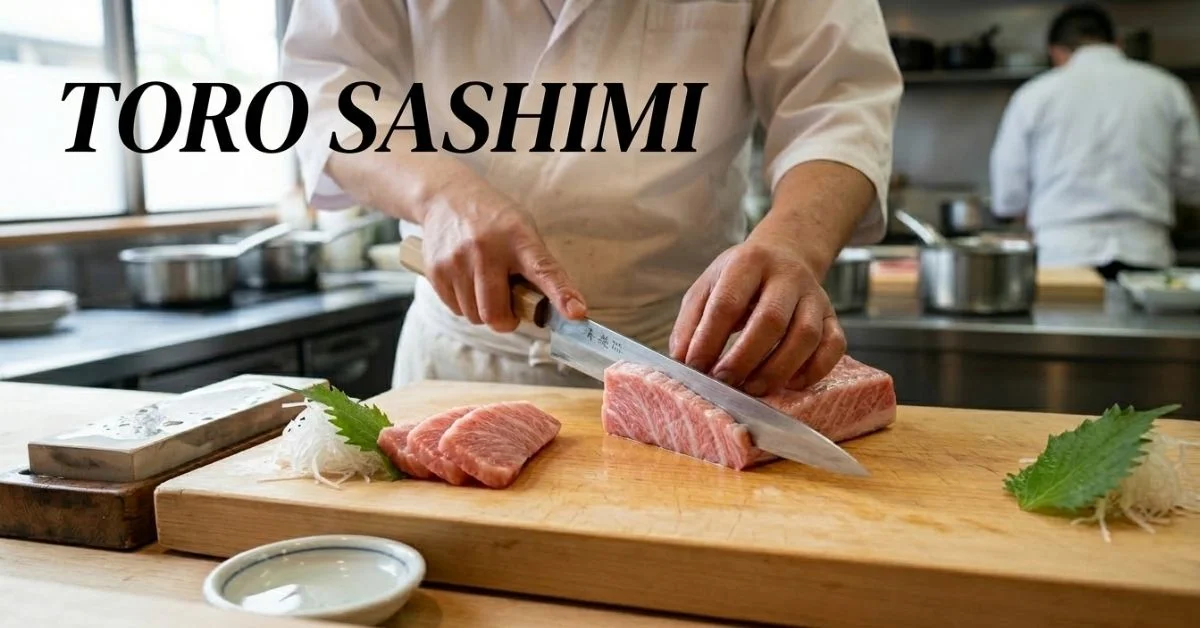
Once thawed, gently pat the tuna dry with paper towels. Place the fish on a clean cutting board with the grain of the muscle fibers running horizontally. Using a long sashimi knife, cut the fish in a single smooth pull toward yourself. Avoid sawing motions, which can tear the delicate flesh.
Follow these basic slicing steps:
• Trim uneven edges from the tuna block
• Slice against the grain to improve tenderness
• Use long single strokes with the knife
• Keep slices around 5 to 7 millimeters thick
• Wipe the blade between cuts for clean edges
Proper slicing reveals the beautiful marbled pattern of toro. Each slice should look smooth and glossy, with delicate layers of fat running through the meat. These visual qualities signal a well prepared sashimi dish.
Aburi Toro Technique
Aburi toro is a popular variation of toro sashimi that uses light searing. In this technique, the surface of the fatty tuna is briefly torched to caramelize the oils while leaving the interior raw. The result is a smoky aroma that complements the rich flavor of the fish.
To prepare aburi toro at home, place sliced toro on a chilled plate. Using a kitchen blowtorch, quickly pass the flame over the surface of the fish for a few seconds. The goal is to lightly sear the fat rather than cook the tuna completely. As the fat warms, it releases an irresistible aroma and slightly crispy texture.
After torching, chefs often add simple toppings such as green onion, grated daikon, or yuzu ponzu sauce. These ingredients provide freshness and balance the richness of the tuna belly. Aburi toro is especially popular in modern sushi restaurants because it combines traditional sashimi with a touch of smoky flavor.
Classic Serving Styles for Toro
Toro sashimi can be served in several elegant ways depending on the dining experience. The most traditional presentation is simple sashimi slices arranged neatly on a chilled plate. Garnishes such as shredded daikon radish, shiso leaves, and pickled ginger create visual contrast while refreshing the palate.
Another popular serving style is toro nigiri sushi. In this preparation, a slice of fatty tuna is placed over a small oval of seasoned sushi rice. The warmth of the rice slightly softens the tuna fat, enhancing the melt in mouth sensation. Some chefs brush the fish lightly with soy sauce before serving.
Modern sushi restaurants also experiment with creative toro dishes, including:
• Aburi toro nigiri with seared surface
• Toro sashimi topped with caviar
• Toro carpaccio with citrus dressing
• Toro sushi rolls with green onion garnish
Despite these variations, the goal remains the same. The natural flavor of the tuna belly should remain the focus of the dish.
Dipping Sauces That Complement Toro
Toro sashimi is often served with simple dipping sauces that highlight its natural taste. Heavy sauces are avoided because they can overwhelm the delicate richness of the fish. Instead, chefs prefer light seasonings that enhance umami flavor.
Common dipping options include:
• Soy sauce with fresh wasabi
• Yuzu ponzu citrus sauce
• Light sea salt flakes
• Fresh grated ginger
• Finely sliced green onions
When dipping toro sashimi, only a small amount of sauce is needed. The fish already contains natural oils that provide richness and flavor. Light seasoning allows diners to appreciate the subtle sweetness and buttery texture of the tuna belly.
Best Pairings for Toro Sashimi
Toro sashimi pairs beautifully with beverages and side dishes that balance its richness. Because the fish contains high levels of natural fat, refreshing drinks help cleanse the palate between bites. Traditional Japanese dining often includes sake or green tea with sashimi dishes.
Recommended pairings include:
• Dry junmai sake
• Light sparkling sake
• Japanese green tea
• Crisp white wines
• Fresh cucumber salad
Side dishes should remain simple and clean. Pickled vegetables, miso soup, and lightly seasoned rice are common accompaniments. These foods provide contrast while allowing the luxurious flavor of toro sashimi to remain the centerpiece of the meal.
Storage and Safety Guidelines
Handling raw fish safely is extremely important when preparing sashimi at home. Sushi grade tuna should always be kept refrigerated or frozen until ready to use. Proper storage maintains both safety and flavor quality.
Follow these safety guidelines when storing toro:
• Keep frozen toro at minus 18 degrees Celsius or lower
• Thaw slowly in the refrigerator overnight
• Consume within 24 hours after thawing
• Avoid refreezing previously thawed fish
• Keep preparation surfaces clean and sanitized
Serving temperature also affects flavor. Toro sashimi tastes best when slightly chilled but not ice cold. Allow the slices to rest at room temperature for a few minutes before serving. This gentle warming allows the tuna fat to soften and release its signature melt in mouth texture.
Health Benefits and Nutrition
Toro sashimi is not only delicious but also nutritionally valuable. The fatty tuna belly contains high levels of omega 3 fatty acids. These healthy fats support heart health, brain function, and overall wellness. Regular consumption of omega 3 rich seafood is associated with reduced inflammation and improved cardiovascular health.
In addition to healthy fats, toro provides high quality protein and essential nutrients. It contains vitamin D, vitamin B12, and selenium, which support immune function and energy metabolism. Despite its richness, toro sashimi can fit into a balanced diet when eaten in moderate portions.
Approximate nutrition per ounce of toro sashimi:
• Calories: around 60 to 70
• Protein: about 6 grams
• Healthy fats: around 4 grams
• Omega 3 fatty acids: high levels
Because of its richness, toro is usually served in small portions. Even a few slices provide a satisfying and flavorful dining experience.
Toro Sashimi at Home vs Sushi Restaurants
Enjoying toro sashimi at a professional sushi restaurant can be a memorable experience. Skilled sushi chefs spend years mastering fish selection, knife techniques, and presentation. Their expertise ensures each slice is perfectly prepared and served at the ideal temperature.
However, preparing toro sashimi at home is also possible with the right ingredients and tools. Buying sushi grade tuna from trusted suppliers allows home cooks to experiment with slicing techniques and serving styles. Many people enjoy preparing toro for special occasions or small gatherings.
The key difference lies in experience and precision. Restaurants offer expertly cut fish and creative presentations, while home preparation provides a more personal and educational approach. Both methods allow diners to appreciate the luxurious flavor of toro sashimi in their own way.
Conclusion
Toro sashimi is one of the most celebrated dishes in Japanese cuisine because of its rich flavor, silky texture, and beautiful marbling. Made from the fatty belly of bluefin tuna, this premium ingredient delivers a melt in mouth experience that sushi lovers treasure. Understanding the differences between otoro and chutoro, learning proper slicing techniques, and sourcing high quality sushi grade tuna can help anyone appreciate this delicacy more deeply. Whether enjoyed in a traditional sushi restaurant or prepared carefully at home, toro sashimi offers a unique taste of luxury seafood.
FAQs
What is toro sashimi?
Toro sashimi is raw fatty tuna belly sliced and served without rice, usually from bluefin tuna.
What is the difference between otoro and chutoro?
Otoro has the highest fat content and melts instantly, while chutoro has balanced fat and firmer texture.
Is toro safe to eat raw?
Yes, when it is labeled sushi grade and handled with proper freezing and storage methods.
What does toro sashimi taste like?
It has a buttery, rich flavor with a smooth texture that melts gently in the mouth.
Where can I buy sushi grade toro?
Specialty seafood markets, Japanese grocery stores, and trusted online seafood suppliers sell sushi grade tuna.
How should toro sashimi be stored?
Keep it frozen until use, thaw slowly in the refrigerator, and eat within 24 hours for best quality.

If you have ever searched for a food trend or a quick recipe and landed on a blog that just felt different, cleaner, faster, and actually useful, there is a good chance you stumbled onto a jalbiteblog-style post. I have been down that rabbit hole more times than I can count, and once I understood what made that format work, I could not unsee it. This article breaks down exactly what jalbiteblog is, how it works, and why it keeps showing up in food searches everywhere.
What Is Jalbiteblog?
Jalbiteblog is a food-focused digital content format built around two things: current food trends and beginner-friendly recipes. Think of it as a food blog that does not try to overwhelm you with long backstories or complicated techniques. Instead, it gets straight to the point, explains a trend or dish clearly, and gives you something useful to try at home.
The name itself blends the idea of a “bite” (small, digestible content) with the blog format, creating a style that feels light but still genuinely helpful. It sits somewhere between a full recipe website and a food news page, which is exactly why people keep finding it useful.
The meaning behind the term
“Jalbiteblog” is not a registered brand in the traditional sense. It represents a content philosophy more than a single website. The word combines casual food language with the blog format to describe content that is quick to read, visually clean, and focused on what people actually want to cook or learn about right now.
Why it appears in food trend searches
Because jalbiteblog-style content targets trending food topics alongside searchable recipes, it often shows up when people look up popular food items, seasonal dishes, or viral cooking ideas. Search engines tend to favor this format because it answers specific questions quickly without burying the answer under piles of filler content.
Read also: Louisiana Famous Fried Chicken Menu: Full Guide With Prices and Ordering Tips
What Kind of Content Jalbiteblog Focuses On
The content inside a jalbiteblog is not random. There is a clear pattern to what gets published and why.
Food trends explained simply
Rather than writing academic breakdowns of why a food is trending, jalbiteblog content explains it the way a friend would. Something like, “Birria tacos are everywhere right now because the braised beef combined with melted cheese in crispy tortillas became a full-on social media moment.” Simple, direct, and actually useful.
Easy, quick recipes
Most recipes in this format stick to six to ten ingredients and skip the multi-day prep. The goal is that someone with a regular home kitchen can make the dish the same evening they read the post. Steps are kept low and instructions avoid the kind of technical jargon that makes beginners close the tab.
Drinks and seasonal ideas
Seasonal content plays a big role here. Summer drinks, winter warmers, holiday-specific recipes, and trend-driven beverages all fit naturally into the jalbiteblog format. This kind of content also performs well in search because people look for it at very specific times of year, which gives it a natural traffic boost.
Ingredient and kitchen guides
Beyond recipes, the format also covers simple ingredient explanations. If a trending recipe calls for miso paste or sumac and a reader has no idea what those are, jalbiteblog content usually includes a short explanation right alongside the recipe instead of sending you off to find it yourself.
How Jalbiteblog Works (Step-by-Step Flow)
Here is the thing most people miss: jalbiteblog is not just about the writing style. It follows a repeatable workflow that makes the content both searchable and actually readable.
I spent more time than I should have picking this apart, so let me save you the effort.
Step 1: Trend or recipe idea selection
The process starts with figuring out what people are currently searching for or talking about. This could be a dish going viral on social media, a seasonal ingredient picking up steam, or a cooking technique that keeps appearing in food videos. The idea selection is intentional, not random.
Step 2: Content creation format
Once the idea is locked in, the content is structured around answering the reader’s main question first. The recipe or trend explanation comes early in the post, not buried after five paragraphs of background. This keeps readers engaged and makes the post far more likely to show up in search results.
Step 3: Publishing structure (blog layout)
A jalbiteblog post typically starts with a short intro, moves into the main explanation or recipe, uses short sections with clear headings, and wraps up with quick tips or a FAQ. The layout is designed to work just as well on a phone screen as on a desktop, because most food content today is read on mobile.
Step 4: How readers interact with posts
Readers do not usually go through these posts top to bottom. They skim for what they need. Jalbiteblog content is built around that behavior. Key information sits in headings, ingredient lists are formatted for easy scanning, and steps are numbered clearly. This makes the content genuinely useful even for someone who only has a couple of minutes.
What a Typical Jalbiteblog Post Looks Like
Understanding the structure helps whether you are a reader or someone thinking about creating this type of content.
Title and hook style
Titles in this format are direct and specific. Something like “How to Make Crispy Smashed Potatoes in 25 Minutes” works much better than “The Ultimate Potato Guide.” The hook in the first paragraph usually covers what the dish is, why it is worth making, and how long it takes, all within the first few sentences.
Recipe or trend breakdown format
The body of the post follows a predictable but effective structure. A short explanation of the dish or trend comes first, followed by a list of ingredients with quantities, numbered steps in plain language, and a few notes on substitutions or variations. This makes the content useful for different dietary needs without needing a separate post for each version.
Use of visuals and short sections
Most jalbiteblog posts rely on one or two strong images rather than a gallery of twenty. The writing is broken into sections short enough to read in one glance, which keeps the page feeling clean rather than overwhelming.
FAQs and quick tips structure
Almost every post ends with a small FAQ or tips section. These answer the follow-up questions a reader would naturally have after going through the recipe. Questions like “Can I make this ahead of time?” or “What can I swap out for the main ingredient?” are standard. This also helps the post show up for more specific searches people type in.
Why Jalbiteblog Is Gaining Popularity
Let’s be honest, this format did not get popular by accident. Several things about it match exactly how people consume food content right now.
Short attention-friendly content
Nobody wants to read 3,000 words before getting to the recipe. Jalbiteblog-style content respects that. It gets to the useful part fast without cutting the context that makes it actually helpful. That balance is harder to pull off than it sounds, which is why not every food blog manages it well.
Mobile-first design
Most people search for recipes while standing in a kitchen or sitting on the couch with their phone. Jalbiteblog content is built for that experience. Short paragraphs, scannable ingredients, and clear steps all work on a small screen without the reader having to zoom in or scroll through walls of text.
Mix of trends plus practical recipes
The combination of what is trending and what is actually cookable is the real draw. Following food trends is fun, but only if you can do something with that information. Jalbiteblog content gives you both in the same post.
Jalbiteblog vs Traditional Food Blogs
You might be wondering, is this really that different from a regular food blog? It is, and here is why.
Content depth vs speed
Traditional food blogs often include long personal stories, detailed dish histories, and multiple recipe variations in one post. That depth is genuinely valuable for some readers. Jalbiteblog content trades some of that depth for speed and clarity. It answers your question first and adds context only where it actually helps.
Recipe complexity differences
A traditional food blog might walk you through a homemade croissant recipe with a three-day lamination process. A jalbiteblog would more likely show you a quick version using store-bought puff pastry, or explain why croissants are trending without necessarily teaching you to make them from scratch. Neither approach is better, they just serve different reader needs.
User experience comparison
On a traditional food blog, the reading experience is often more immersive. You learn about the creator, their kitchen, their family. Jalbiteblog content is less personal in that way, but faster and more immediately practical. Readers who return to jalbiteblog-style content are usually looking for something specific rather than browsing for general inspiration.
Real Benefits and Limitations
Benefits for readers
You get information quickly, in a format that is easy to act on. Content is organized so you can find what you need without reading everything. Seasonal and trending topics keep things relevant to what people are actually cooking right now. Beginners especially benefit because the language skips the assumptions about what you already know.
Challenges
The biggest challenge with this format is keeping quality consistent. Because the format is quick to produce, some jalbiteblog-style sites publish low-effort content that covers trends without actually testing the recipes. And trend-based content does have a short shelf life. A recipe tied to a viral moment might pull massive traffic for two weeks and almost nothing after that.
Repetition is also real. When multiple creators chase the same trend at the same time using the same format, posts start feeling nearly identical. The ones that stand out are the ones that add a genuine angle or actually test the recipe rather than just rewriting what is already everywhere.
What Most People Get Wrong About This Topic
Most people assume jalbiteblog is just another food blog with a trendy name. The real difference is structural and intentional. It is not about the niche or even the recipes themselves. It is about how the content is organized to serve a specific type of reader, someone searching for something specific, reading quickly, and walking away with something they can actually use.
Another common misunderstanding is that this format is low quality by design. Done well, jalbiteblog-style content is actually harder to write than a traditional long-form food post. Getting that balance of short and useful right, without leaving out what matters, takes real skill and genuine knowledge of the topic.
How Beginners Can Use or Start a Jalbiteblog
Starting this type of content is very much within reach if you go about it the right way.
Choosing a niche within food
Broad food blogs are harder to grow than focused ones. Picking a specific angle like quick weeknight dinners, no-bake desserts, or budget-friendly meals gives your content a clear identity and makes it easier for the right readers to find you. Jalbiteblog format works especially well with niche topics because the content is already built to be specific and targeted.
Keeping content simple and consistent
Consistency matters more than volume. Two well-structured posts a week will outperform five rushed ones over time. Focus on fully answering one question per post rather than trying to cover everything at once.
Avoiding common mistakes
The biggest beginner mistake is writing about a trend you have never actually tried. If you have not made the recipe, do not write it as if you have. Readers notice, and trust is genuinely hard to rebuild once you lose it. Another mistake is copying the structure of successful posts without understanding why that structure works, which leads to content that looks like jalbiteblog but does not perform like it.
Future of Jalbiteblog-Style Content
Role of AI and digital food trends
AI tools are already being used to push out food content fast. The ones that succeed are still the ones backed by real testing and human judgment. AI can help with structure and speed, but it cannot replace actual cooking experience. Jalbiteblog content built on real kitchen knowledge will keep outperforming the automated versions.
Growth of short-form food content
The appetite for fast, practical food content is not going anywhere. Short-form video has trained people to expect quick answers, and written content that mirrors that pace will keep growing. Jalbiteblog-style writing is well-positioned for this because it already delivers information the way people now expect it.
Conclusion
Here is my honest take on all of this jalbiteblog works because it respects the reader’s time without dumbing things down. It is not about being the flashiest food blog out there. It is about being the one that actually helps when someone is standing in a kitchen trying to figure out what to cook. Whether you are reading it or building it, the principle is the same. Get to what matters, back it up with real experience, and make it easy to use. Do that consistently, and the rest tends to follow.
FAQs
What is Jalbiteblog in simple terms?
It is a food content format that combines trending food topics with simple, beginner-friendly recipes in a clean, easy-to-read blog style. The focus is on being quick and practical rather than long and detailed.
Is Jalbiteblog a real website or a concept?
It is both. The term refers to a content style or format, but there are also actual blogs that follow this approach. It is more useful to think of it as a format category than a single website.
What makes it different from regular food blogs?
Traditional food blogs often include long personal stories and complex recipes. Jalbiteblog content skips the lengthy intro and delivers useful information faster, with a structure built for mobile readers who are scanning rather than reading everything.
Why is it trending online?
It matches how people actually search for and consume food content today. Short attention spans, mobile browsing, and the pull of social media food trends all point toward content that is fast, visual, and immediately useful.
Can beginners create similar content?
Yes, and beginners are often well-suited for it because the format rewards clarity over expertise. The key is to actually try the recipes you write about and focus on explaining things simply rather than trying to sound impressive.
You have probably stood in an Asian grocery store staring at that long, thick white root and thought, “what even is this thing?” I have been there. Most people who search “white root vegetable” are really just trying to figure out what daikon is and what to do with it. So let’s clear that up right away and get into the good stuff, because once you understand daikon, it becomes one of those vegetables you actually look forward to cooking with.
This covers what daikon is, how it tastes, how to buy and cook it properly, what mistakes to avoid, and when to reach for it instead of turnip or regular radish.
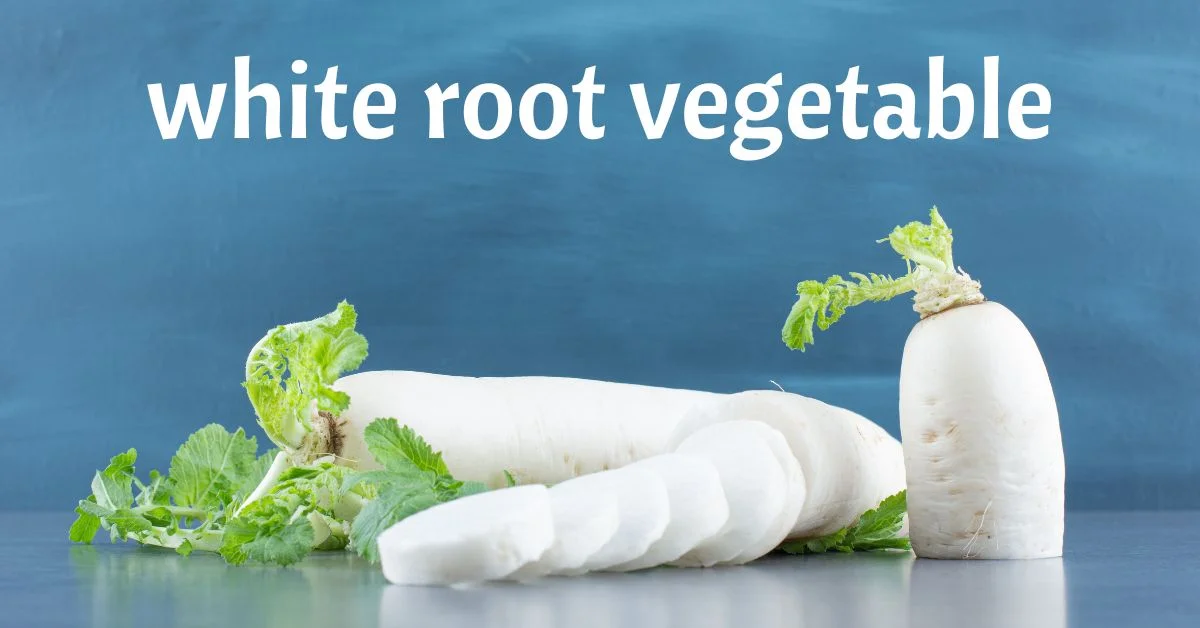
What Is a White Root Vegetable?
When you search “white root vegetable,” most results and most conversations in kitchens point to one thing: daikon. It is a long, thick, pale-white root with a mild flavor and a crisp bite. Think of it like a very large, mild radish that you can cook, grate, pickle, or eat raw.
Yes, there are other white-colored root vegetables out there, like parsnips, turnips, and jicama. But when people say “white root vegetable” in the context of Asian cooking, recipes, or grocery shopping, daikon is almost always what they mean. That is the focus here because that is what most people are actually looking for when they land on this topic.
What Is Daikon (White Radish)?
Origin and Appearance
Daikon comes from East Asia and has been grown in China, Japan, and Korea for centuries. The word “daikon” is Japanese and simply means “big root.” It is easy to recognize because of its size. A typical daikon looks like a large white carrot or a fat candle, usually around 30 to 50 centimeters long, though smaller ones are common too.
The skin is smooth and pale white to off-white. The flesh inside is white and firm, similar to a raw potato in texture but with more moisture. The green leafy tops are edible as well, though most stores sell it already trimmed.
Taste and Texture Explained Simply
Raw daikon has a mild, slightly peppery flavor. It is nowhere near as sharp as a red radish, which can genuinely sting a bit. The peppery note is subtle, almost fresh-tasting, with a light bitterness underneath. When you bite into it raw, it is crisp and juicy, kind of like a cucumber but a bit denser.
Once you cook daikon, the flavor changes noticeably. The sharpness disappears, and what is left is a soft, slightly sweet, almost neutral taste that absorbs whatever broth or sauce surrounds it. This is exactly why daikon is so popular in slow-cooked soups and stews.
Common Names Around the World
You might see it labeled as mooli in South Asian grocery stores, especially in Pakistan, India, and the UK. In some regions it is called white radish, Chinese radish, or Japanese radish. All of these names point to the same vegetable, so do not let that trip you up at the store.
Read also: Dry Salami: What It Is, How to Choose It, and Use It Right
How Does Daikon Taste? A Beginner’s Guide
Raw vs Cooked Flavor
Raw daikon tastes clean and mildly spicy. If you have ever eaten a regular red radish and found it a bit too aggressive, daikon is a much gentler version of that. It works well grated over rice or noodles, sliced thin in salads, or served alongside rich dishes to cut through the heaviness.
Cooked daikon is a completely different experience. It turns tender and almost silky after simmering. The mild bitterness fades and it picks up a slightly sweet, almost buttery quality. This is the version you find in Japanese oden, Korean doenjang stew, and Chinese braised pork belly dishes.
Texture in Different Dishes
In salads or as a garnish, daikon stays crisp and light. Grated daikon, called daikon oroshi in Japanese cooking, has a wet, fluffy texture that works beautifully as a topping for grilled fish or tempura.
In soups and braises, daikon becomes soft but does not fall apart easily if you cut it into thick rounds. Cut it too thin and cook it too long though, and it turns mushy fast. That is one of the most common beginner mistakes, and honestly, I figured it out the hard way before anyone told me.
Why Some People Find It Mild and Others Find It Spicy
Here’s the thing: it depends on which part of the root you are using. Younger, smaller daikon tends to be milder and sweeter. Older, larger daikon, especially the top portion near the leaves, can have a stronger, slightly more bitter bite. If you want the mildest flavor, go for the middle and lower portions of the root. The tip end carries the most kick.
Daikon vs Other Root Vegetables
Daikon vs Turnip
This is one of the most common points of confusion, and people mix these two up all the time. Daikon and turnip look similar from a distance, but they are not the same vegetable and they definitely do not taste the same.
Turnip has a more pronounced, earthy bitterness, especially when raw. It is starchier and heavier in texture. Daikon is juicier, milder, and much less bitter. Turnip shows up a lot in European cooking, while daikon dominates Asian cuisines.
If a recipe calls for daikon and you use turnip instead, the dish will taste noticeably earthier and heavier. It can work in a pinch, but the result will be different enough that you will notice.
Daikon vs Red Radish
Red radishes are small, sharp, and quite peppery. They are usually eaten raw as a snack or garnish and are rarely cooked because their texture changes quickly with heat. Daikon is milder, larger, and flexible for both raw and cooked uses.
Think of red radish as your sharp, quick garnish and daikon as the main ingredient that can actually carry a dish.
When to Use Each (Simple Decision Guide)
Use daikon when you want something mild, juicy, and flexible, especially in soups, stir-fries, pickles, or grated as a topping. Use turnip when a recipe specifically calls for it or when you want a heartier, earthier note in winter stews. Use red radish when you want a peppery crunch on a salad or taco without any cooking involved.
How to Use Daikon in Everyday Cooking
Best Cooking Methods
Raw: Grate it over noodles or grilled meat, slice it thin for salads, or cut into matchsticks for slaws. It adds a refreshing crunch and mild heat without overpowering the other ingredients.
Pickled: Quick-pickled daikon is genuinely one of the easiest things you can make. Slice it thin, add rice vinegar, salt, sugar, and a pinch of turmeric for color, then let it sit for 30 minutes. You end up with bright, tangy slices that pair perfectly with banh mi, rice bowls, and Korean barbecue.
Stir-fried: Daikon holds up well in a hot wok. Cut it into thin rounds or matchsticks and stir-fry with garlic, soy sauce, and sesame oil for a simple side dish. It cooks in about five minutes and stays slightly firm.
Simmered in soup or braised: This is where daikon really shines. Cut it into thick rounds, drop it into a flavorful broth, and let it simmer for 20 to 30 minutes. It absorbs everything. Japanese oden, Korean galbi-tang, and Chinese pork rib soup all use daikon this way, and for good reason.
Popular Dishes Using Daikon
Daikon shows up in Japanese ramen as a topping, Vietnamese banh mi as pickled slices, Korean kimchi as cubed pieces called kkakdugi, Chinese lo bak gou which is that turnip cake that is actually made with daikon, and Indian mooli paratha where grated daikon is stuffed into flatbread. It travels well across cultures.
Easy Beginner Recipe Idea
A simple place to start is daikon and carrot pickle. Julienne equal amounts of daikon and carrot, toss with salt and let it sit for ten minutes, then rinse and mix with rice vinegar, sugar, and a little fish sauce. It keeps in the fridge for up to a week and honestly goes with almost everything you make.
How to Choose Fresh Daikon at the Store
What to Look For
Fresh daikon should feel heavy and firm for its size. The skin should be smooth without too many cracks or soft spots. The color should be even and white, not yellowish or dull gray. If the greens are still attached, check that they look fresh and perky rather than wilted and sad.
Smaller daikon tends to be sweeter and more tender. Very large ones can have a pithy or hollow center, which affects both texture and flavor in ways you will not enjoy.
Signs of Old or Bad Daikon
Avoid daikon that feels light or hollow when you pick it up. Soft patches on the skin are a bad sign. If the flesh looks translucent or feels spongy when you cut into it, it is past its best. A strong, pungent smell is also a clear sign that it has been sitting around too long.
Common Mistakes When Cooking Daikon
Overcooking and Losing Texture
Daikon absorbs liquid and softens quickly. You might be wondering why your soup daikon turned to mush, and the answer is almost always that it went in too early. Add it in the last 20 to 25 minutes rather than from the very beginning. Cook it for a full hour in a braise and it turns into a soft, collapsing disappointment.
Using It in the Wrong Dishes
Daikon has a high water content, which means it releases moisture when it cooks. If you add it to a dish where you do not want extra liquid, like a thick stir-fry sauce, it can water things down in a way that catches you off guard. Either salt it and press it first to remove some moisture, or use it in dishes where the extra liquid is actually welcome, like soups and braises.
Not Balancing Its Mild Flavor
Because daikon is mild, it needs strong partners to actually taste good. Soy sauce, miso, ginger, garlic, sesame oil, and fermented pastes all work well alongside it. Plain boiled daikon with nothing on it tastes like almost nothing. Season it generously or use it in a well-flavored broth and the difference is dramatic.
What Most People Get Wrong About Daikon
Let’s be honest: most people buy daikon once, boil it plain, find it completely underwhelming, and never touch it again. The real issue is not the vegetable. It is the approach. Daikon genuinely needs good seasoning or a flavorful base to show you what it can do.
The other common error is treating it like a potato. Daikon is not starchy at all. It will not thicken a sauce or give you that same filling, hearty quality. Once you stop expecting it to behave like a potato or turnip and start using it for what it actually does well, absorbing flavor in a braise, adding crunch when raw, bringing lightness to a soup, it becomes a genuinely useful part of your regular cooking.
Nutrition and Health Benefits
Key Nutrients
Daikon is mostly water, which makes it very low in calories. A 100-gram serving has roughly 18 calories, making it one of the lightest vegetables you can eat by volume. It contains vitamin C, folate, potassium, and some B vitamins. The greens are even more nutritious and can be cooked like spinach or mustard greens if you can find them still attached.
Digestive and Hydration Benefits
Daikon contains digestive enzymes, particularly amylase and protease, which help break down carbohydrates and proteins. This is one reason it is traditionally served alongside heavy, oily foods in Japanese cooking. The high water content also helps with hydration and keeps digestion moving. It is not a miracle food by any stretch, but it earns its place as a genuinely light and supportive addition to meals.
How to Store Daikon Properly
Fridge Storage Tips
Wrap daikon in a slightly damp paper towel, place it in a plastic bag or sealed container, and keep it in the crisper drawer. If the greens are still attached, remove them before storing because they pull moisture away from the root and speed up wilting.
Already cut it? Wrap the cut end tightly with plastic wrap to prevent it from drying out and picking up fridge odors.
How Long It Lasts
A whole, uncut daikon stays fresh in the fridge for one to two weeks. Once cut, use it within three to four days for the best texture and flavor. Pickled daikon lasts much longer, usually two to four weeks in a sealed jar in the fridge.
Conclusion
Daikon is one of those vegetables that rewards you once you actually learn how to treat it right. Pick a firm, heavy root, pair it with bold seasonings, and match it to dishes where its natural strengths, absorbing flavor, adding crunch, keeping things light, can actually come through. If you are new to it, start with a quick pickle or toss some thick rounds into your next soup. You will get it pretty quickly from there. And once you do, it tends to become a regular in the rotation without much convincing needed.
FAQs
Is daikon the same as turnip?
No, they are different vegetables. Daikon is a type of radish with a mild, slightly peppery flavor and a juicy, crisp texture. Turnip is earthier, starchier, and a bit more bitter. They can sub for each other in cooked dishes but the taste difference is noticeable enough that it matters.
Can you eat daikon raw?
Yes, and it is actually really good that way. Grated daikon is a common condiment in Japanese cooking, and thin slices work well in salads, coleslaws, and wraps. Raw daikon has a fresh, mild crunch with just a hint of pepper that makes it a nice contrast to richer ingredients.
Why does daikon sometimes taste bitter?
Bitterness usually comes from older roots, the top section near the leaves, or daikon that has been sitting in your fridge too long. Fresh, medium-sized daikon used from the middle portion gives you the mildest and sweetest result.
What can I substitute for daikon?
In raw dishes, jicama is a solid substitute because it has a similar crisp, mild texture. In cooked dishes, turnip or kohlrabi can work, though they bring more earthiness. For pickled daikon, regular radishes or even cucumber can fill in, though the flavor will be noticeably lighter.
Is daikon healthy for daily use?
Yes, it is very low in calories and contains useful nutrients including vitamin C and digestive enzymes. Eating it regularly as part of a varied diet is perfectly fine and can genuinely support digestion and hydration. Just treat it as one part of balanced meals rather than leaning on it as a single fix.
Let me be honest with you the first time I tried making spicy beef jerky at home, I was convinced it was going to be a disaster. I had overpriced store-bought bags in my pantry and figured there was no way I could match them without special equipment. I was completely wrong. Once you understand a few key things about meat selection, marinade balance, and heat control, you can make spicy beef jerky that puts most commercial brands to shame. This guide walks you through everything, including the mistakes I wish someone had warned me about before my first batch.
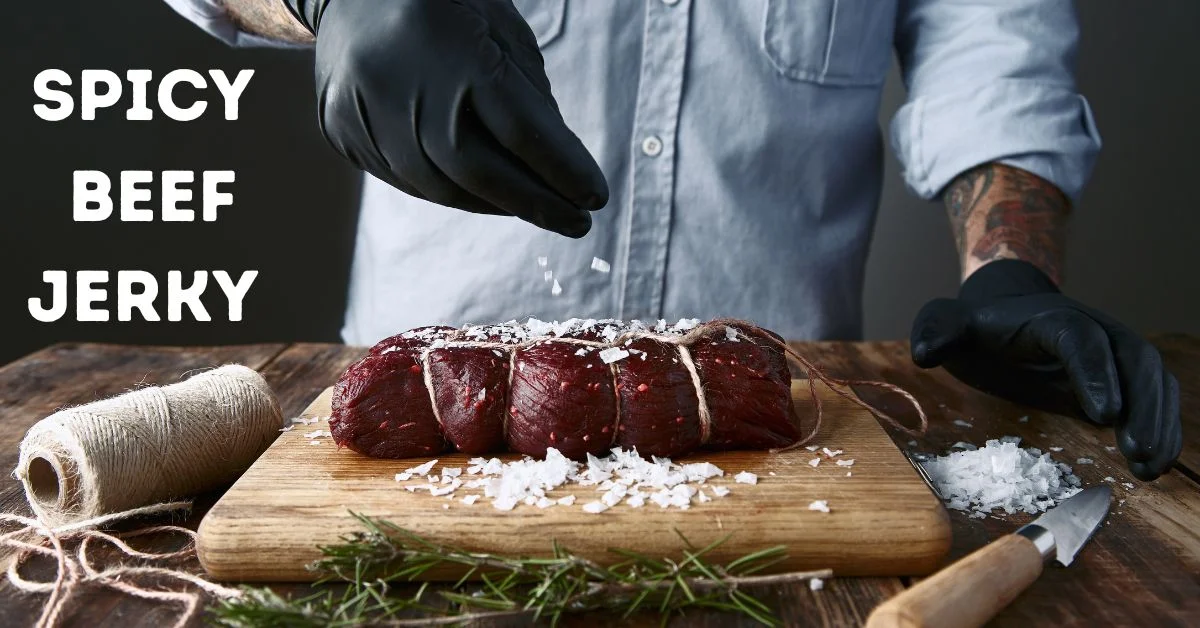
What Is Spicy Beef Jerky?
Spicy beef jerky is dried, seasoned beef with chili-based heat built directly into the marinade. Unlike regular jerky, which mostly tastes salty and smoky, spicy jerky carries a layered heat you feel building at the back of your throat. It is shelf-stable, protein-dense, and keeps well for weeks when stored properly.
How It Differs from Regular Jerky
Regular jerky relies on salt, smoke, and a hint of sweetness for flavor. Spicy jerky adds chili peppers, hot sauces, or spice blends to the marinade, so the heat soaks all the way into the meat rather than sitting on the surface. Here is the thing most beginner guides never mention the drying process concentrates your flavors as moisture leaves the meat. Whatever spice level you put in will feel noticeably stronger once the jerky is finished, and that one detail changes how you should build your marinade from the start.
Common Flavor Profiles
Sweet and spicy is the most popular style, where brown sugar or honey softens the chili heat into something more snackable. Smoky chipotle is a close second, with a rich, earthy burn that does not hit as aggressively as fresh chili. Extra hot styles using ghost pepper or Carolina Reaper powder are a different category entirely and genuinely not for casual snacking. Teriyaki-based spicy jerky leans sweeter with a soy backbone and a gentle jalapeño finish that sneaks up on you.
Read also: How to Cook Whole Tilapia (Complete Beginner’s Guide)
Choosing the Right Beef Cut
Best Cuts for Jerky
The best jerky always comes from lean cuts. Fat does not dry properly, goes rancid faster, and makes the texture greasy rather than giving you that firm, satisfying chew. The cuts that work best are top round, bottom round, eye of round, and flank steak. Top round is the most common choice because it is affordable, easy to find, and has a clean grain that makes slicing manageable. Sirloin tip works well if you want something slightly more tender. Avoid ribeye or chuck great for cooking, terrible for drying.
Why Fat Affects Shelf Life and Texture
Fat does not behave like muscle during dehydration. When you dry fatty meat, the fat sits between the dried fibers and starts oxidizing, creating an off smell and sour taste within just a few days. Even a small white fat cap on the edge of a slice can cause that piece to spoil faster than the rest of the batch. Trim it off before you start slicing, every single time.
How to Slice Beef for Perfect Jerky
Slicing against the grain gives you tender jerky that breaks apart easily when you bite in. Slicing with the grain produces a tougher, chewier result. Most people prefer against-the-grain for everyday snacking, while with-the-grain holds up better for hiking or long workout sessions. A simple trick that made a big difference for me was partially freezing the meat for 45 to 60 minutes before cutting — it firms up just enough to give you clean, even slices without the beef sliding around under the knife.
For thickness, aim for 4mm to 5mm. Thinner than 3mm turns brittle. Thicker than 6mm dries unevenly and stays chewy in the center. That middle range hits the sweet spot for most home drying methods.
The Spicy Marinade Formula
A solid jerky marinade has four things working together salt, sweet, spice, and acid. For every 500 grams of beef, use this base ratio:
Soy sauce or Worcestershire 60ml Brown sugar or honey 1 tablespoon Chili flakes, powder, or hot sauce adjusted by heat level Apple cider vinegar or lime juice 1 tablespoon Garlic powder 1 teaspoon Liquid smoke (optional) 1 teaspoon
The acid tenderizes the meat slightly and helps flavors absorb more deeply. Do not skip it. For heat ingredients specifically, chili flakes hit fast and fade. Chili powder gives a deeper, more rounded burn throughout each piece. Cayenne is pure heat that amplifies whatever else is in the marinade. Ghost pepper or Reaper powder gets measured in pinches only.
Spice Control System: Mild to Extreme Heat
I spent way too many batches figuring this out, so you do not have to go through the same trial and error. Instead of one fixed recipe, here is a heat-level framework you can apply to any marinade.
Level 1 to 5 Heat Scale
Level 1 (Mild): Half a teaspoon of chili flakes only. Warm aftertaste, good for anyone new to homemade jerky.
Level 2 (Medium): One teaspoon chili flakes plus a quarter teaspoon cayenne. Clear, noticeable heat that builds slightly without lingering too long.
Level 3 (Hot): One teaspoon cayenne plus one tablespoon hot sauce. Builds quickly and sticks around at the back of your throat for a few minutes after each piece.
Level 4 (Very Hot): One and a half teaspoons cayenne plus half a teaspoon habanero powder. Intense, face-warming heat that most spice lovers will enjoy but casual snackers will find too much.
Level 5 (Extreme): A quarter teaspoon of ghost pepper or Reaper powder maximum. Genuinely painful for most people use gloves and always do a small test batch first.
How Drying Changes Spice Intensity
As moisture leaves the beef during drying, all the flavor compounds concentrate, including capsaicin. Expect your finished jerky to feel about half a heat level spicier than the raw marinated meat tasted. If you are targeting a Level 3 result, marinate at Level 2.5. Tasting and adjusting the marinade before the meat goes in gives you a much more predictable final product every time.
Step-by-Step: How to Make Spicy Beef Jerky
Combine all marinade ingredients and stir until the sugar dissolves before adding anything else. Add your sliced beef, making sure every piece is fully coated. Use a zip-lock bag with the air squeezed out, or press plastic wrap directly onto the meat surface in a bowl. Refrigerate for a minimum of 6 hours, with 12 to 24 hours giving noticeably better results. Flip or shake the bag a couple of times if you remember it helps redistribute everything on thicker slices. Do not go past 36 hours, because the acid starts breaking down the meat fibers too aggressively and the final texture suffers.
Before drying, pull each piece out and pat it dry with paper towels. If the surface is still wet going in, the jerky steams rather than dehydrates in the first hour and your drying time goes up. Lay everything flat on your drying surface without any overlapping airflow needs to reach both sides of every piece.
Drying Methods Compared
Oven Method: Set to 70 to 80°C (160 to 175°F), prop the door open with a wooden spoon, and place jerky on wire racks over baking sheets. Expect 3 to 5 hours depending on thickness. Rotate racks every hour because the back of most ovens runs hotter than the front.
Dehydrator Method: The most consistent results for home jerky making. The fan moves air at a steady temperature across all trays evenly. Set to 70°C (160°F) and expect 4 to 6 hours with very little babysitting needed. Texture and color stay uniform across the whole batch.
Smoker Method: Best flavor by a clear margin. Low heat combined with real wood smoke creates a depth that neither oven nor dehydrator can replicate. Set to 70 to 85°C (160 to 185°F) and use hickory, cherry, or apple wood. Avoid mesquite — it overwhelms the spice flavors completely. Expect 3 to 5 hours, slightly faster than the dehydrator.
How to Know When Jerky Is Done
Pull one piece out, let it cool for a full minute, then bend it. Properly dried jerky bends without snapping but should not feel soft or moist anywhere in the center. A slight surface crack when bent is exactly what you want. Snaps cleanly in two means overdone. Bends with no resistance and feels soft means it needs more time.
Overdrying is more common than people admit. It turns jerky brittle, crumbly, and flavorless. Pull a test piece around the 3-hour mark regardless of what the recipe says. Underdried jerky is a food safety issue if the center still feels damp and pliable, it goes back in for at least another hour. The USDA recommends an internal temperature of 71°C (160°F) for beef jerky. When unsure, finish it in a 100°C oven for 10 minutes after dehydrating.
Troubleshooting Spicy Beef Jerky
Too spicy: Reduce cayenne or hot sauce by half next time and replace some of it with smoked paprika to keep the flavor without the burn. Too mild: Your marinade was probably too diluted or the marinating time too short. The marinade should taste clearly spicy and slightly too salty on its own before the meat goes in.
Too tough: Almost always comes from slicing with the grain or over drying. Switch to against-the-grain slicing or try a more tender cut like flank steak. Flavor not absorbing: Score each slice lightly with a fork before marinating to help the liquid penetrate faster, and check that your marinade has enough salt — salt is what carries flavors into the meat fiber.
Storage, Shelf Life, and Safety
In humid climates, room temperature storage is genuinely risky. Jerky left in open air can develop surface moisture within two to three days, which leads straight to mold. Vacuum sealing is the most effective solution, and adding silica gel packets inside the bag gives extra protection on top of that.
At room temperature in a dry climate, properly dried jerky lasts up to two weeks in an airtight container. In the fridge it stays good for a month. In the freezer, well-sealed jerky holds up for six months without meaningful texture or flavor loss. White fuzzy spots mean mold discard the whole batch, not just the affected pieces. A sour smell or sticky texture are the other signs to watch for.
Flavor Variations You Can Try
Sweet and Spicy: Add two tablespoons of brown sugar and a tablespoon of sriracha to the base marinade. Sweetness hits first, heat follows at the back. Easy crowd-pleaser.
Jalapeño Teriyaki: Swap Worcestershire for soy sauce and mirin, add two tablespoons of pickled jalapeño brine and one teaspoon of jalapeño powder. Tangy, slightly sweet, with a clean green-chili heat.
Smoky Chipotle: Blend two chipotle peppers in adobo sauce into the marinade and add a teaspoon of smoked paprika. Slow-building barbecue-style heat that works especially well in a dehydrator.
Extreme Hot Style: Start from Level 4 and add a quarter teaspoon of ghost pepper powder. Wear gloves. Test five or six pieces before committing a full batch.
What Most People Get Wrong About Spicy Jerky
Most people treat spice like a volume knob they can simply turn up when they want more heat. Real jerky flavor comes from layering different types of heat — the sharp fast hit from cayenne, the deeper slower burn from chipotle, and the lingering warmth from chili flakes work together in a way that no single ingredient can replicate on its own. Dumping in more of one thing produces jerky that either stings immediately and fades, or just tastes bitter with nothing interesting behind it.
The other common mistake is treating the printed drying time as a hard rule. Every batch is different based on marinade moisture, slice thickness, and how your specific appliance runs. Use the bend test as your actual guide and treat the time estimate as a rough starting point only.
Conclusion
Your first batch of spicy beef jerky will teach you more than any guide ever could. Choose a lean cut, build your marinade with layered heat rather than just piling on one spice, and always use the bend test rather than the timer. Start at Level 1 or 2 if you are new to this and work your way up as you get comfortable with the process. Make one proper batch using these principles and I am pretty confident you will never go back to paying store prices for something you can make better at home.
FAQs
How long should I marinate spicy jerky?
Six hours minimum, but 12 to 24 hours gives significantly better flavor. Do not go past 36 hours or the acid degrades the texture.
Can I make jerky without a dehydrator?
Yes, an oven at 70 to 80°C (160 to 175°F) works well. Use wire racks, prop the door open, and rotate every hour for even drying.
Why is my jerky not spicy after drying?
Usually a diluted marinade or short marinating time. The marinade should taste clearly spicy before the meat goes in. Also check that your spices are fresh old chili powder loses its heat fast.
What is the safest way to store homemade jerky?
Vacuum-sealed bags in the fridge last up to a month. In humid climates, always use airtight containers with silica gel packets at room temperature.
Can I use chicken instead of beef?
Yes. Slice at 3 to 4mm, use the same marinade, and dry to 74°C (165°F) instead of 71°C. The texture is lighter but the spice system works exactly the same way.
-

 Food3 days ago
Cuts of Steak: Complete Guide to Beef Cuts
-

 Food3 days ago
What Is Andouille Sausage? Complete Guide
-

 Food3 days ago
Wagyu Beef Price per Pound: Complete Cost Guide
-

 Food3 days ago
Shirleys Coffee Shop Guam Locations Menu and Guide
-

 Food3 days ago
Ultimate Tripas Recipe and Cooking Guide
-

 Tech7 days ago
DemonScans Review: Is It Safe for Manga Readers?
-

 Drinks3 days ago
Easy Lychee Martini Recipe Sweet & Floral Cocktail
-

 Food3 days ago
Italian Ice Flavoring Guide: Flavors, Bases, and Recipes